

How to Decorate Cakes with Fresh Flowers: Floral Wreaths, Crowns & More
Learn how to create a wreath or “cake crown” for your next event. Tools included.

Buttercream cake with a cake crown of rosemary, lavender and one bright pink anemone.

Buttercream cake with a cake crown of rosemary, micro flowers and blackberries.
What is a cake crown?
A cake crown is a miniature floral wreath designed to decorate the top of a cake, pie, or other dessert. Made with tiny herb cuttings, delicate foliage, and fresh or dried flowers, a cake crown is a beautiful way to bring the natural beauty of the garden to your dessert table.
While cake crowns are often used as fresh flower cake decorations for weddings, birthdays, showers, and other special occasions, don’t feel limited to cakes. These little botanical wreaths are surprisingly versatile. Generally ranging from 4 to 10 inches in diameter, they can be scaled to suit all kinds of celebrations and tablescapes.
Try using smaller cake crowns as floral napkin rings for a dinner party, or place them around individual place settings as a natural alternative to traditional flowers. They can also be used to embellish seasonal centerpieces—a miniature crown around a pumpkin in autumn or nestled around a vase filled with candy canes in winter.
Think of a cake crown as a tiny piece of flower art that can move beyond the cake. With a few fresh flowers, herbs, and bits of greenery, you can create a simple botanical decoration that works throughout your celebration.
Below is a time-lapse of me creating a cake crown from herbs, foliage, and flowers.
Time-lapse video of Kim Bensing creating a cake crown or mini wreath.
what you’ll need
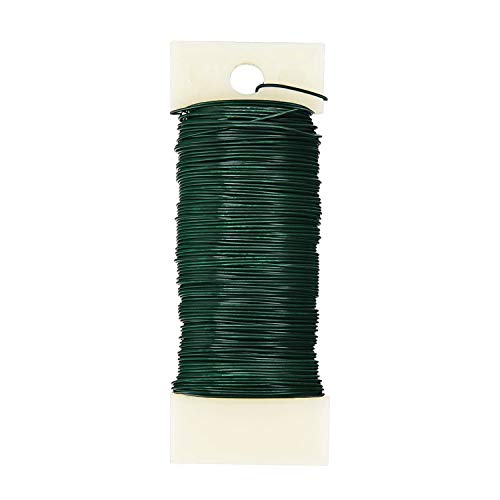
To make a cake crown or mini floral wreath, you’ll need just a few simple floral design tools. Start with green florist wire. I typically use 22-gauge floral wire because it’s flexible enough to shape easily while still providing enough structure to support the flowers, herbs, and greenery. I prefer green wire because it blends naturally into the foliage and is less noticeable in the finished wreath.
If you already have another type of flexible floral wire on hand, you can certainly use it instead. Just make sure the wire is clean, unused, and appropriate for floral arranging.
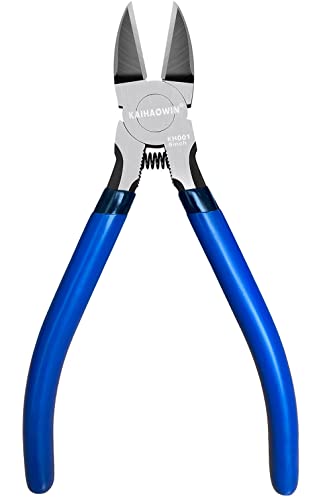
You’ll also need small wire cutters, floral adhesive, and your favorite pair of flower snips. With these few basic tools, you’ll be ready to create your own fresh flower cake crown, mini floral wreath, or botanical cake decoration.
Supply list
Sturdy Greens & Foliage such as:
-Boxwood
-Rosemary
-Eucalyptus
A few mini fresh or dried flowers buds and pods:
(a few suggestions)
-Begonia
-Lavender
-Ranunculus
Green Florist Wire
Wire Cutters
Floral Snips
Flexible Ruler (is helpful but not required)
Floral Adhesive (Oasis is a reliable brand that I use)
How to make a cake crown topper or mini Floral wreath
Creating a cake crown topper or mini floral wreath is surprisingly simple once you have the right size wire base. For a cake crown that measures approximately 6 inches in diameter, cut about 12½ inches of floral wire from the roll. This gives you enough length to form the circle and wrap approximately ½ inch of wire around the opposite end to securely close the ring.
The amount of wire you’ll need will vary depending on the size and purpose of your wreath. A 6-inch, 8-inch, or 10-inch cake crown will each require a slightly different length of wire.
Because I often create fresh flower cake crowns for cakes of different sizes, I like to use a flexible ruler to measure my wire ring precisely. This makes it easy to create a wreath that fits the top of the cake beautifully—large enough to make an impact, but not so large that it hangs awkwardly over the edges.
Taking a few extra moments to measure your cake crown topper before adding the flowers will give you a much more polished and professional-looking finished design.
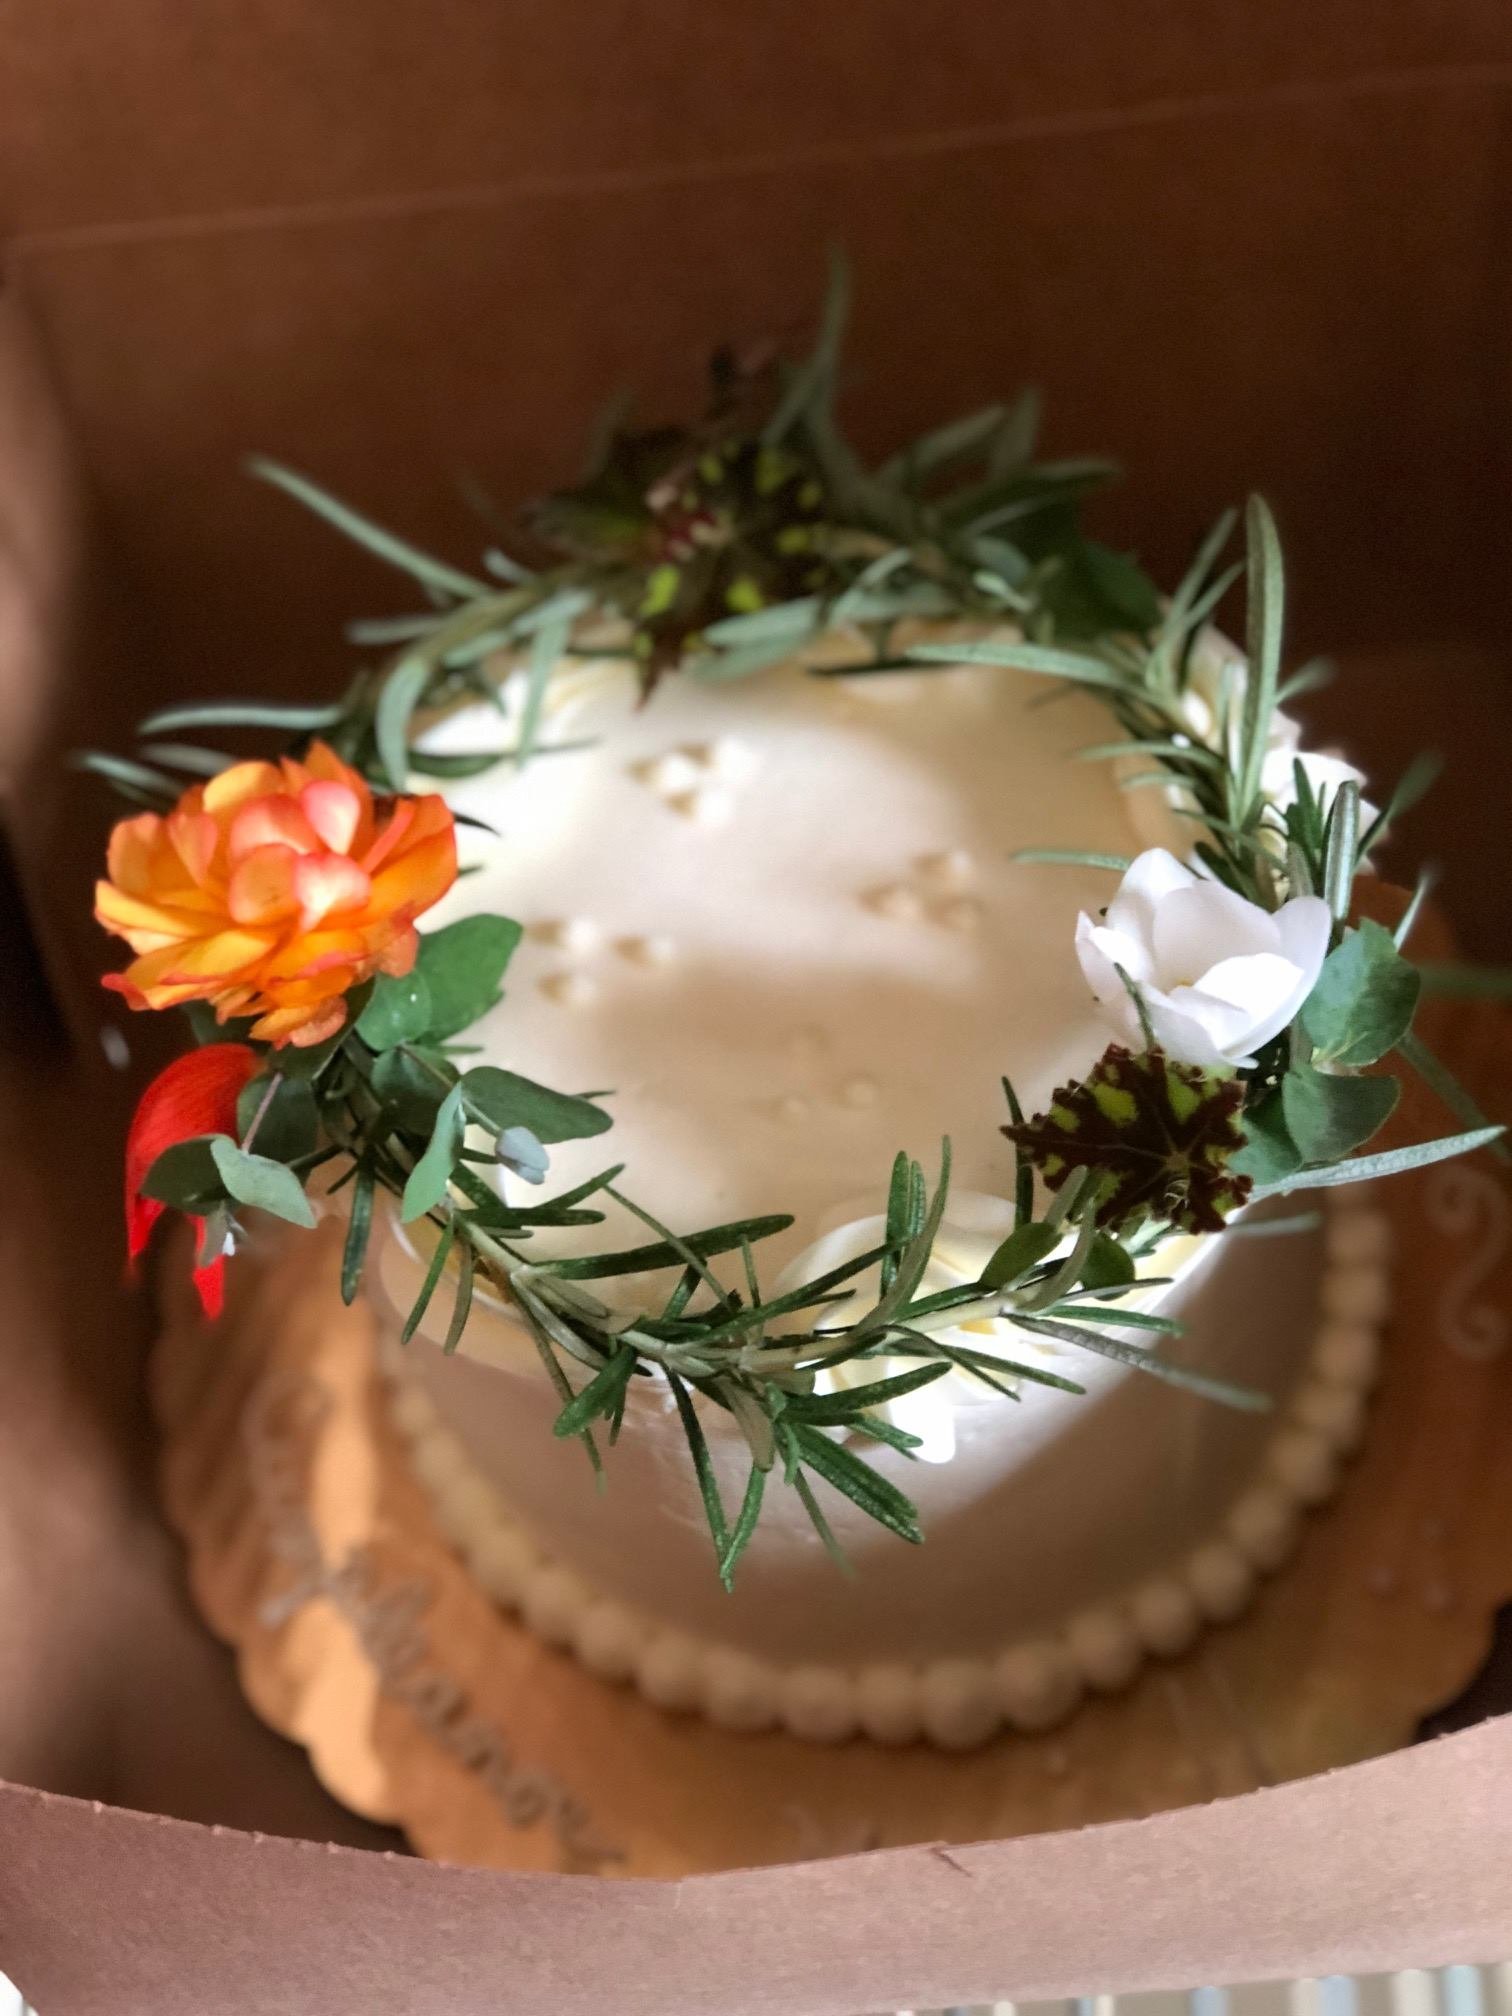
Vanilla cake with a cake crown of rosemary, eucalyptus, and mini begonia.
Prepare your supplies, flowers, and greenery. Gather everything on your work surface and snip your greens and flowers into manageable pieces that will work well with your floral wire frame. I like to create a small work area using a paper towel or, even better, a paper plate. The round shape makes an ideal work surface and helps protect your table or countertop from floral adhesive.
Attach your first pieces of greenery. Place approximately three small dabs of floral adhesive on the back of two small base greens and allow the adhesive to set for about 30 seconds. Position the pieces on the wire, adhesive side down, facing in the same direction. Hold them gently in place for about one minute, or until they remain secure when you lift your fingers. Because the sprigs are small and lightweight, very little pressure is needed as long as the adhesive makes contact with the wire and has enough time to set.
Continue layering the greenery. Once your first pieces are firmly attached, work your way around the entire wire frame, adding greens and foliage until the wire is completely covered. As you go, tuck the stem of each new piece underneath the end of the previous piece. This overlapping technique helps create a fuller, more natural-looking mini floral wreath while concealing the wire.
Add your focal flowers. Wait a few minutes for the greenery to become secure before adding your flowers. This gives you a stable foundation and makes it much easier to create a balanced cake crown topper.
Choose small flowers, buds, and botanical details. Small, tightly formed flowers, miniature buds, and seed pods work especially well for a cake crown. Look around your garden for interesting little blooms—even flowers growing from hanging plants can provide beautiful details. Dried flowers are also a wonderful option during winter. I especially love using strawflower saved from the fall because it holds its color beautifully. Don’t be afraid to incorporate interesting grasses and pods, too, as long as they are clean and won’t drop seeds, shed petals, or otherwise create debris on the cake.
Choose Flowers That Will Hold Up
When creating a fresh flower cake crown, it’s important to consider how well each flower or herb will hold up out of water. Some varieties are naturally sturdier than others, while delicate flowers and herbs can wilt quickly. Avoid anything that loses its shape easily, especially if your cake crown needs to look beautiful for several hours.
I usually keep my completed cake crowns refrigerated until it’s time to place them on the cake. This helps the flowers stay fresh and maintain their shape. If possible, use a clean refrigerator or a separate refrigerator without food, since food odors, moisture, and bacteria can affect delicate flowers.
Add the Flowers and Botanical Details
Once your greenery is securely in place, begin adding your small flower buds, seed pods, herbs, and colorful botanical accents. Use just a small dab of floral adhesive to attach each piece, working your way around the wreath and placing flowers wherever they create the most pleasing composition.
Try not to overdo it. One of the beautiful things about a mini floral wreath or cake crown is that it doesn’t need to be completely covered with flowers. Leave some of the greenery visible and allow the individual blooms to breathe. Often, the simplest floral cake designs are the most elegant.
Freshly made cake crowns can typically be kept in the refrigerator for a few days, making them easy to prepare ahead of your celebration. I’d love to see what you create, so please leave a comment and share your photos!
If you’re local to Bucks County, Pennsylvania, I’m also available to create a custom fresh flower cake crown for you. Just give me a call or send me a text to get started.
For those who want to make their own, I’ve linked all of the cake crown supplies and floral design tools below for your convenience.

Chocolate cake with a cake crown of boxwood, eucalyptus, lavender, dried pods & micro flowers.
A Note About Flower Safety
Whenever you’re creating fresh flower cake decorations, choose flowers and herbs that are in season and know how they were grown. Avoid flowers that have been treated with pesticides or other chemicals that are not appropriate for use around food. It’s also important to research the flowers and herbs you plan to use, as some varieties can be toxic or poisonous.
Most importantly, remember that a cake crown is a decorative element, not an edible decoration. The flowers, greenery, wire, and adhesive should be removed before the cake is served.
Please clearly tell anyone receiving or serving the cake that the cake crown is NOT TO BE CONSUMED.
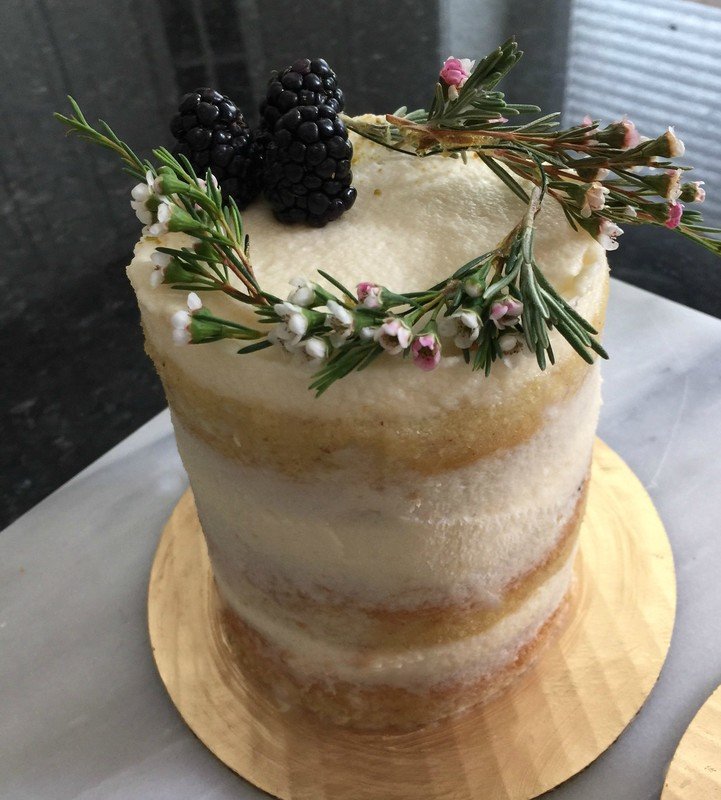
Layered naked cake with a cake crown of wax flower and blackberries.
HIRE A DESIGNER OR CREATE YOUR OWN
Whether you’d like to create your own floral cake decorations or have a professional design them for you, there are plenty of beautiful ways to bring fresh flowers and herbs to your celebration.
Explore more floral cake ideas to see examples of fresh flower cake designs, cake crowns, floral wreaths, and botanical cake decorations, along with pricing for custom designs by Studio Sprig.

Layered cake with a cake crown of boxwood, rosemary, lavender, & micro flowers.
I look forward to connecting with you!
I’m always here to inspire and support your creative journey. Sign up for Studio Sprig to receive new post notifications, creative inspiration, and fresh ideas delivered to your inbox. You can also follow along on Instagram and Pinterest for more floral design, botanical inspiration, and beautiful ideas for celebrating with flowers.
Cake Crowns designed by: Studio Sprig
Cakes: One Sweet Baking Co.


Disclosure: I am an Amazon Associate and will sometimes offer affiliate links. The price you pay will be the same whether you use the affiliate link or go directly to the vendor’s website using a non-affiliate link. Thank you.

How to Create a Stunning Centerpiece
How to create a stunning winter centerpiece

Start with a great base
A few months ago I found this fantastic cement pedestal planter on Facebook’s Marketplace. It’s very heavy but I managed to get it into my car with a little help from the seller. I was lucky with this one because the beautiful white paint patina was only flaking off a little bit -just enough to show the age, but not enough to ruin my kitchen, where I decided to showcase this rare beauty. Look around garden centers for one of your own and if you’d like to recreate a smaller version of this, I found this replica.

Find A wreath to cover the top
I found this medium silvery wreath floating around, so I decided it would make a great base for my arrangement. It hides the chicken wire mechanics I placed inside the planter for stem stability and it covers the opening enough without hanging too far over the gorgeous, detailed edges. In hindsight, a looser green wreath would work just as well, and if you only have one that hangs over the edges a bit, that would be okay too because it would look soft and flowing. That being said, I recommend looking around your house for something that fits your decorative base well and if you can’t find something then quickly create a small wreath with wire and fresh greens, branches or even faux foliage. Here is a good starting point if you can’t find or make something. Consider pulling apart an old, worn-out wreath and filling it with something new and fresh, but be sure it will compliment your focal flower color palette nicely.

Focal Flowers
When choosing my palette for this winter arrangement, I went with creamy whites and browns so that my design could last all winter and not need to be changed out soon after the Holidays. I decided to use these faux Magnolia branches and a few off-white wooden stems I had lying around. The Magnolia stems are a mix. I found some at a home decor boutique and I found some at Michaels, The wooden flowers came from Trader Joe’s and I’ve had them for years.

The Execution
To fill in the planter, I began by placing each large Magnolia branch so that it loosely spilled out over the scalloped edges of the planter. I had to bend each long, wired stem so they’d be short enough for the planter. I didn’t want to cut them because I may use them differently next year. Once bent, I liked the way they just randomly popped out here and there on all sides.

Secondary Flowers
Next, I began anchoring the wooden flowers so they’d create height in the center. of the arrangement These stems are held up with the chicken wire inside under the wreath. This is important because, without the inside structure, I would not be able to get this grand height. You could also use floral foam, but I try to stay away from foam whenever possible.

Filler Flowers
Once all the creamy Magnolias and wooden flowers were placed where I wanted them, I grabbed a big bundle of muted dried Hydrangea that I picked from my own gardens, and began filling in the spaces. Dried Hydrangea are a bit messy, but they are so nice and fluffy and they do a great job covering up all the stems and rounding out the arrangement. And I don’t mind mixing faux, silks, and dried, as long as my color palette is pleasing and the overall aesthetic is textural and nice. And if you can’t use dried, here is a link for faux Hydrangea stems.

the End Result
So here is the result. A wintery mix of Magnolia & Hydrangea placed smack dab in the middle of my small, antique, kitchen island. It takes up most of the surface, but I love that. And my favorite part is that I do not have to disassemble after Christmas. This color scheme will take me through the winter very nicely. I hung a few dried oranges from the arrangement on Christmas Eve and I may hang a few small hearts for Valentine’s Day. Please tell me what you think. XO - Kim
Supplies for the Magnolia Cement Planter Design
Replica Pedestal Planter (small)
Wooden Flowers (I found mine at Trader Joes)


How We Transformed Our Farmhouse Kitchen by Reusing, Updating, and Thrifting: (Coffee Bar)
Since coffee is a big part of my mornings, we transformed this area into a little coffee bar. And what does every coffee bar need, but a big chunky mirror above it? This is my favorite part because the mirror I used didn't cost anything.
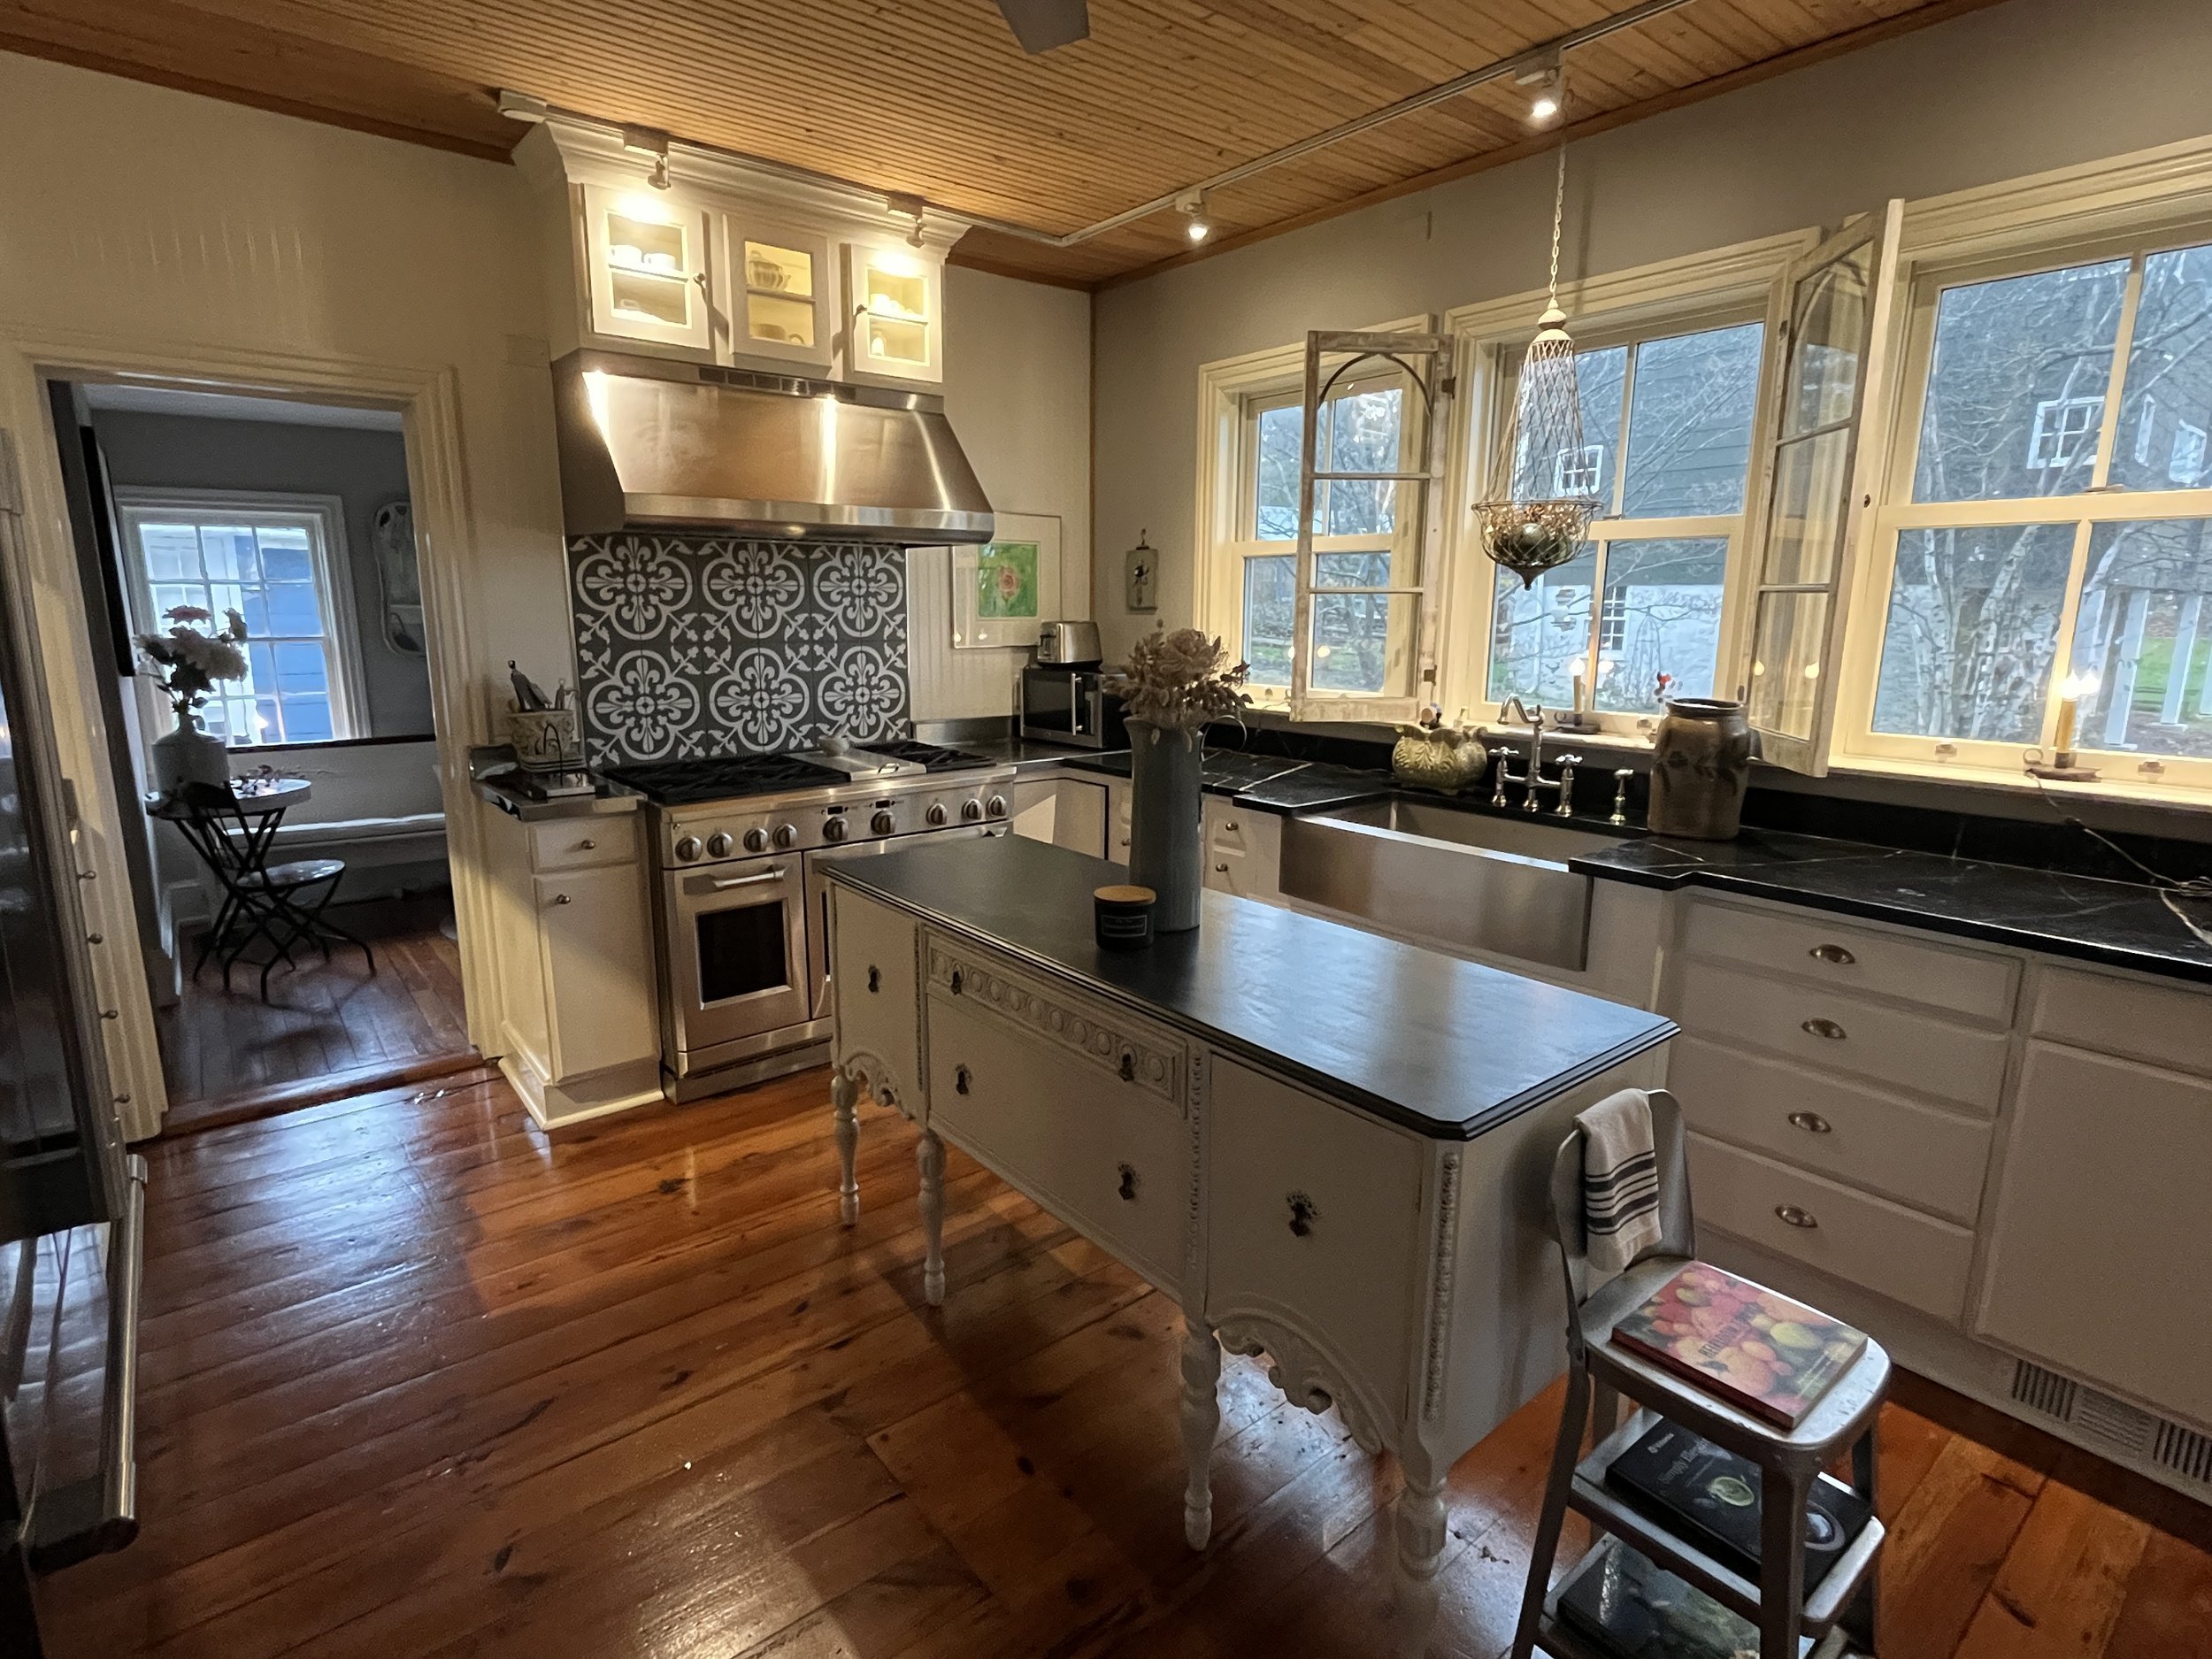
Welcome to our farmhouse kitchen. I explained in a previous blog post, why we love historic homes, so today I wanted to share with you some of our farmhouse renovation hacks we’ve used over the years. This is an excerpt from my full kitchen renovation blog that you can read here.
We began minor family-friendly renovations the minute we moved here in 2007, and we continue to make them because we are still not finished and we recently listed our farm on homeexchange.com.
As we begin this exciting journey of home exchanging for travel I thought I’d share some of the ways we previously restored rooms, gardens, and outbuildings and how we’re simplifying to make our home exchange-worthy for guests. I will break these down by project so look for them in future blogs.

Farmhouse renos can unveil difficult challenges, objects of educational interest, and even disturbing artifacts. Even a small change can prove difficult. But we didn't let that discourage us during this kitchen construction project because as we uncovered the years we looked for creative design elements and clever ways to get what we needed, disguising imperfections along the way.
making a Coffee Bar
Using found objects: One side of the kitchen came with a small clean-up sink and dishwasher. It's a great bonus space that older farmhouses usually don't enjoy. In the original kitchen, the very old double wall oven used to be on the left, but with the renovation, we moved the refrigerator to that space and kept the little sink, dishwasher, and lower cabinets much the same. If you look closely you’ll see a window peeking out of the wall. That’s the kind of surprise that’s very exciting. I spent days trying to rearrange where the fridge could go so that I could expose that window because it looks right into the refurbished pantry. Finding this was so perfect, but I could not find another space for the fridge and so we had to sacrifice the window….for now.
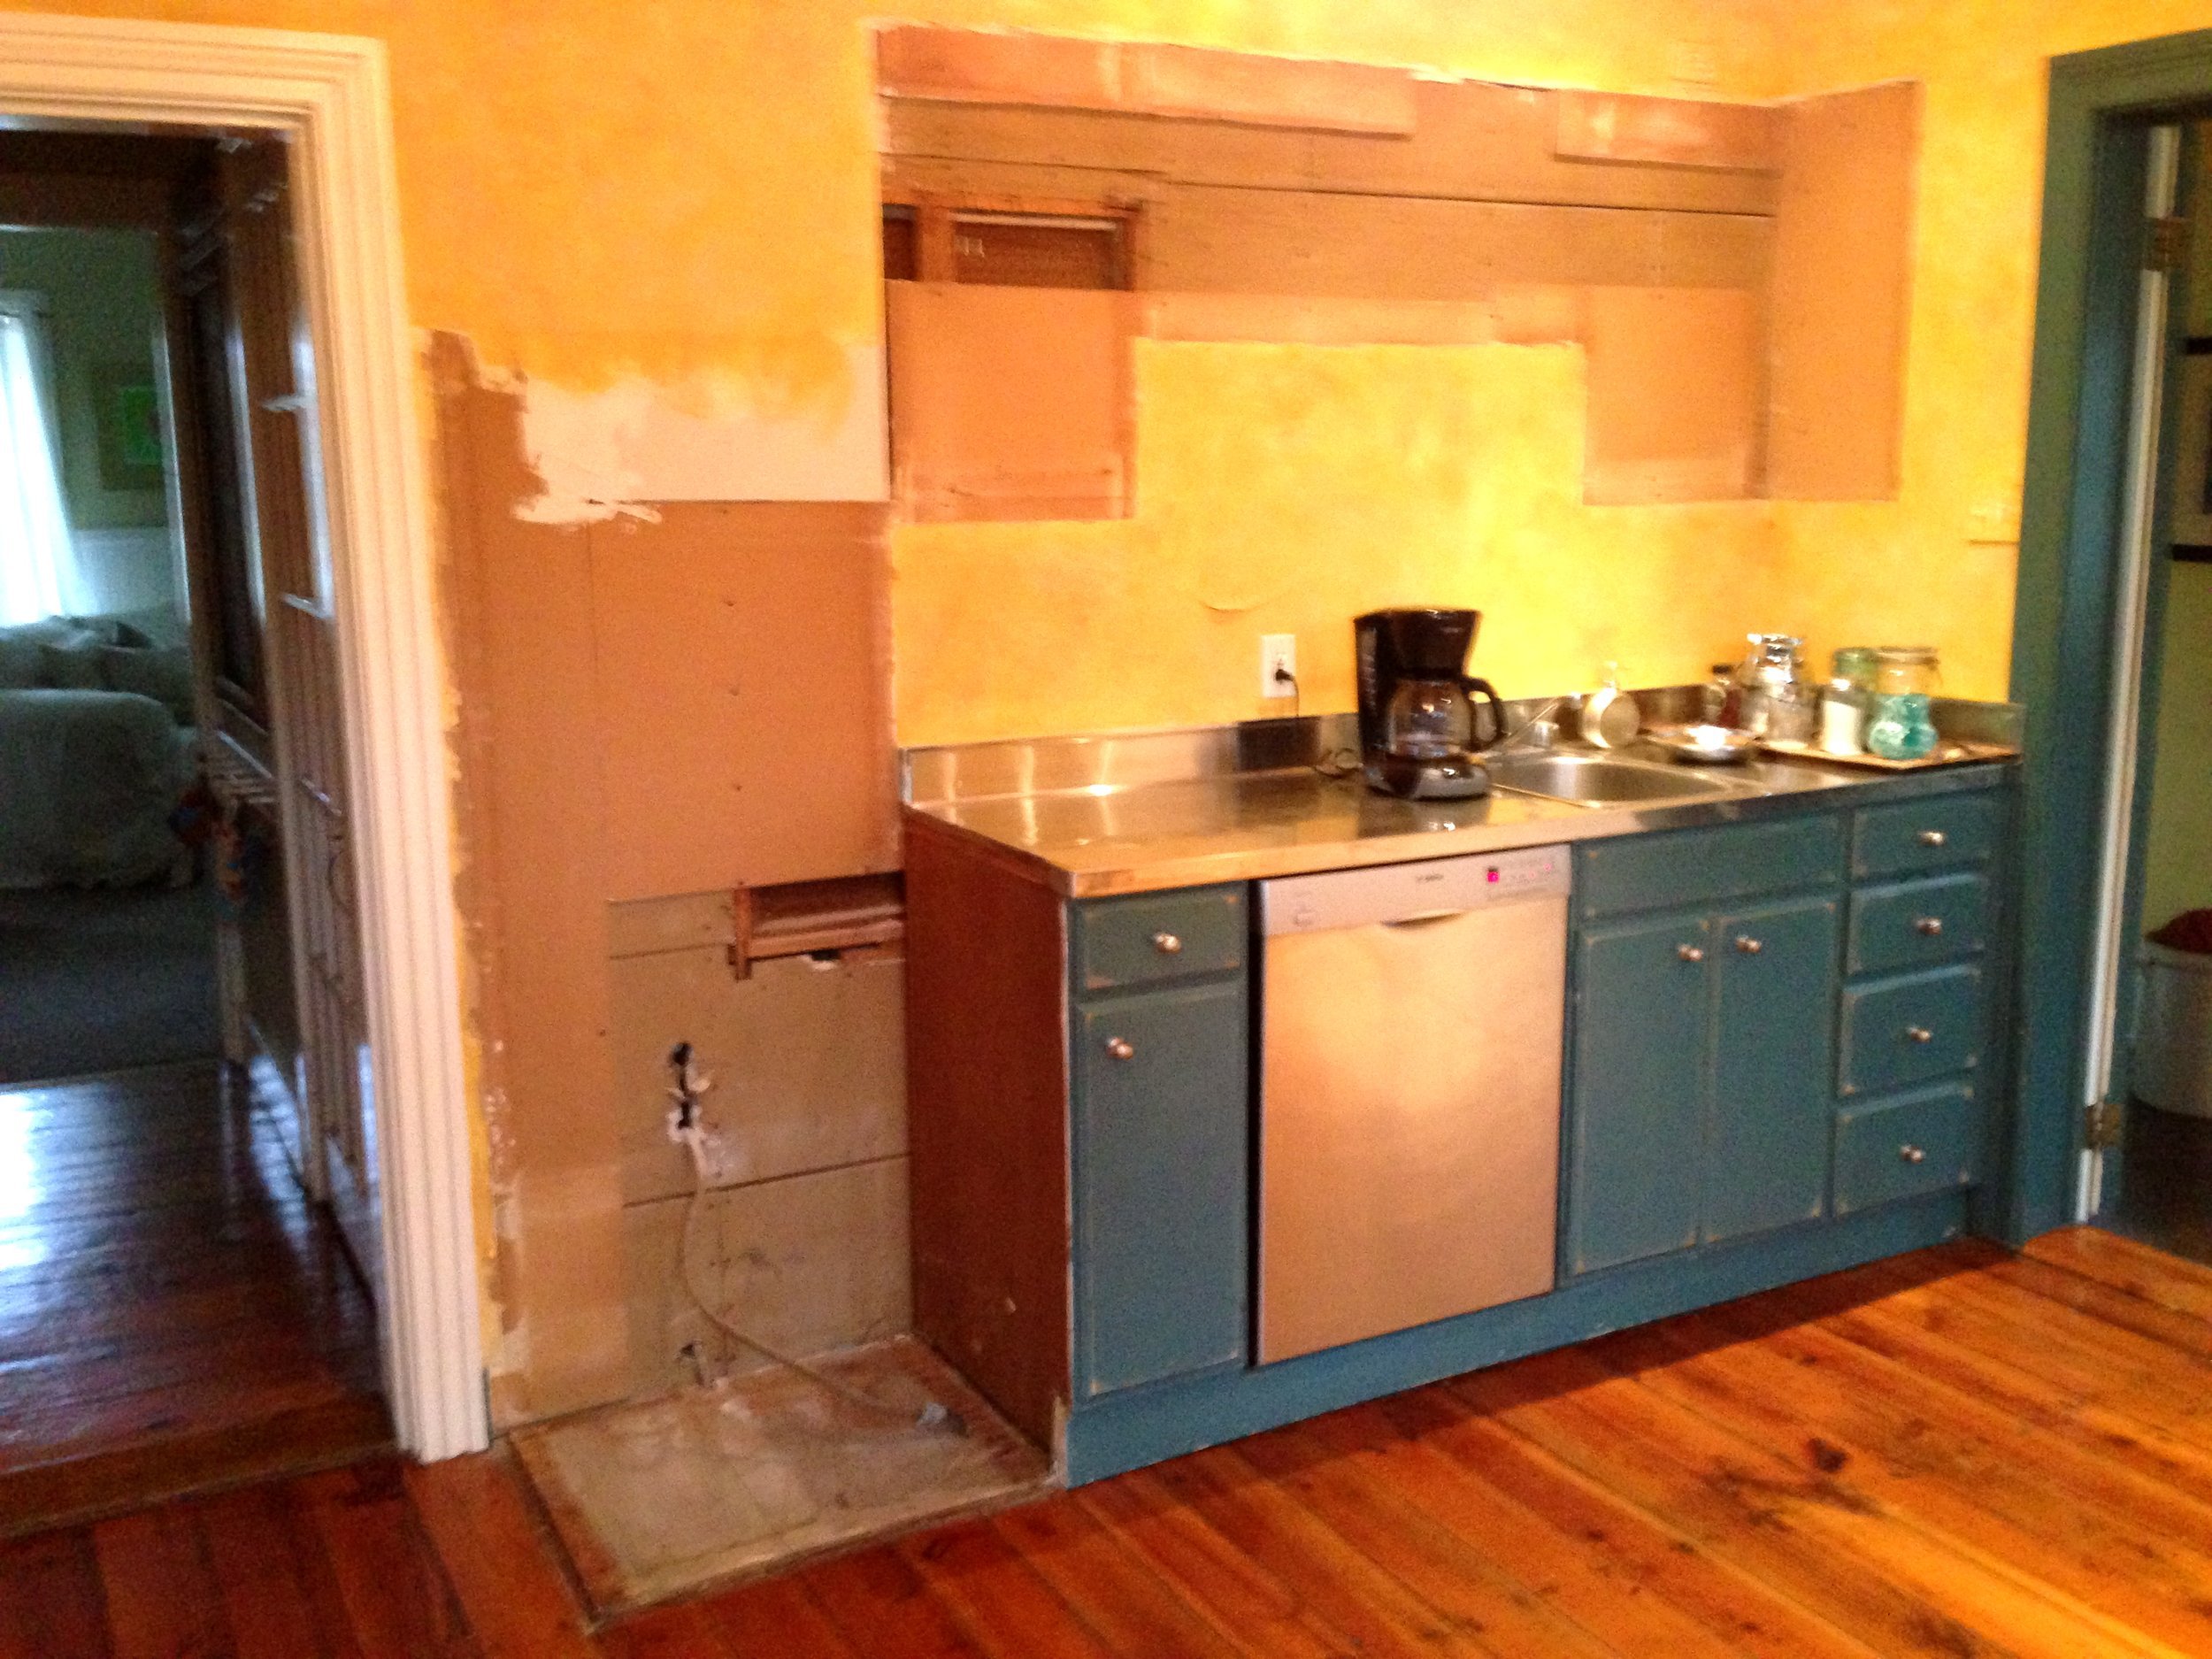

Since coffee is a big part of my mornings, we transformed this area into a little coffee bar. And what does every coffee bar need, but a big chunky mirror above it? This is my favorite part because the mirror I used didn't cost anything. In fact, I found the wooden frame alongside the road one day. It was just abandoned by its owner never to be used again, or so they thought. I grabbed it, cleaned it, painted it, took it to the local glass shop, and had it fitted with new antiqued mirror glass. Yes, this is something you can actually buy. I just love the way it turned out and how it fits perfectly in the space. It's a great way to repurpose an old frame that you can't part with and it’s a conversation piece for sure. Start hunting for yours.

Here are a few detailed photos of the mirror, Kingston Brass faucet, magnetic spice tins, etc. You can find links to most of these items and/or items with similar styles on Studio Sprig’s Shop My Home page.
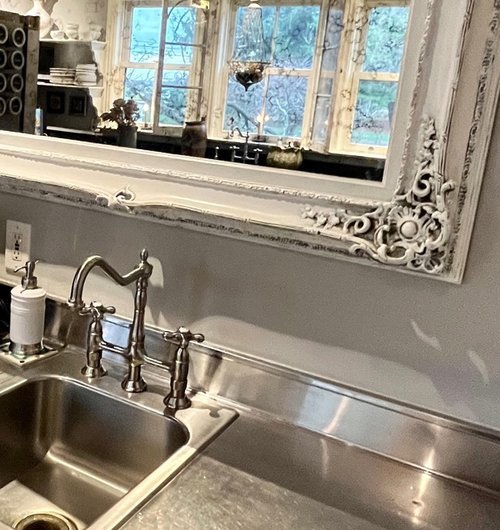
I like to keep a little vintage-style pitcher next to the coffee maker so that I can easily fill it. I store my coffee grounds in a pretty apothecary jar and I use a stainless, beaded scooper created by an artist at a craft fair. I’ve linked a really nice copper coffee scooper here. The apothecary jar and soap dispenser sit upon artistic tiles made by my children.

Thank you for visiting the coffee bar portion of my kitchen. I am happy to answer any questions you may have about the transformation if you comment below. And if you’d like to see the full kitchen transformation blog, visit here. If you’re a blogger, what’s your favorite SEO Tool? I’ve had much keyword success with RankIQ. Learn more here.

How We Transformed Our Farmhouse Kitchen by Reusing, Updating, and Thrifting
As we begin this exciting journey of home exchanging I thought I’d share some of the ways we previously renovated rooms, gardens, and outbuildings and how we’re simplifying to make our home exchange-worthy for future guests.

Welcome to our farmhouse kitchen at Windy Hill. I explained in a previous blog post, why we love historic homes, so today I wanted to share with you some of the farmhouse renovation hacks we’ve used over the years.
We began minor family-friendly renovations the minute we moved here in 2007, and we continue to make them because we are still not finished and we recently listed our farm on homeexchange.com.
As we begin this exciting journey of home exchanging for travel I thought I’d share some of the ways we previously restored rooms, gardens, and outbuildings and how we’re simplifying to make our home exchange-worthy for guests. I will break these down by project so look for them in future blogs.

Farmhouse renos can unveil difficult challenges, objects of educational interest, and sometimes disturbing artifacts. Even a small change can prove difficult. But we didn't let that discourage us during this kitchen construction project because as we uncovered the years we looked for creative design elements and clever ways to get what we wanted and needed, disguising many imperfections along the way.
Paint
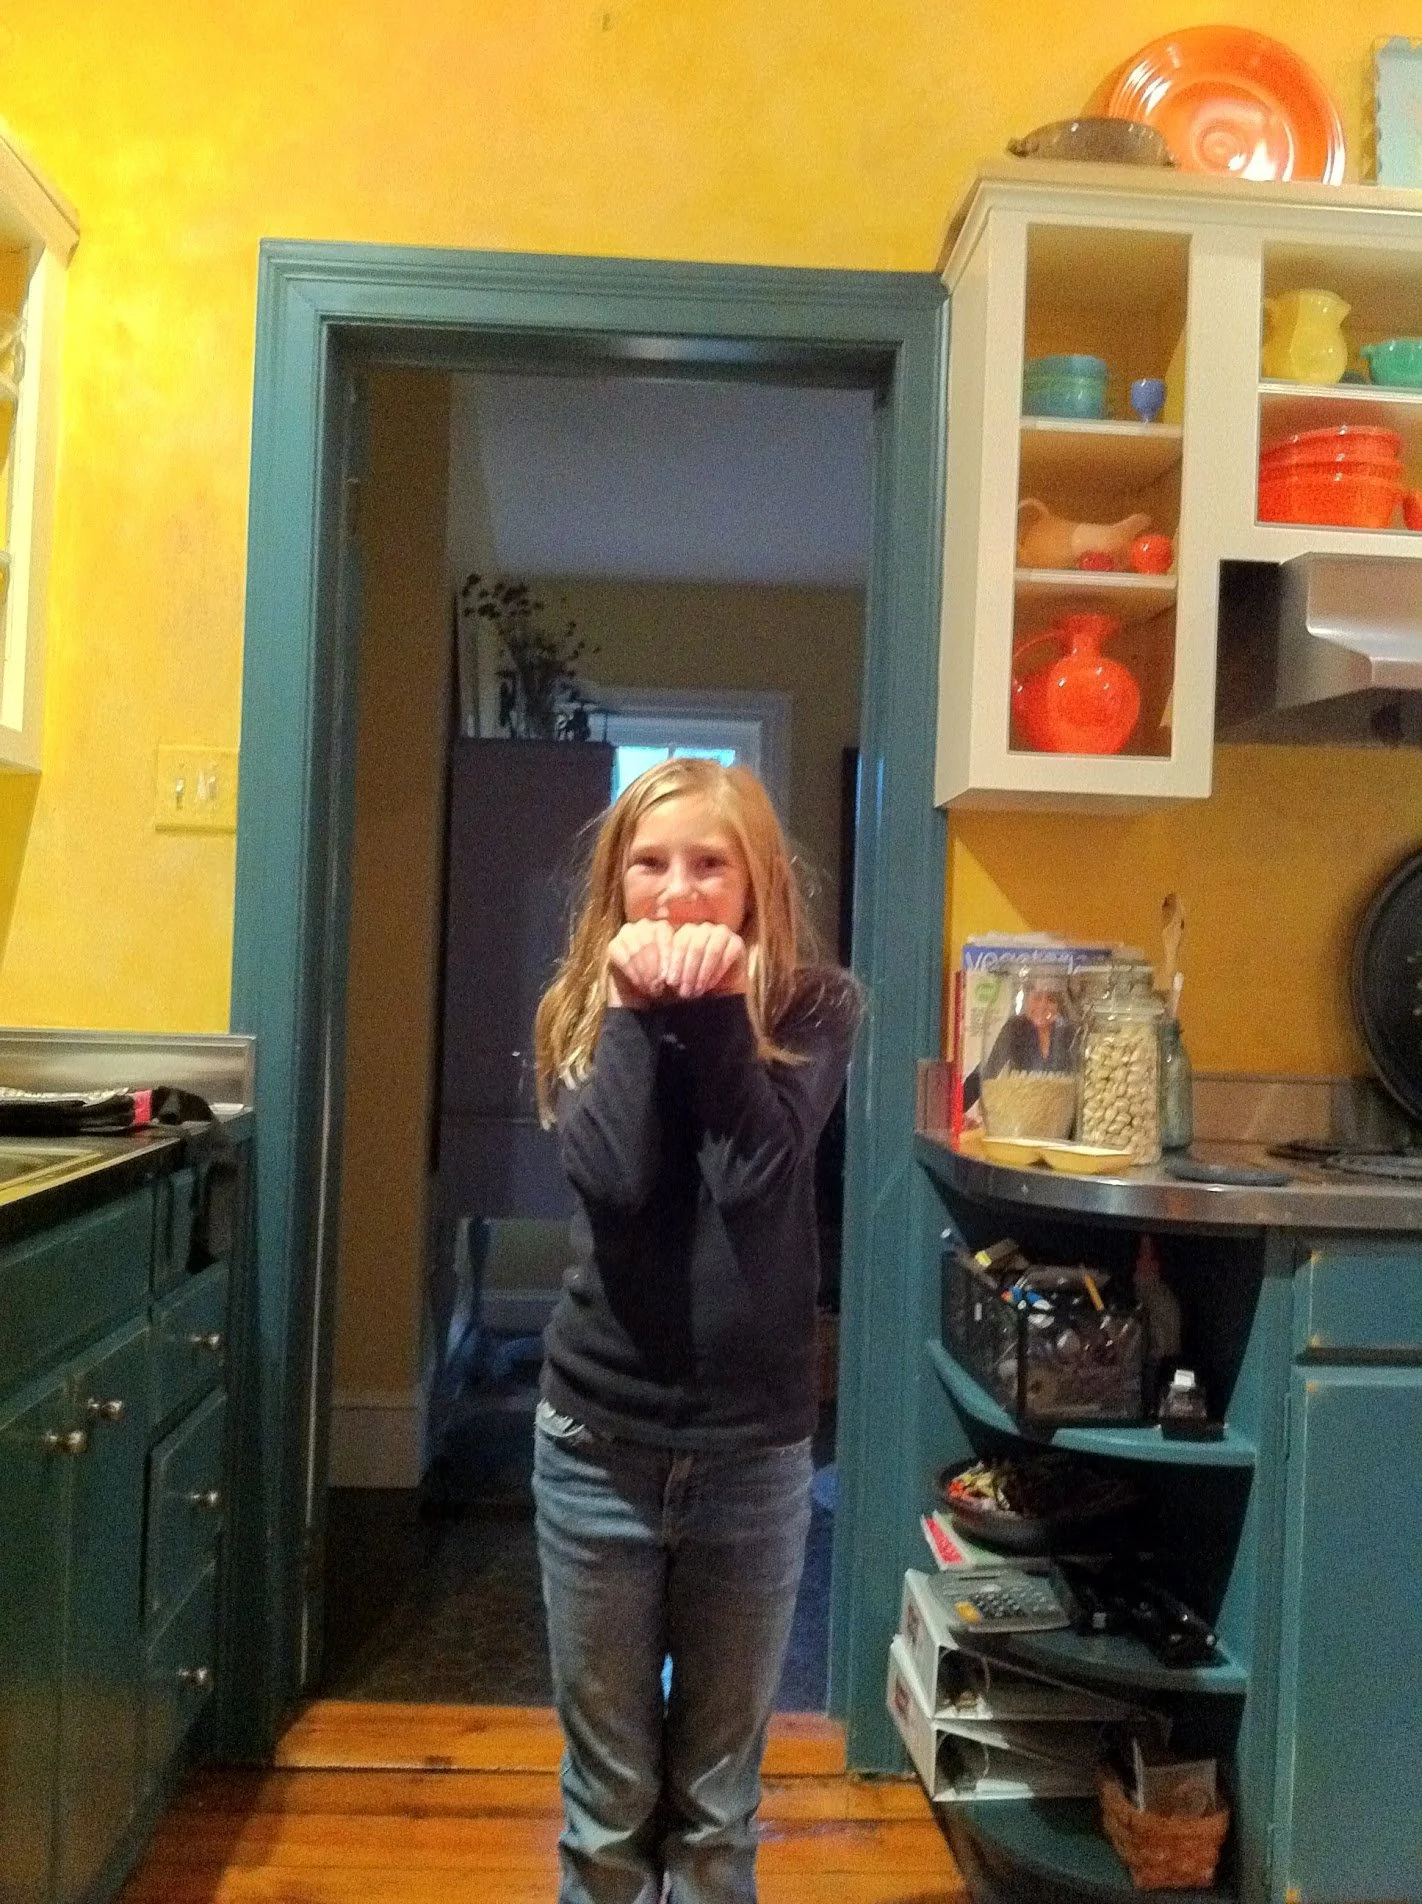
Neutralize and calm: When we moved here in 2007 this kitchen was a bright and cheery, yellow and teal, "French Country", a vintage farmhouse style you see a lot. The cabinets and trim were teal, while the walls were a rag-rolling yellow. We promptly inserted our Fiestaware collection on the open shelves and lived with it for a short while. But after a few years, it was looking pretty worn and dated, so we made the decision to renovate the kitchen.
For the renovation we decided not to do traditional white walls, instead, we painted them a light gray and opted for white cabinets, white trim (to match the rest of the house), and eventually a white island piece. We chose Benjamin Moore's White Dove as it’s a soft, mellow white. The kitchen always had vintage stainless steel appliances, so as needed we slowly upgraded with new appliances and I think they complement the updated neutral colors well.
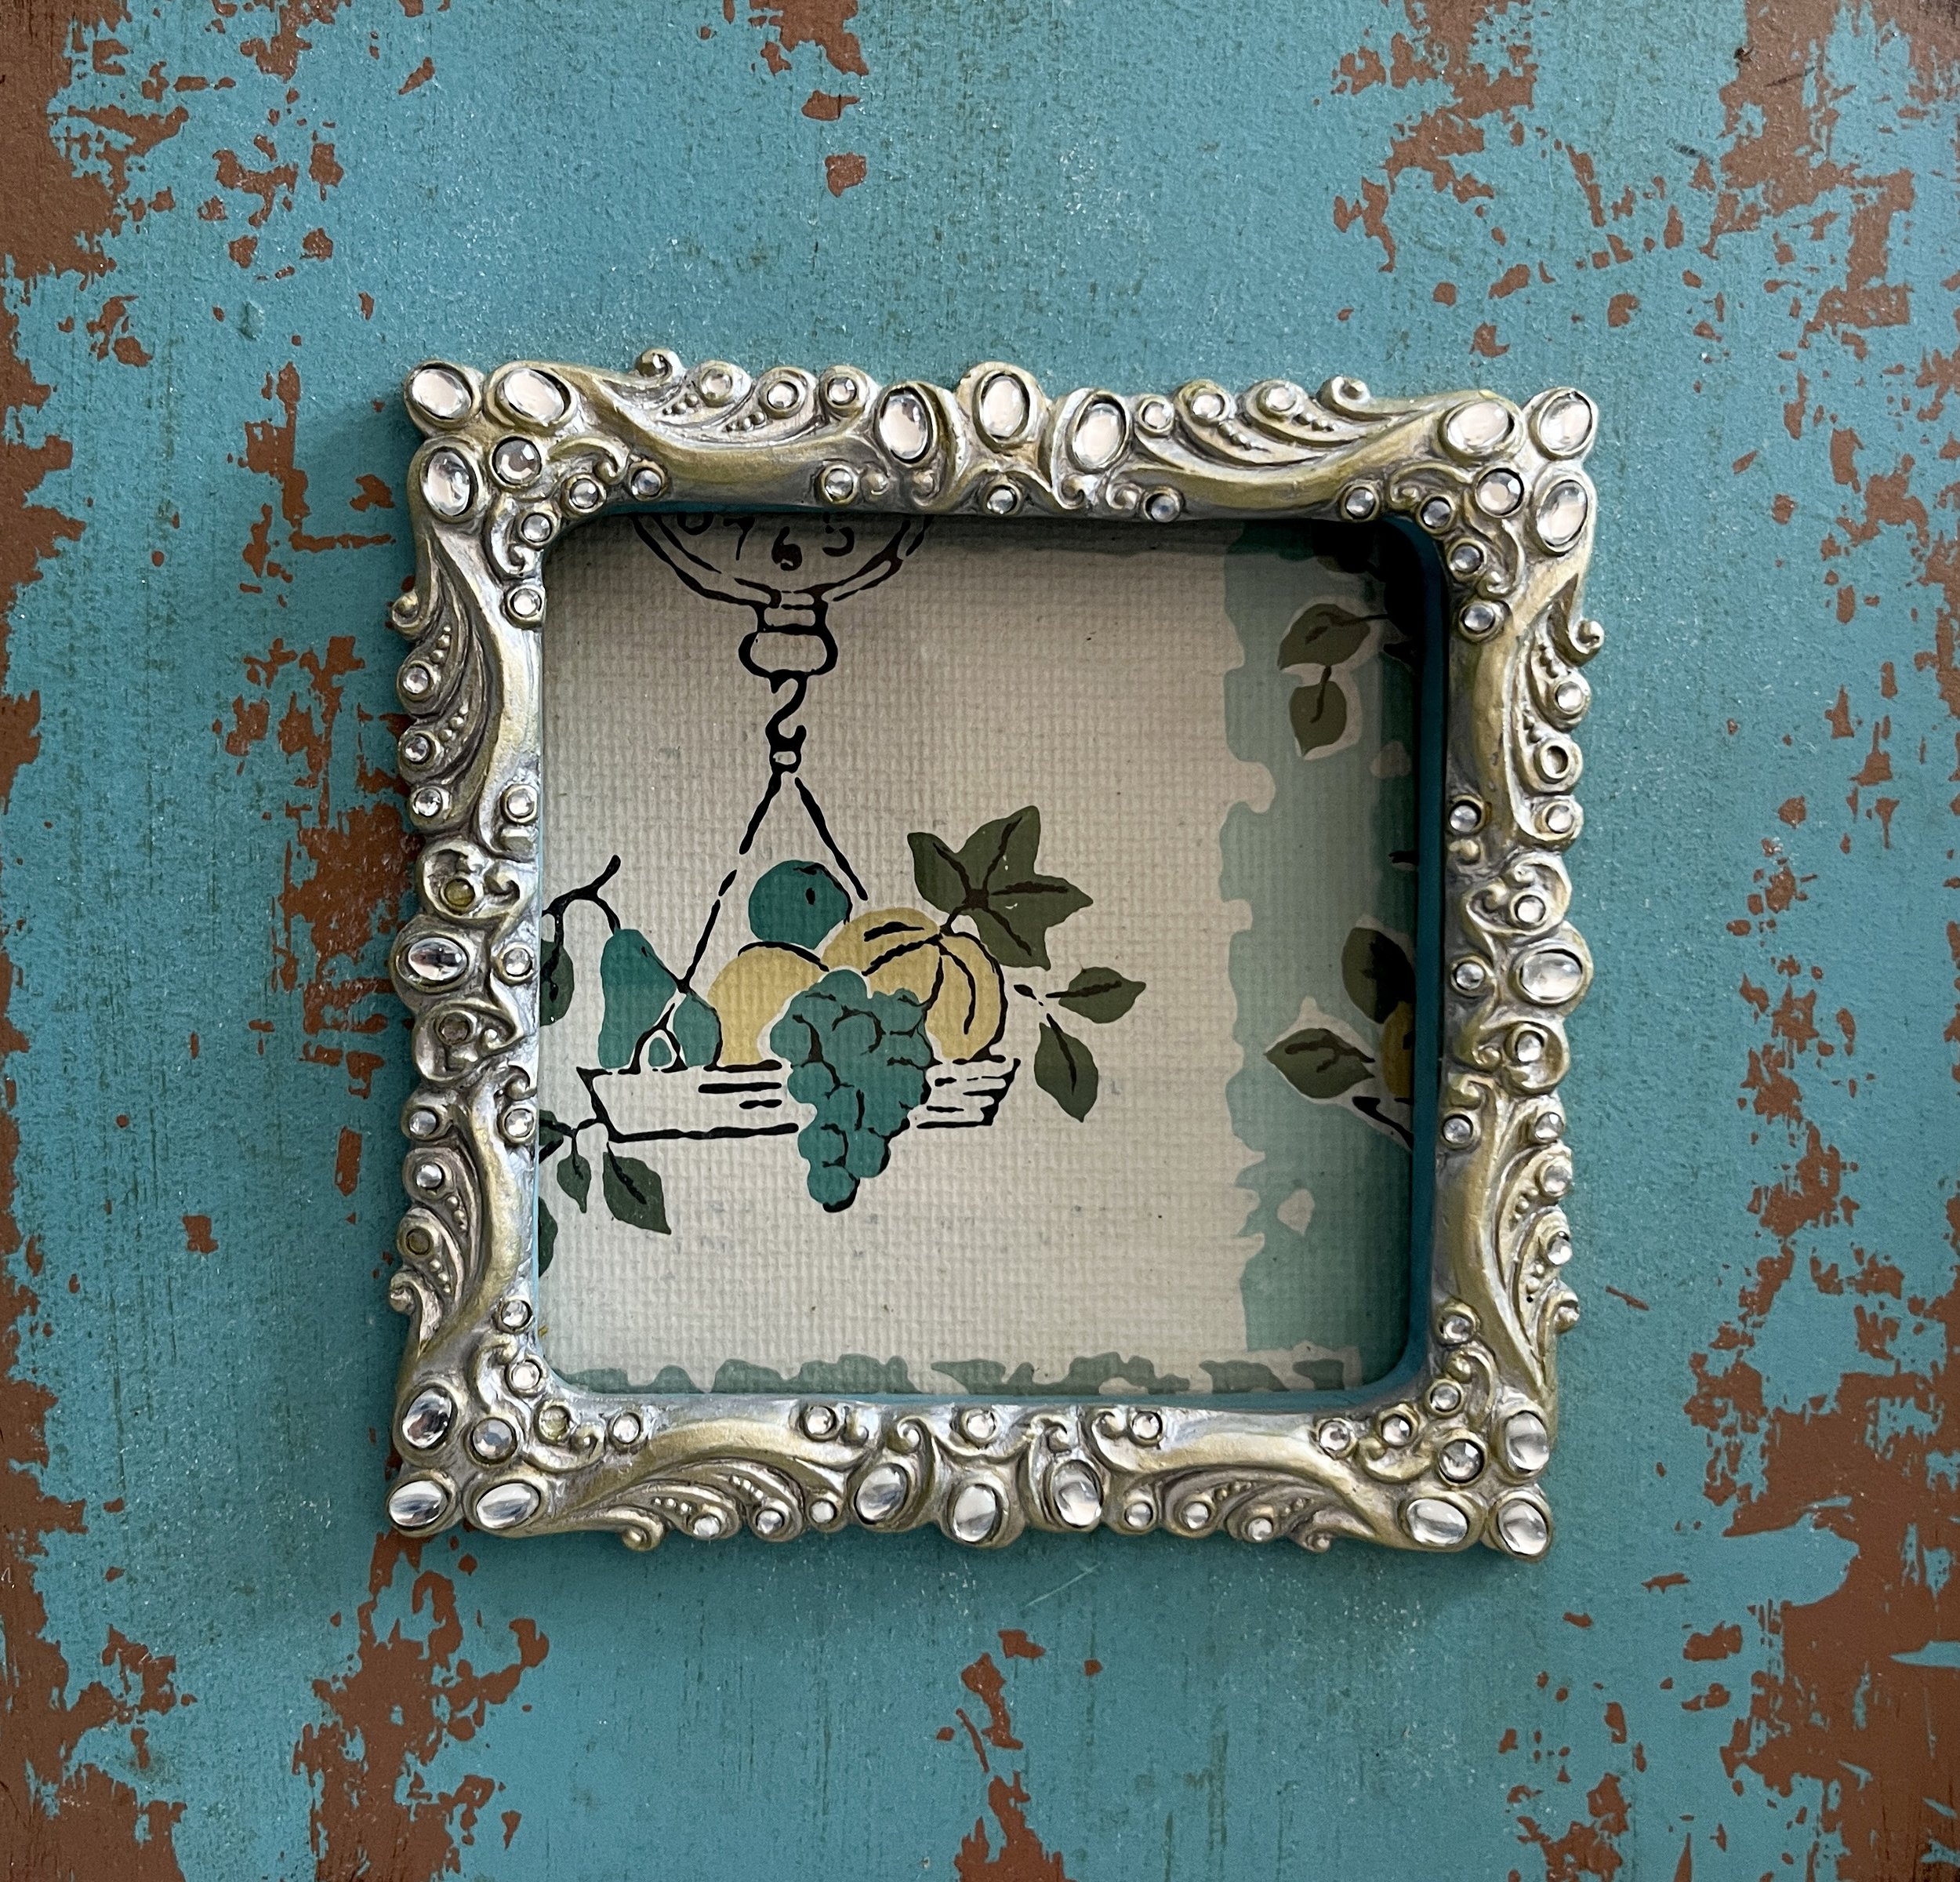
When we dug in, we found vintage wallpaper remnants under some of the upper cabinets. It was clearly a 1950s fruit pattern, so I imagine this is why the woodwork was originally painted teal even though the rest of the house trim was already painted white. As we peeled some of that old wallpaper away, I was quick to frame a small fragment.
Wall Removal
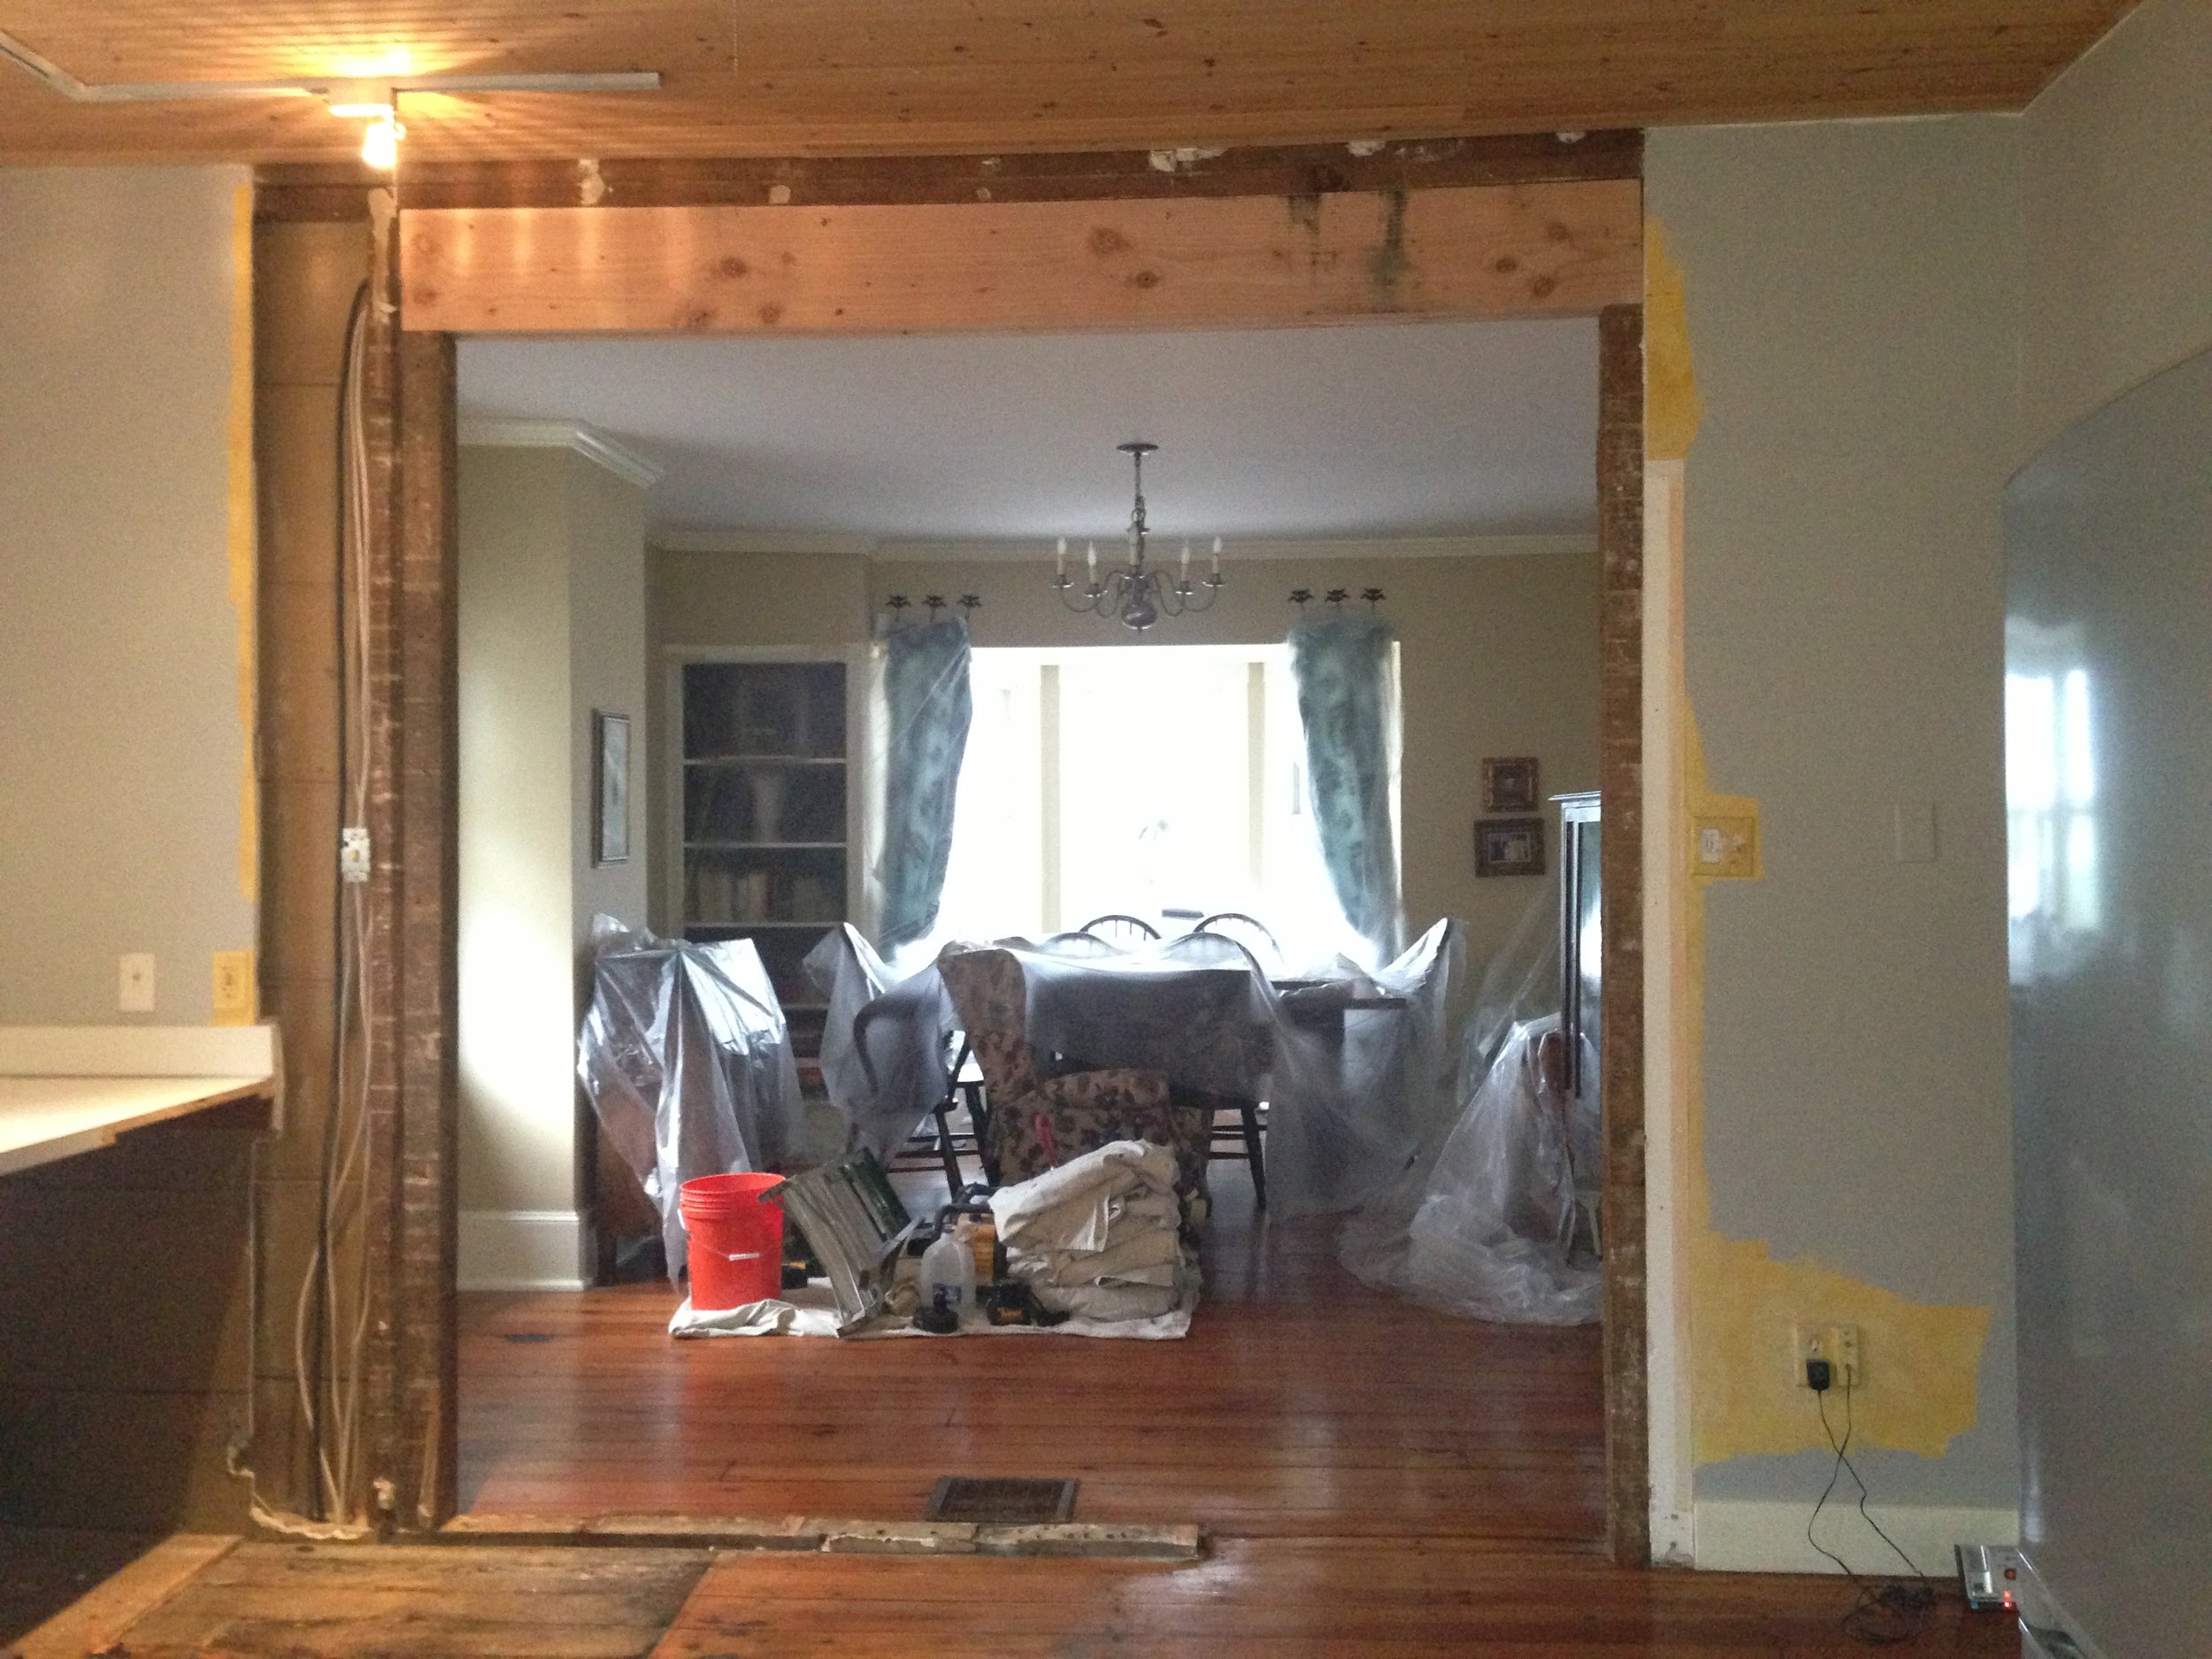
The biggest change: By far our best idea was to remove the entire wall that housed the refrigerator and a small doorway to the dining room. By far, it was the best idea for this kitchen and my husband gets all the credit for that one. In fact, he even designed the double french doors, window wall, and transom we have now.
Our contractor found horse hair used for insulation when he removed this wall and he needed to install a support beam so the rest of the house wouldn't come down. But other than that, the construction of this section went rather smoothly. We had to patch the hardwood floor in some places but opening this wall really created a new space for us which lets in much more natural light while the french doors still provide privacy when needed. If you’re thinking of doing something like this, be sure to use an insured contractor with a very good reputation, because you never know what you may find.


Kitchen IslanD
Flexible and Versitile: Because we opted for only one set of open shelves and no upper cabinets, we had to come up with farmhouse design ideas for storing unsightlies like water bottles, small dishes, and spices. This kitchen is not that big, therefore a large custom island with seating, as you see in modern kitchens, was out of the question. I wanted to find a solution that was versatile, movable, and ultimately removable if I someday grew tired of it and wanted to change my style.

So one day while thrifting with my sister-in-law, I came across an antique brown buffet that was narrow enough to fit the space but long and high enough to actually be useful. As luck would have it, it was half-price day, so I snagged it for under $200. We lived with it intact for a few years, until one day I brought out the brushes and painted the bottom white with a chalkboard painted top. The chalkboard black paint is almost the same tint as the new soapstone countertop which is from Bucks County Soapstone. I just love the way it looks plus it provides extra counter space. It’s “flexible” and it encourages much fun in the kitchen because we can write and draw on it when entertaining plus keeping the paint close at hand makes touch-ups easy. And if someday I find something better, I won’t have the price agony weighing me down.

Cabinet Repurposing
Big cost savings: We opted out of buying new custom cabinetry, and instead, reused the existing lower cabinets which originally spanned all four walls of the kitchen. However, in several places, we did have to completely disassemble some and piece them back together a little differently so that we could move around or eliminate appliances like the refrigerator and wall oven. We called it the great cabinet shuffle.

So I guess you could say we have some custom cabinetry in a sense as our contractor knocked out the rounded shelves and gave us a small storage space instead next to the range. He also rebuilt the cabinet under the main sink to accommodate the new stainless apron sink we wanted to add centered under the 3 windows (shown above) which existed before we arrived. We also repurposed some leftover upper open shelves (which were pretty ugly), transforming them into glass-fronted cabinets with crown molding as an accent above the range hood.
I found these glass doors below at an antique shop, and as I often do, I brought them home having no idea where I would use them. But when I discovered that they somehow fit the kitchen windows perfectly I used them to highlight the middle window and set it off above the sink. It reminds me of the open shutters I’ve seen in France. Some new hardware, a few antique accents, and a little white paint, and this old house was coming along nicely.

Coffee Bar
Using found objects: One side of the kitchen came with a small clean-up sink and dishwasher. It's a great bonus space that older farmhouses usually don't enjoy. In the original kitchen, the very old double wall oven used to be on the left, but with the renovation, we moved the refrigerator to that space and kept the little sink, dishwasher, and lower cabinets much the same. If you look closely you’ll see a window peeking out of the wall. That’s the kind of surprise that’s very exciting. I spent days trying to rearrange where the fridge could go so that I could expose that window because it looks right into the refurbished pantry. Finding this was so perfect, but I could not find another space for the fridge and so we had to sacrifice the window….for now.
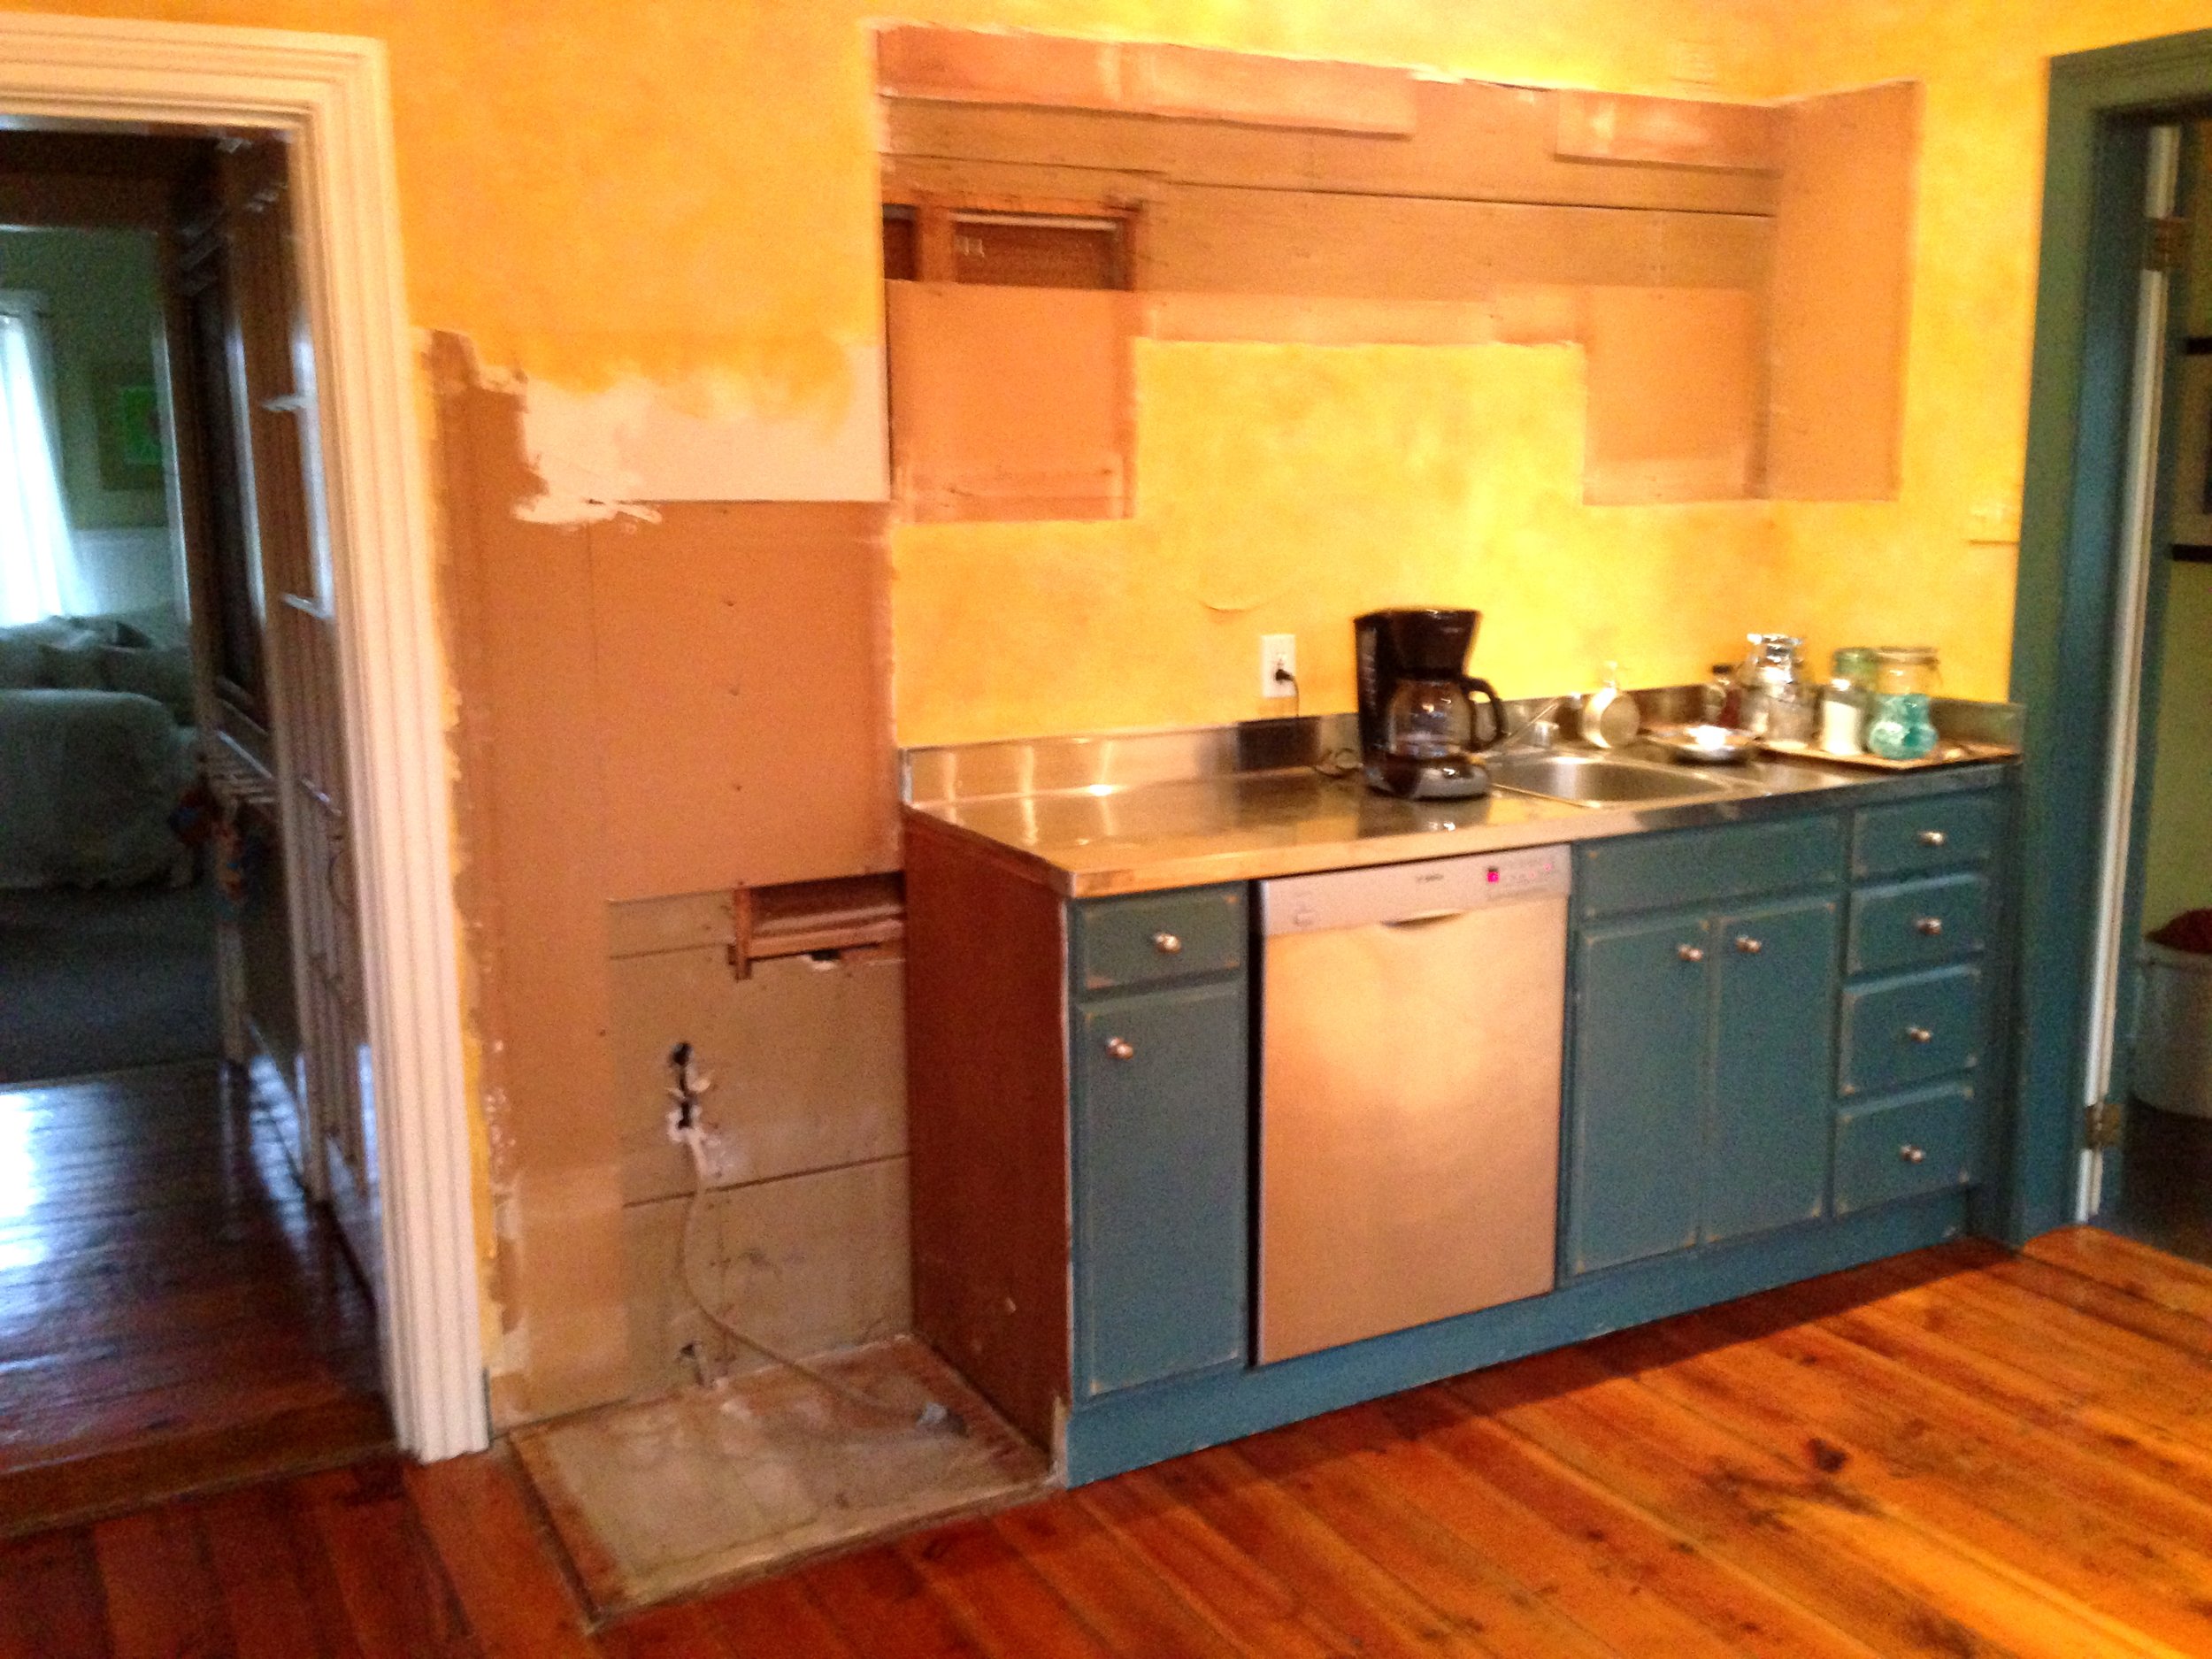

Since coffee is a big part of my mornings, we transformed this area into a little coffee bar. And what does every coffee bar need, but a big chunky mirror above it? This is my favorite part because the mirror I used didn't cost anything. In fact, I found the wooden frame alongside the road one day. It was just abandoned by its owner never to be used again, or so they thought. I grabbed it, cleaned it, painted it, took it to the local glass shop, and had it fitted with new antiqued mirror glass. Yes, this is something you can actually buy. I just love the way it turned out and how it fits perfectly in the space. It's a great way to repurpose an old frame that you can't part with and it’s a conversation piece for sure. Start hunting for yours.
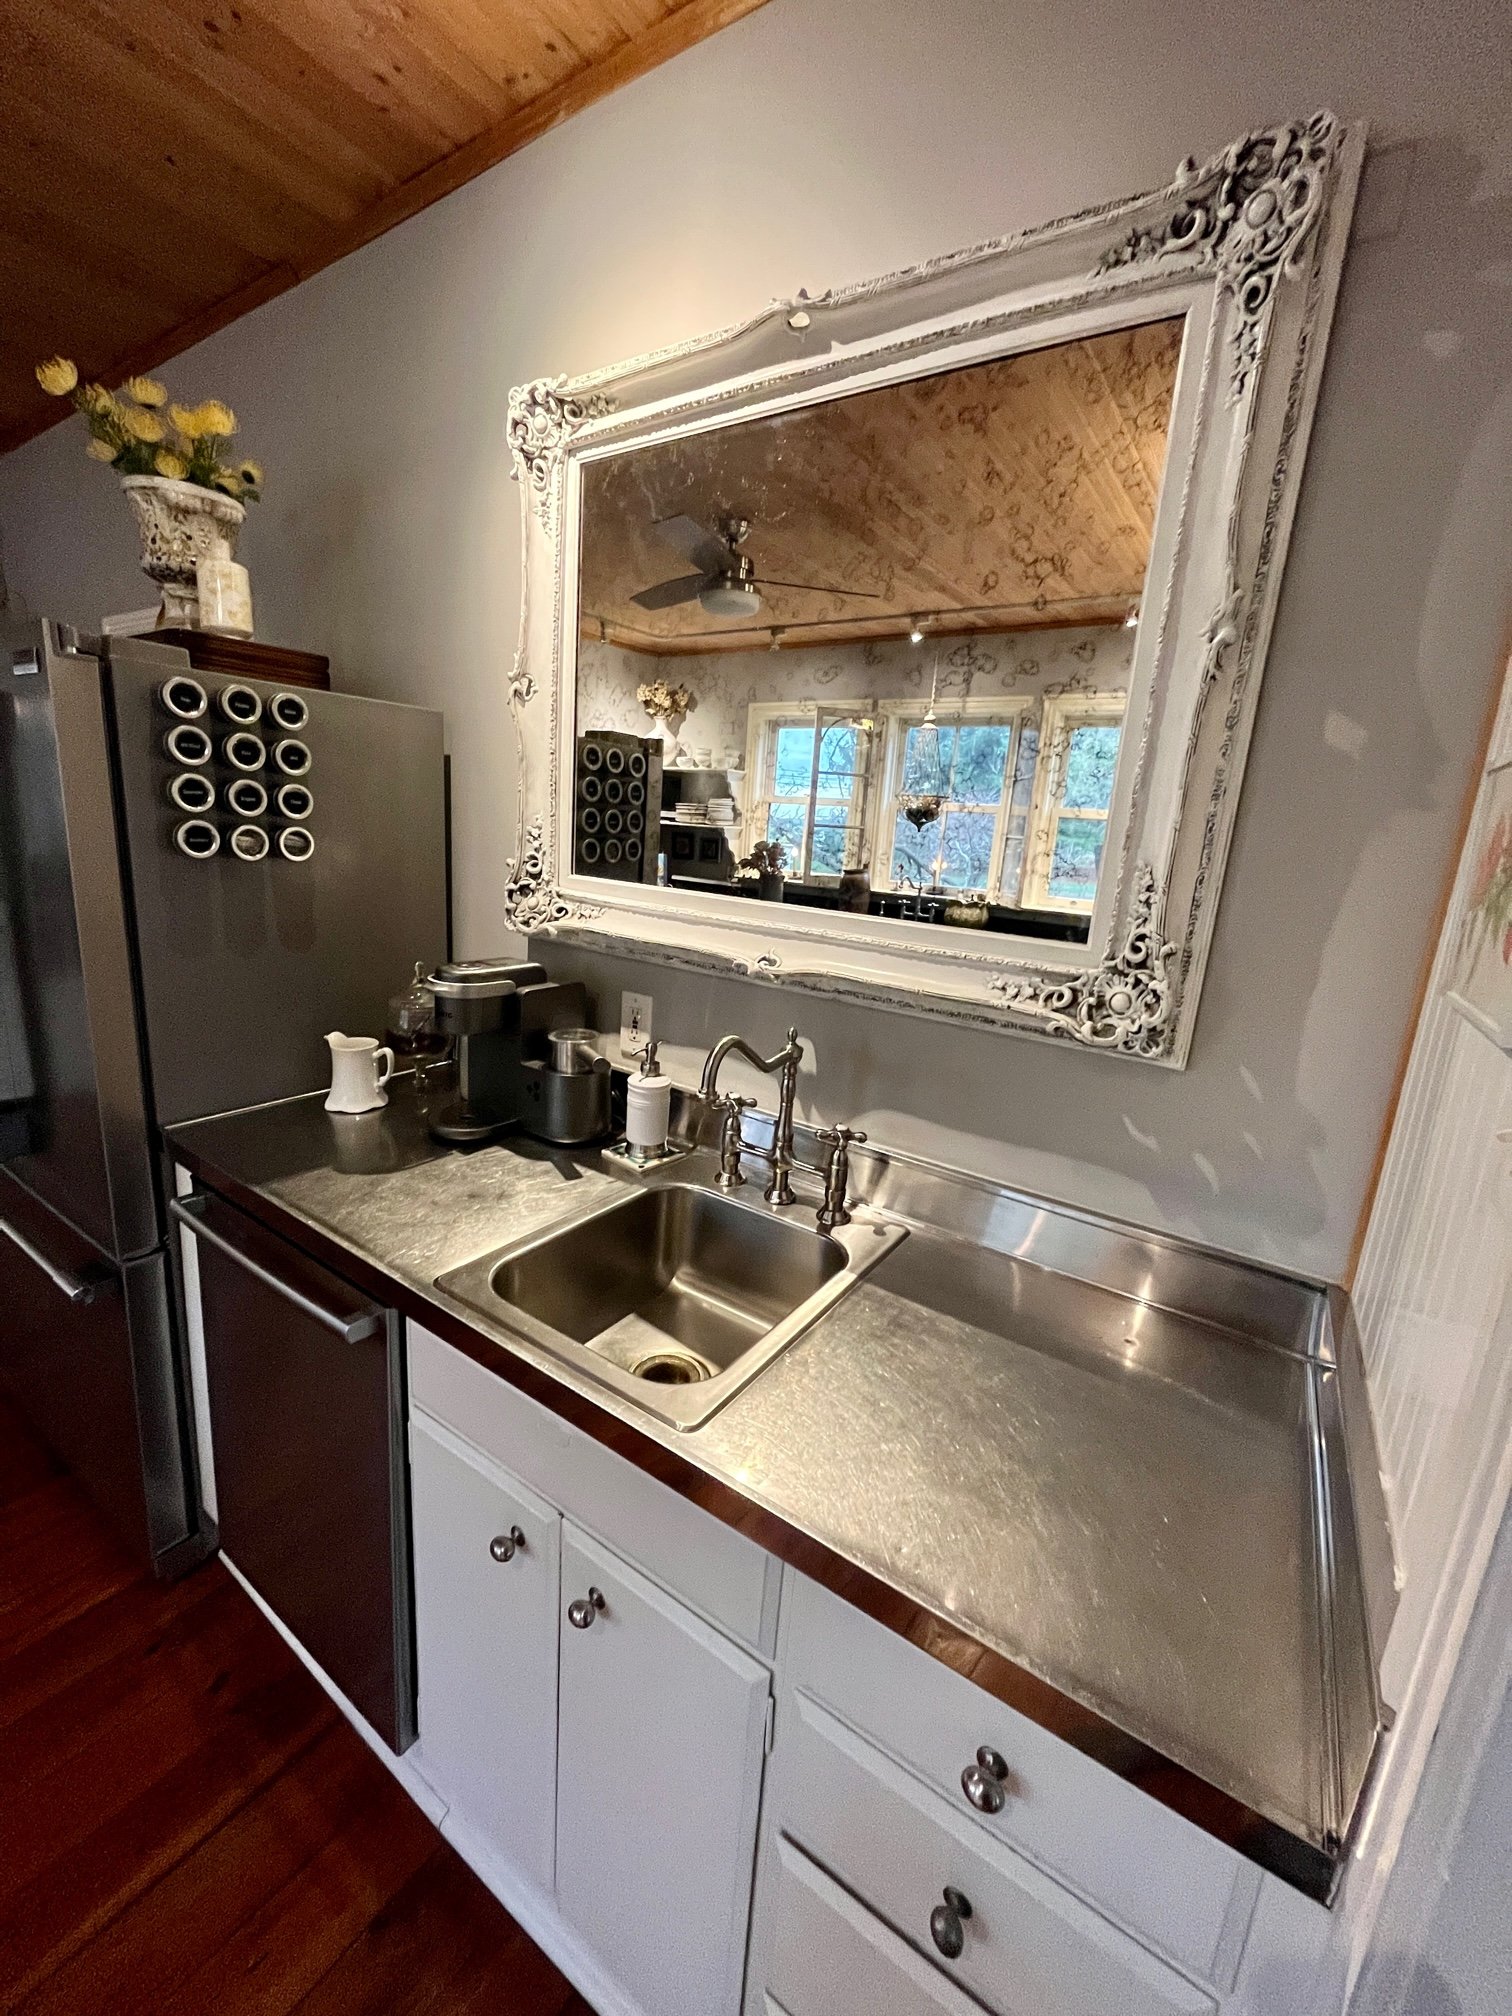
Here are a few detailed photos of the mirror, Kingston Brass faucet, magnetic spice tins, etc. You can find links to most of these items and/or items with similar styles on Studio Sprig’s Shop My Home page.

I like to keep a little vintage-style pitcher next to the coffee maker so that I can easily fill it. I store my coffee grounds in a pretty apothecary jar and I use a stainless, beaded scooper created by an artist at a craft fair. I’ve linked a really nice copper coffee scooper here. The apothecary jar and soap dispenser sit upon artistic tiles made by my children.
Glassware Storage
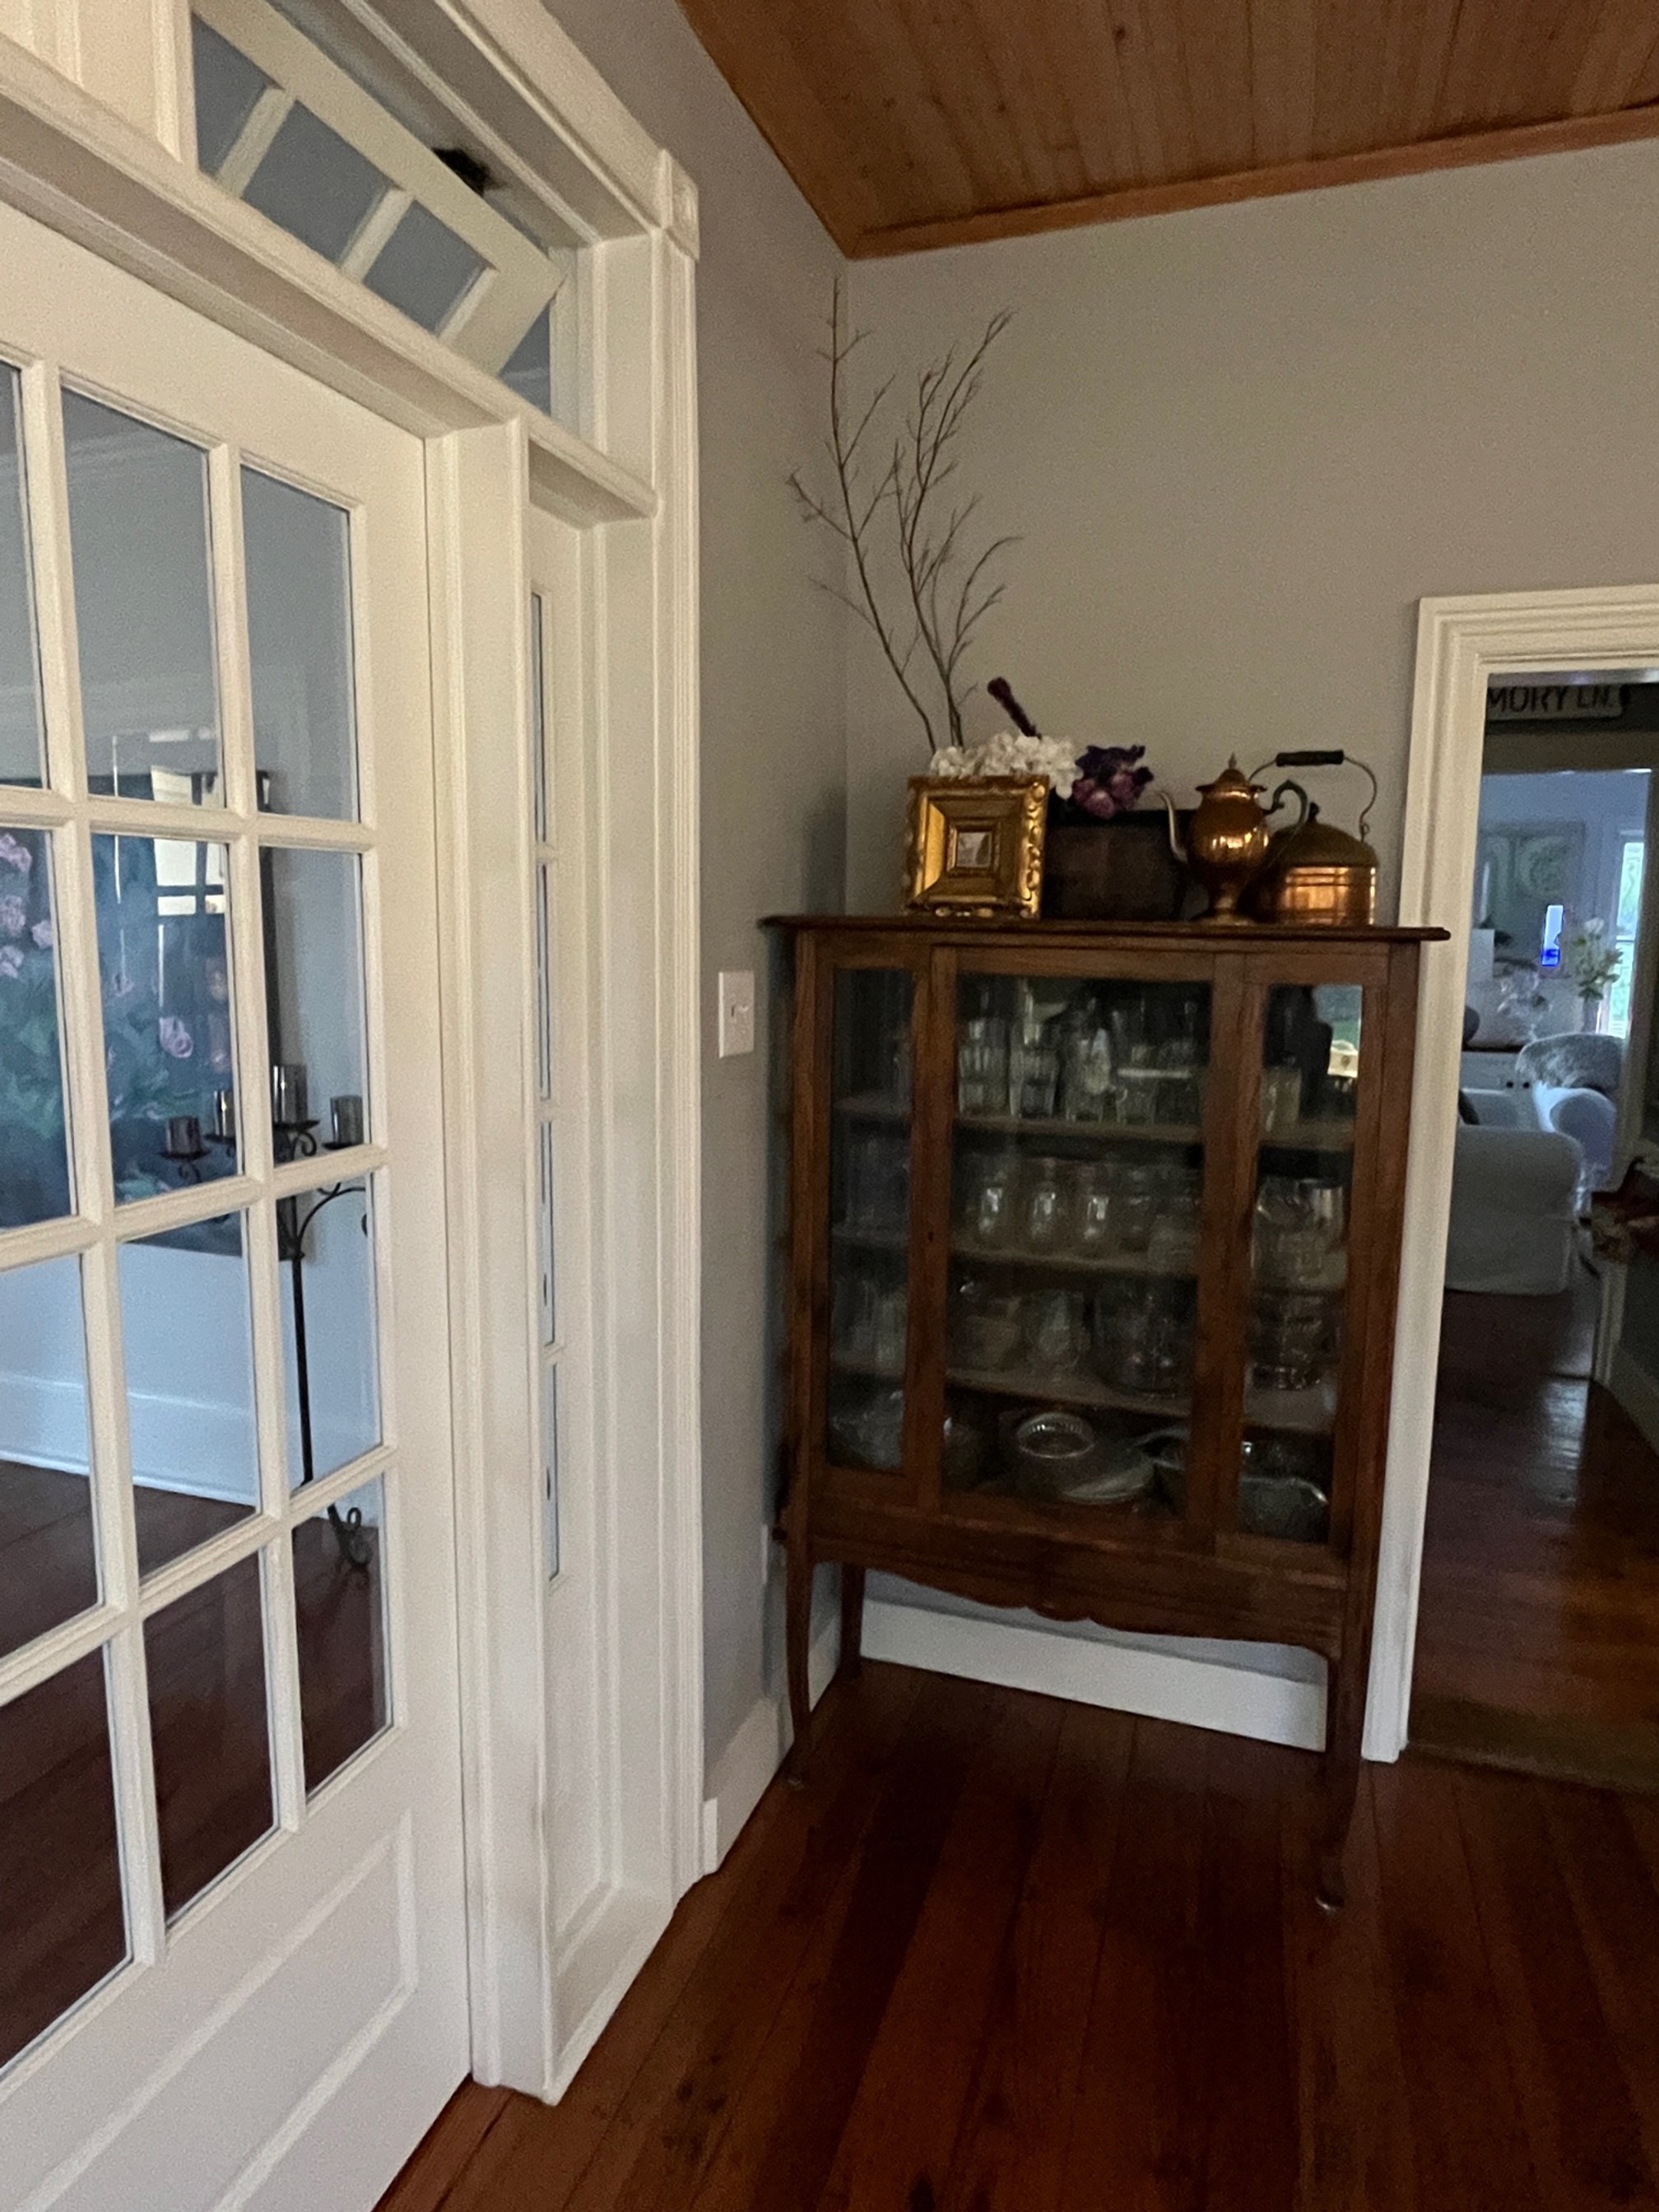
With the elimination of upper cabinets comes the realization that you'll need a place to put all of your glassware. Many years before purchasing this farmhouse, I purchased this delicate hutch at a yard sale. It was in great shape so I stripped the varnish and exposed the woodgrain as soon as I brought it home. It moved around inside various homes until finding a perfect vocation in this kitchen as the keeper of all things glass. Drinking glasses, glass bowls, glass dishes, and random glass items that need a place to perch.

There's a little section of wall where it fits very nicely and here it will undoubtedly remain forever, or until I change my mind. I like having all of my glassware in one perfect place and the glass doors encourage me to keep it neat and tidy.
Thank you for visiting my kitchen. If you are interested in some of the products or product styles we used, here is a pretty comprehensive list with links for your convenience. Shop my home. I am happy to answer any questions you may have about the transformation if you comment below. If you’re a blogger, what’s your favorite SEO Tool? I’ve had much keyword success with RankIQ. Learn more here.

How to Make Sentimental Easter Eggs
HOW TO MAKE SENTIMENTAL EASTER EGGS

Easter is just around the corner, and it’s time to start thinking about easy-to-do spring decor ideas. Sentimental eggs that tell a story are a great way to add interest to the season. Creating a decoration that you can display every year is a meaningful way to enjoy a happy memory, and reusing something worn and weathered is a great way to honor the environment too.
Why maKE sentimental eggs?
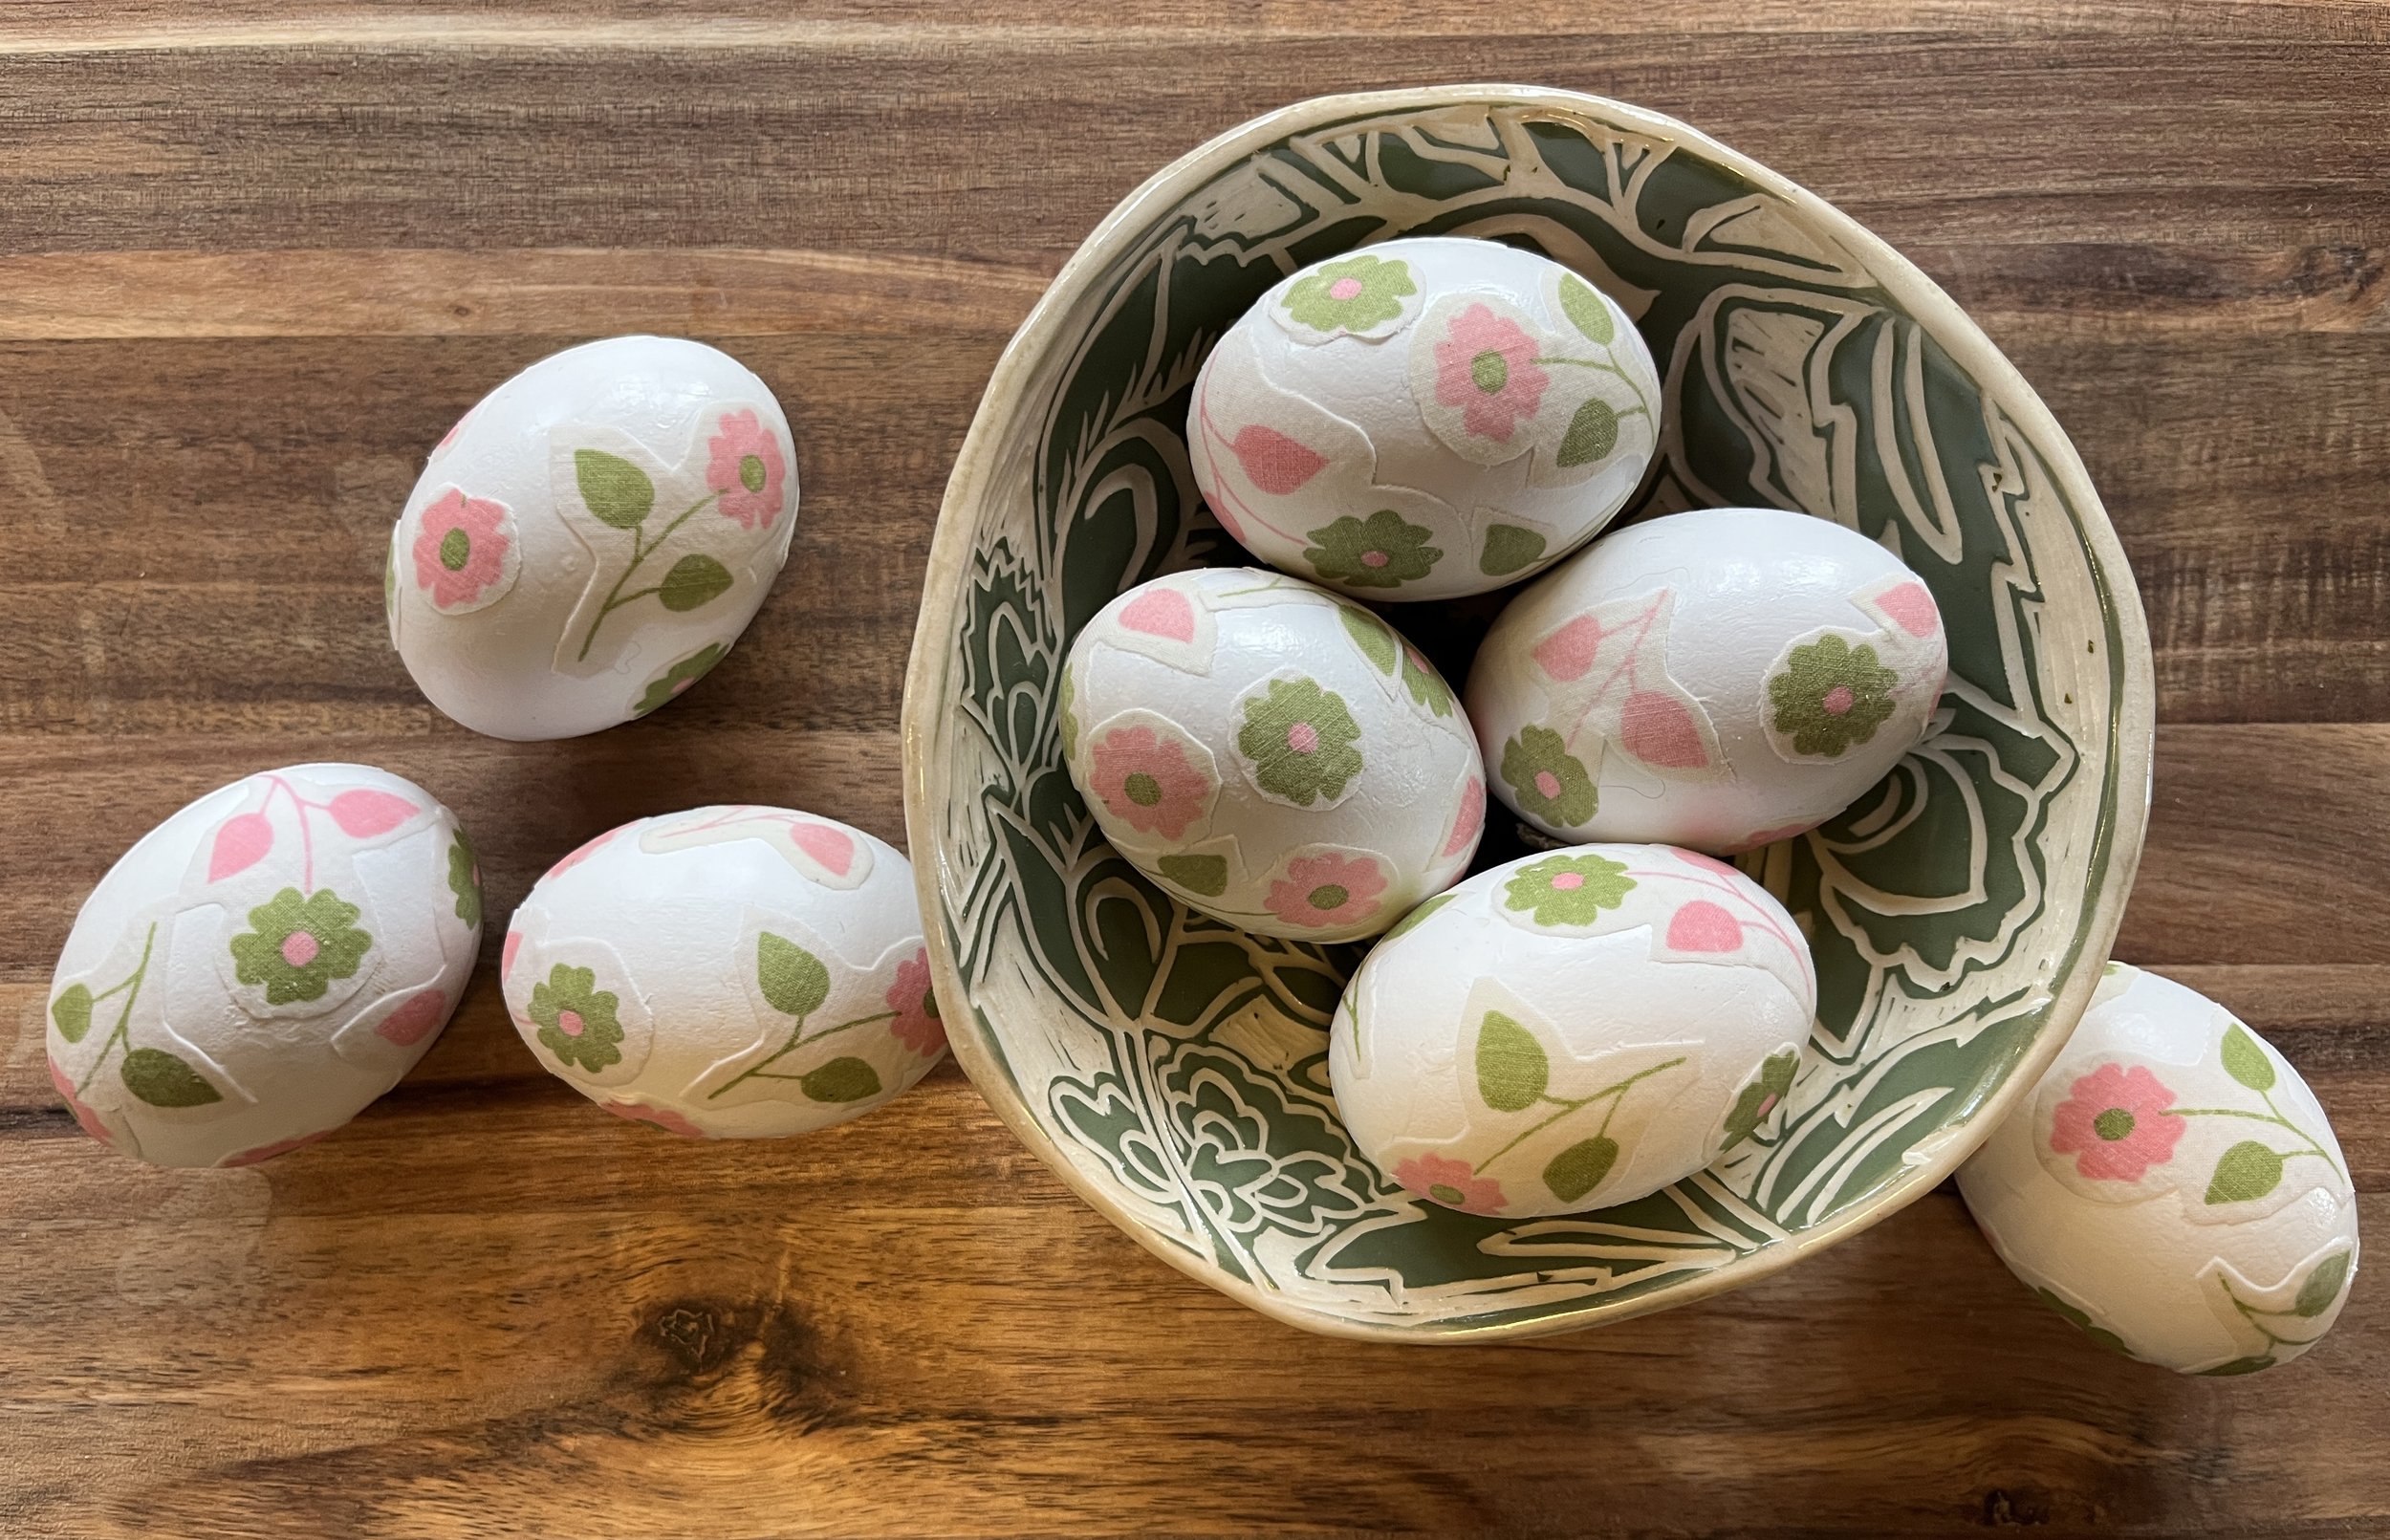
Last year I created these pretty floral eggs with a vintage pillowcase that has a story. This particular pillowcase was part of a set of vintage sheets my mother chose for me when I was a child. When my children were small I hired a seamstress to design clothing using some of my hand-me-down vintage sheet sets (don't worry, I will blog about that soon because they were awesome!). But this time I made eggs instead.

This particular pink and green pillowcase above was an outlier that I was mixing in here and there with my other linens. I used it for many years and always took great care of its delicate nature, however, as expected over time it wore very thin. One day, my washing machine completely shredded it and I was sad because it reminded me of my mother. So instead of throwing it in the garbage, I wondered what I could do to preserve it. I decided since Easter was my favorite holiday, that I'd try to create a few decorative eggs so that I could enjoy this childhood memory every year going forward. The samples I created tell a story, so they are now the first set of what I am calling my Story Eggs.

the BEST FABRIC FOR MAKING story eggs
I used floral, vintage sheets from my childhood, but you can also use any scrap of sentimental fabric you can find. Maybe it is a small clipping from your grandmother’s wedding dress or a cutting from your child’s favorite cotton onesie. I would recommend hunting for thin cotton as it's much easier to work with. For reference, thin, vintage pillowcases are the perfect texture and work very well.
Estate sales and thrift shops are great places to hunt for fun and fabulous vintage cloth. You don't need much fabric for this project so if you go to a fabric shop ask if they have quilting squares, as that's another great source that won’t cost a lot. If you’ve never heard of Spoonflower, they also have the option to order an 8”x8” square swatch for just $5 with any pattern you choose, and better yet you can even upload your own pattern designs and create your own custom fabrics. Imagine uploading your child’s artwork, creating a pattern, and having spoonflower print it on fabric. I’ll put a link at the bottom for you to see what I am talking about. I have also included more links for pillowcases and trims at the bottom of this post. Use your imagination and gather what works best for you to create your own memorable Story Eggs.

WHAT TYPE OF EGGs SHOULD I USE?
I don't like to use real eggs because they are hard to work with and they can crack and spoil over time. I also don't recommend plastic eggs because they aren’t substantial enough. Instead, I recommend using an assortment of really nice wooden eggs.
Here I used very inexpensive white wooden eggs, but you can also order brown wooden eggs. And I also found a collection of white, brown, and pale green wooden eggs which closely resemble the chicken eggs I buy from my neighbor.
Creating a Story Egg with your own sentimental vintage fabric is an easy and fun DIY project that is sure to reignite happy memories. Even children can create these eggs using the simple directions below. With just a few supplies and your creativity, you can make beautiful eggs that will make your Easter and Spring celebrations even more special. When finished, pop them into a child’s easter basket, or present them as a housewarming gift in a simple pottery bowl as I did. They can just be little decorations complimenting your larger Easter Table Ensemble or let the creation of your Story Eggs be an “egg painting alternative” for a family gathering. Either way, I hope these eggs spark many sentimental conversations. Whether your creations are used to decorate for the holiday, become a new family craft, or are given as gifts, try to come up with a new Story Egg idea each year so that this can become a cherished part of your traditions.
To create a story egg you will need:
SUPPLIES:
Fabric Scissor
Small Paint Brushes
White wooden eggs
Mod Podge (Matte Finish)
Fabric
OPTIONAL SUPPLIES:
Brown wooden eggs
White, brown, and pale green wooden eggs
Mod Podge (Gloss Finish)
Pink Vintage Inspired Pillowcases
Blue and Green Vintage Inspired Pillowcases
Purple Floral Inspired Pillowcases
Rick Rack Trim various colors
Egg Cups for drying
Translucent Bags
CREATE YOUR OWN FABRIC WITH SPOONFLOWER:
Spoonflower Custom Fabric Squares

FOLLOW THESE STEPS:
Step 1: Prep wooden eggs
With a slightly damp cloth, clean your wooden eggs to make sure they are free of any dust and debris.
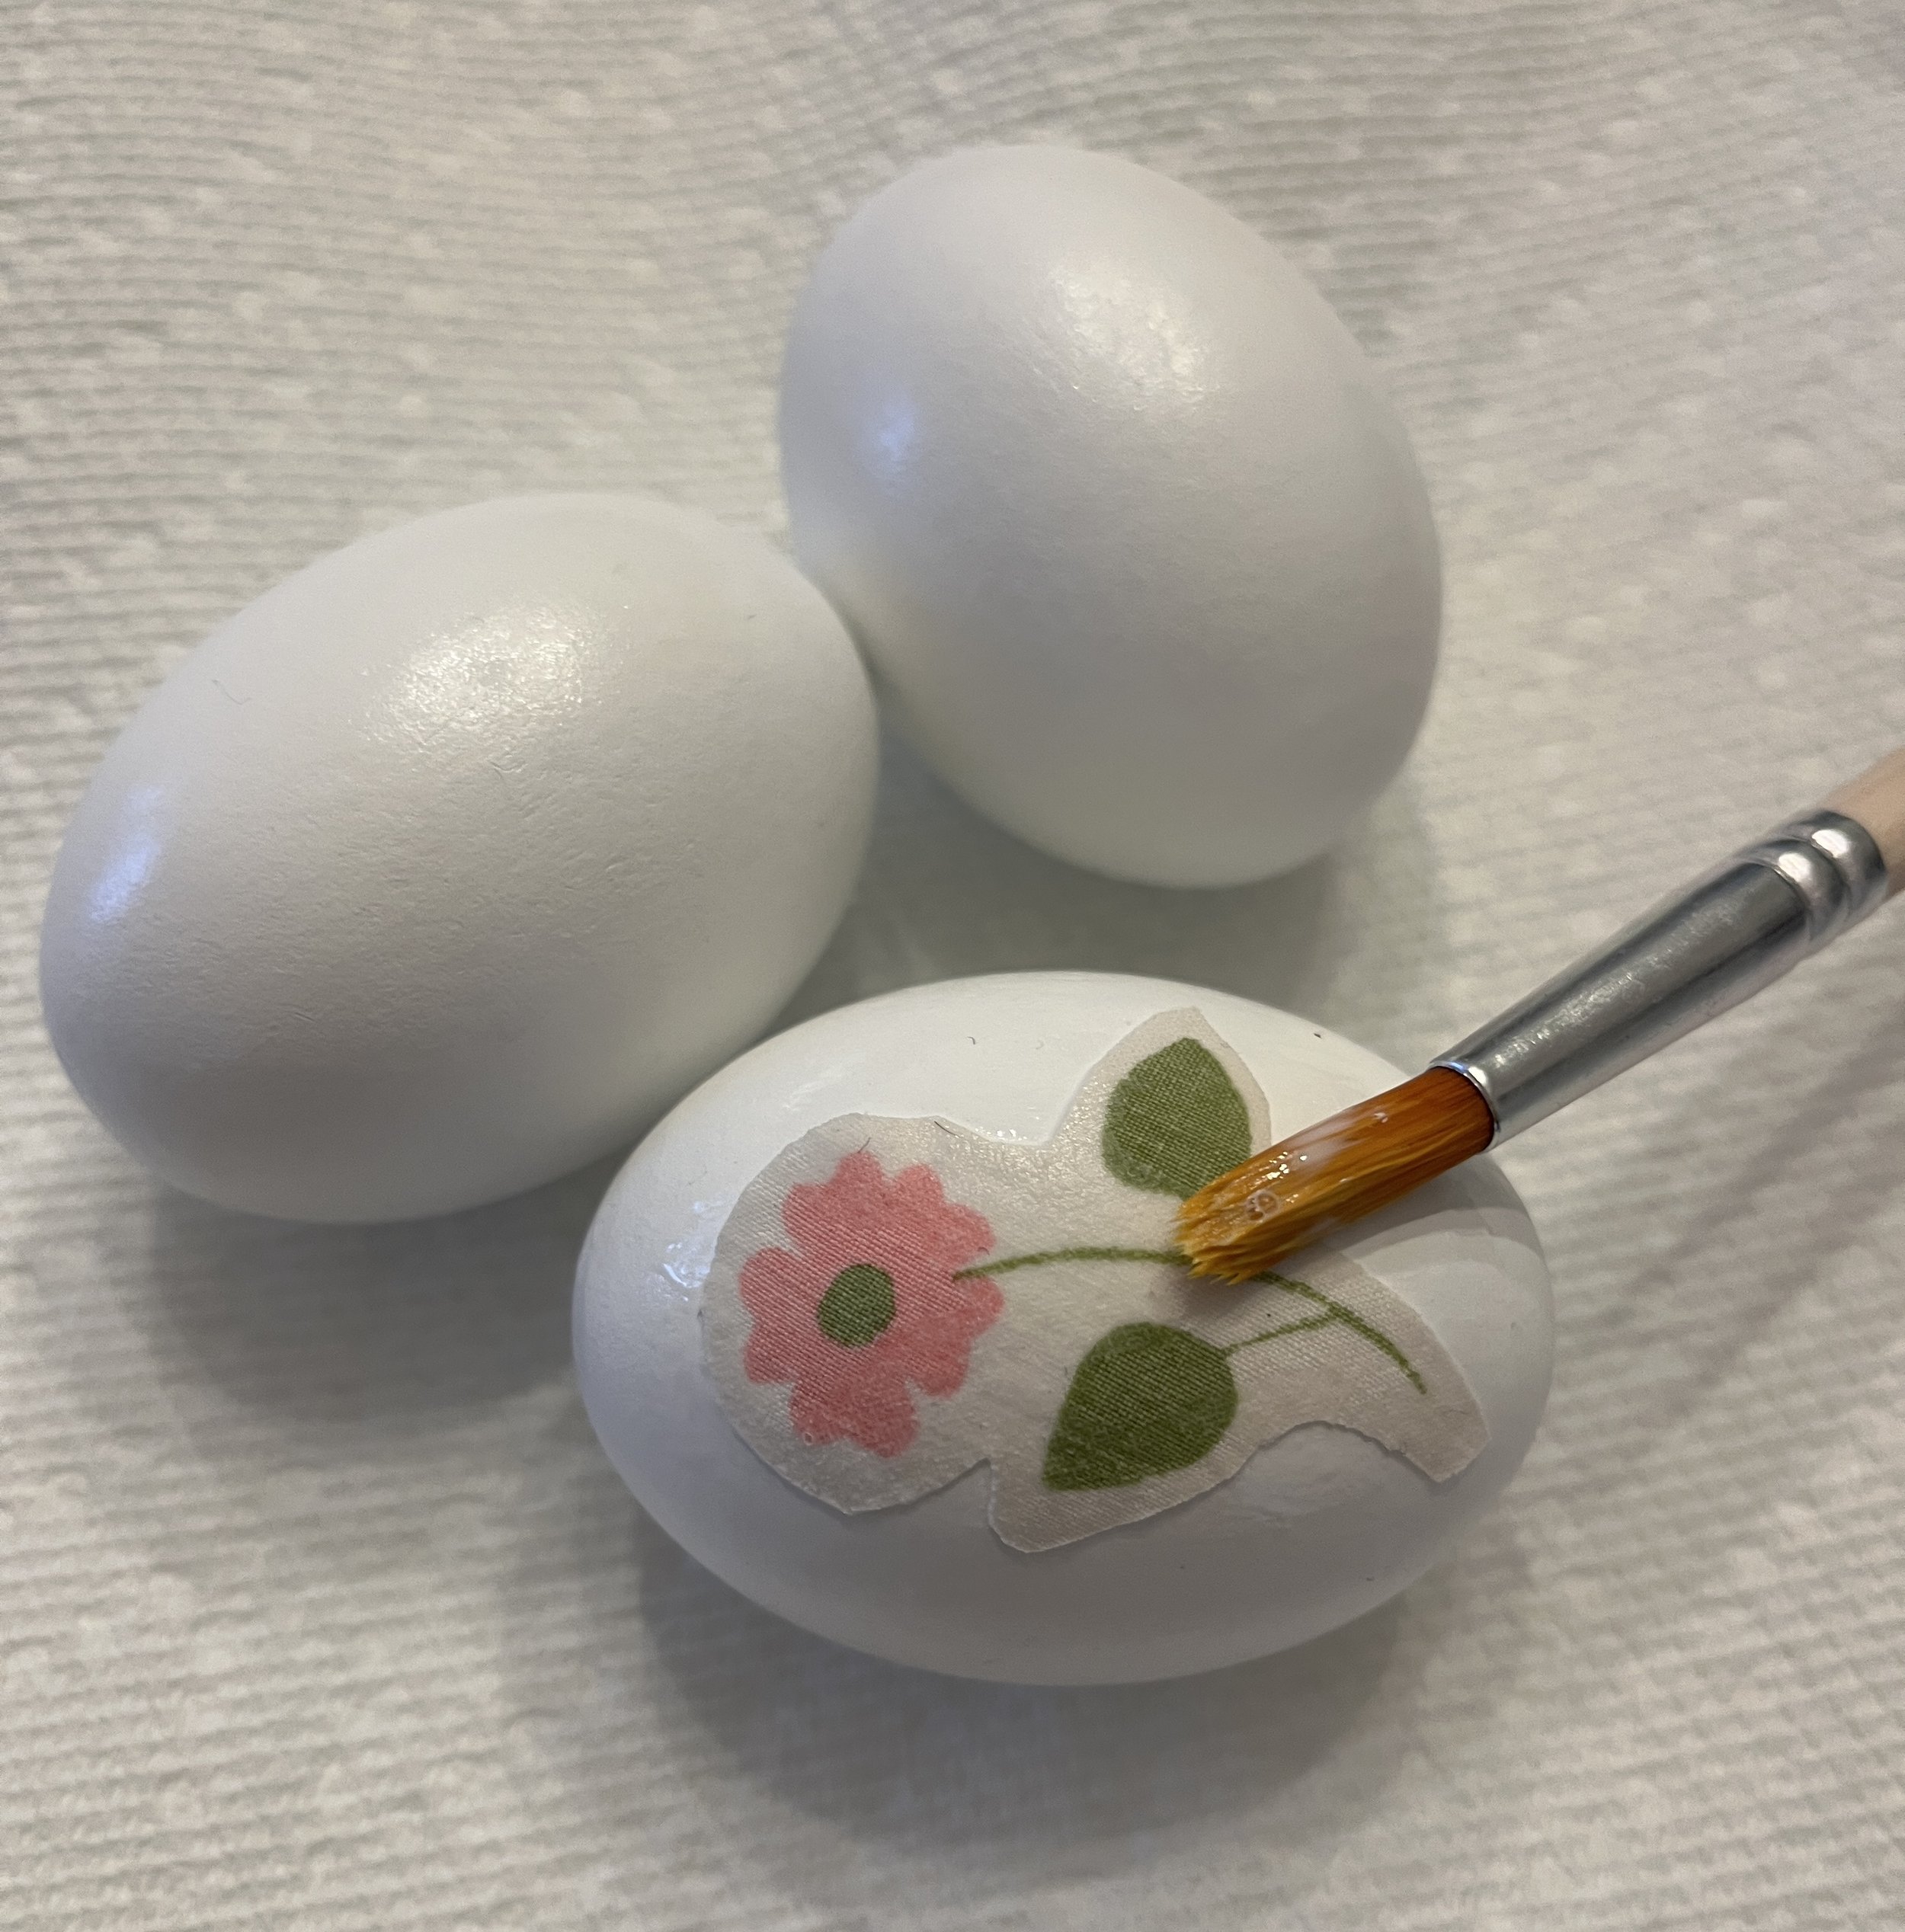
Step 2: Cut fabric designs and patterns into small pieces
Use a fabric scissor to cut around your designs and patterns, breaking them into small portions. Smaller sections, not larger than 2” work best. I simply cut around each flower and stem.
Step 3: Decoupage your eggs
Break out a roll of paper towels to cover your work surface, then use a small paint brush and a small amount of decoupage glue (I use Mod Podge) on the egg (only in the area you'll be adhering your first piece). Then place the piece on that glue. Let dry.
Once you've gone around the entire egg and placed all of your pieces, you are ready to paint Mod Podge over all the fabric pieces and all bare egg surfaces as well. If you choose a matte finish they will dry like mine. A gloss finish is another option. All links are below.
Step 4: Dry your Eggs
This is a great time to pull out your mini egg cups or deviled egg dishes if you have some. The eggs need a place to dry so they do not roll around. You can also use the underside of an egg carton.
Step 5: Display or Package Your Story Eggs
Once your eggs are completely dry, find a pretty bowl or basket for display. If your eggs are created from a sentimental fabric you may want to place each one into a special little translucent bag as I did below and give them to members of your family. You may also choose to add painted polka dots, stripes, or a wedding date or name to complete the memory. This is completely optional.

I’d love to see your Story Eggs or hear about other ways you’ve made sentimental eggs from things you love. If you are enjoying my blog, please share it with friends and subscribe here so you can read the next one.

If you’re a blogger, what’s your favorite SEO Tool? I’ve had keyword success with RankIQ. Learn more here. If you enjoyed this Creative Inspiration you may also like this: DIY HERB DRYING RACK: HERB DRYING AT HOME

10 Ideas for an Eco-Friendly Event or Wedding
10 Ideas for an Eco-Friendly Event or Wedding

Boutonniere design by Studio Sprig. Flower Farm Southern Pines at Cornerstone Farm. Photography by Karmapants
There is so much that goes into planning any event large or small, and remembering to keep things simple and reduce your carbon footprint may be your most difficult challenge. Did you know that the average wedding produces a massive 400 pounds of garbage and 63 tons of CO2? It's not surprising to me, having worked in the industry for over 25 years, but it is disappointing.
The good news is that there are many eco-friendly ideas you can implement when planning your next event if you don’t want to contribute to that excessive waste. Whether it's your wedding day, or just a big day celebration, always considering your environment and your carbon footprint is very important.
First, try breaking your event down into manageable bites by making two lists: "must-haves" and "can live without". You'll quickly find that it's not as difficult as you may have thought and sorting now helps to simplify everything later. Here are ten things to closely consider when planning your day.
1. Consider a Micro event
When creating your guest list, remember it's quality, not quantity that matters. Good news, some of the most special events are very intimate affairs. Although the word micro doesn't only have to describe your guest list, there are plenty of ways to "Go Micro" for the environment, and still have a sizable guest list.
2. Hire an event Planner
At first, an event planner, 'day of', or coordinator might seem like an extravagance that you can't afford, but hiring an event or wedding planner may prove to be your best decision overall, and here's why. Planners plan all day, every day. They know the venues, the entertainment, and all of the little idiosyncracies that might trip you up along the way. They can save you a lot of time, wedding waste, aggravation, money, and especially all that running around. So don't rule them out before you begin. Consider your location, time availability, and energy level. Where are your efforts best allocated?

Venue Hotel Du Village. Flower design by Studio Sprig. Flower Farm Cultivating Joy Flowers. Photography by Elle Studios
3. find A Beautiful Venue
When hunting for a venue, it's a good idea to open your eyes wide and focus on everything, not just capacity and catering options. Look in every corner of the interior, entryways, hallways, bathrooms, and outside in the gardens, parking lots, and all around the grounds where your guests may wander. Take it all in, because this is one area you can really save a bundle.
We all know what it can cost to decorate an empty social hall, school, or ill-styled restaurant. Sure, the price may be fine and they may provide you with tables and chairs, but is that enough? Chances are you'll need to provide all of your own linens, centerpieces, flower embellishments, arches, favors, candles, and sometimes even food. The list can go on forever. But some more inclusive venues provide most of those things and provide you with the proper ambiance that wipes all of the other items off of your list.
Take this gorgeous barn, for instance. It belongs to a good friend of mine and requires minimal embellishment to make it really pop for a small-medium event.

A micro-event at Southern Pines at Cornerstone Farm.
Beautiful venues really focus on visual impact. When touring, take a good look around outside because so many venues have beautifully landscaped grounds and gardens that need no embellishment at all. The decore is built-in. In fact, adding decor can actually take away from the natural beauty that is already there. In some cases, you can host your entire event in a garden space and not need to purchase anything to enhance the event. The flowers and greenery are already all around you! And be inquisitive, many venues today offer a room full of rentable decor, candle votives, large flower planters, and other items for your tables Some even offer these items to customers free of charge. Always ask the venue coordinator, you may be surprised by what they already have and are willing to provide. This is always a better option than buying everything new if you are only intending on using it for one day.

Flower design by Studio Sprig. Flower Farm Southern Pines at Cornerstone Farm. Photography by Littlewing Studios
Here is a peek into Cassia & Justin's green wedding on a beautiful farm property in East Greenville, PA. The wedding took place during covid and the couple did a wonderful job creating a micro event that mimicked an old country wedding. After a couple’s photo session next to the barn and in the fields, everyone walked from the outdoor ceremony up the small hill to the reception which was inside a glass-enclosed mini barn. Most guests stayed overnight on the property at the Inn, just a few steps away. The reception decor was simple and consisted of buckets of fresh flowers and herbs which the bride and maids placed onto three unique micro cakes and into small glass bottles. Photography courtesy of Littlewing Studios.

Herbs grown by Studio Sprig. Flower Farm Southern Pines at Cornerstone Farm. Photography by Littlewing Studios
4. beg, borrow or thrift
If your event is repeated and let's say you host annually, then I'd suggest just purchasing the linens and other necessary items once, and using them as much as possible, but if renting or borrowing is available to you and that makes more sense, then do it.

Flower Farm Southern Pines at Cornerstone Farm. Photography by Littlewing Studios
When searching for vases, candle holders, or other tableware, I suggest always starting at consignment or thrift shops. Antiques are always nicer than new and giving these items a second look is commendable and very green.
I also always encourage my clients to borrow. It’s likely a friend or family member has just the thing you are looking for. Over the years I’ve created many centerpiece arrangements using cherished family heirlooms as the vessel. Delicate teacups, a vintage bottle collection, you name it. Added bonus: there’s often a sentimental story attached to these pieces and guests enjoy hearing it.
5. Host an event At Home
Don't underestimate the space you have right under your nose. This idea always scares people, but using your own home is an easy way to reduce your costs tremendously if cost is a concern. You do not need large furniture or vast spaces to entertain at home. Honestly, I've hosted many events here on our farm both outside in the yard, and inside in our four small lower-level rooms. Our home is not big because it's 172 years old and the rooms were designed to keep people warm and close. But because we always knew we loved to entertain, we made a few good renovation choices over the years and they have helped us achieve this goal successfully.
Many of us have incorporated a patio or deck into our outdoor landscapes. These areas are always great choices for hosting a warm-weather event. I've hosted many events on our very small deck with a round iron table that only seats 4! Truth be told I bought that table at a yard sale, 23 years ago. No matter, because it still works great and when I need more seating, I just add smaller cafe tables, benches, and bars made from old barn doors (all purchased on the Facebook marketplace) to accommodate guests. Miscellaneous ensembles can make our deck look like an eclectic cafe and I'm okay with that vibe.

As for the lawn space, I try to use most of that too. If our event is larger and I need lots more seating, I just rent long tables and chairs from our local rental store. They rent for the entire weekend so I can sometimes squeeze two parties out of one rental. It's relatively inexpensive to rent and very easy because I do not have to worry about storing anything.
6. Stay Local
Choose your event space or wedding venue wisely. The environment is always impacted by where you chose to host. If you want your guests to fly to a destination wedding, for instance, this will undoubtedly affect the sustainability of your event. But driving long distances may as well. There are creative ways you can keep everyone local so they almost don't need to travel at all.

Source: The Knot
Take for example the New Orleans Second Line Wedding Parade, a brass band processional tradition that predates the Civil War. Modern couples incorporate this historic custom into their wedding to give homage to their New Orleans roots. In this tradition, the brass band leads guests on foot from the wedding venue to the reception venue. Now, you'd need for your venues to be near enough, but even if you don't hire an escort band, you could incorporate an eco-friendly l between-venue walk, also popular with rural weddings long ago. And if you have a family member with limited mobility, come up with a cherished way to honor them in your foot parade.
7. eco-conscious sourcing
Casual Biodegrading
If your event calls for more casual, disposable serving products like plates, utensils, and napkins it's best to always choose biodegradable materials instead of plastic. Not only will you have less waste, but you won't contribute to the pounds of trash that most events do.
But don't worry going green does not mean you are not limited to paper goods. There are so many sustainable options today. Below I’ve compiled a list of natural sources with links to compostable dinnerware you can order for your next event. I hope you find a sustainable alternative that fits your style.

Photo courtesy of Maggpie Rentals
Glamorous Renting
Consider renting fancy dishware and glassware instead of buying everything. This opens up the door to an extra level of glam, while still impacting the environment in a positive way.
And did you know you can easily rent almost anything you need? For instance, the seating ensemble above, and many others can be rented from Maggpie in Boyertown, PA. If you have an empty space to fill or just need an interesting backdrop, shop the exact look you want and rent it! Here is a list of other beautiful and off-beat rental options you may not have known about.

Design by Studio Sprig. Handmade Paper Porridge Papers. Eco-Conscious Printer Bucks Digital. Twig from backyard.
Sustainable Stationery
When considering your event stationery needs, it's best to always use recycled or handmade paper and nontoxic inks - or search for sustainable or eco-friendly graphic designers and printers like Bucks Digital, in your area if you are not the DIY type. And if you love to DIY, a great paper source is Greenfield Paper Co. from California. They have reinvented the age-old tradition of creating fine paper without cutting down trees. Green Field Paper Company offers three lines of recycled papers that integrate post-consumer pulp with non-traditional additives such as seeds, hemp, coffee chaff, denim, junk mail, and garlic skins! All of their products are made in the USA and they do not use any dyes or bleach. Earth pigments are used to color the papers and all of their seed paper contains non-GMO non-invasive seeds. Or Porridge Papers, my source in the design above, whose owner Christopher once produced a single custom sheet that was sent to Martha Stewart and another order of 2.2 million pieces embedded with lettuce seeds for Kraft Foods. Using seeded and plantable paper is really cool, good for the environment, and a way to save the “memory” of your event.
8. Stay in Season
Flowers
If you choose to incorporate beautiful flowers or plants into your event design, always try to stay in season. Seasonal blooms have always been the goal of Studio Sprig for many reasons. First of all, they are much fresher and much more beautiful, in my opinion. Many times they are harvested one or maybe only two days before your event. This means they not only look their best, but they will hold up longer if you want to repurpose them afterward. Staying in season is so good for the environment because you are using what nature is already providing instead of forcing growth in greenhouses far away in climates more suitable. Here is a nice guide for choosing flowers by season.
Food & Drink
Building your menu around the seasons is such a smart idea. Tomatoes always taste better in summer. We all know this. Staying in season and trying to use local farms eliminates the need to transport food long distances at great cost. Most chefs would jump at the chance to create a menu with only seasonal ingredients, and if you are preparing the food and drink yourself, here are two helpful books.


9. Grow Your Own flowers
When it comes to your event or wedding flowers, there are plenty of sustainable flower farmers you can choose from. Some of them have designers on the premises while others contract the service.
Another good option might be to plan ahead and grow your own. This is much easier if you're planning a micro event or a larger event with less need for custom flowers and greens. But if you or someone you know is an avid gardener, this endeavor could be very rewarding. If you do decide to do this, however, I’d recommend a backup plan just in case. Weather and pests are obstacles to be aware of. This book by Floret’s Erin Benzakein is a well-organized guide to growing your own.

Ann Hayes of Southern Pines at Cornerstone Farm gives a tour of her dahlia fields.
And did you know you can also hire local farmers to grow flowers for you? I work with several growers willing to do this if they have enough lead time and can grow what the event requires in the correct season. And when local farmers grow your flowers you have the peace of mind that the job will get done right and if they do run into a problem on your special day, they are most likely to have a surplus of other varieties for you to choose from and/or the connections to get what you need.
Cool idea: Hosting a tour of the flower farm growing your event flowers is a unique way to bring a small group from your event together. It’s a fabulous setting for an outdoor bridal shower or with this tour you can create an educational precursor for an eco-friendly fundraising event.


10. Donate whenever possible
Food
One great way to avoid a lot of food waste after your catered event is to donate your leftover food to a local church, animal shelter, food bank, or homeless shelter. You'd need to follow food safety guidelines of course and ask your caterer if they have a process in place for this already, but if they do not here are some links that may help you find what you are looking for.
Feeding America: Looking for a Food Bank near you
Great Nonprofits: Looking for a Homeless Shelter near you
Humane Society: Looking for an Animal Shelter near you
Decor & Flowers
Donations of decor are also appreciated greatly. Perhaps you know you'll never use 200 votive candle holders again or you just don't have space for the 25 vases you accumulated. There's probably a bride out there somewhere who would love to recycle your glass jars for you. Or maybe some local hospitals could use a few fresh floral arrangements for their lobby this week. One of the easiest ways to resell your lightly used decor is on the Facebook marketplace.

Flower design by Studio Sprig. Flower Farm Detweiler Homestead. Photography by Taylor Cotilla
Enjoy this glimpse of Lindsay & Jordan's late summer wedding. Lindsay requested a pure white, sustainable bridal bouquet so I chose to work with one of my local favorites, white lisianthus. These focal flowers were grown on the reputable Detweiler Homestead Farm originally in Telford, PA, and they were accented with greens harvested from Bloom Flower Farm, originally from Hilltown, PA. A bridal, one bridesmaid bouquet, several boutonnieres, and cake flowers were the complete floral order for this beautiful, micro event.
Thank you for reading this blog, Please comment below and share your thoughts and suggestions. I’ve included some great resources below. Just click the image for your convenience. If you enjoyed this blog and would like to sign up please join our subscriber list here.


This blog is a personal blog written and edited by me. For questions about this blog, please contact Kim@kimbensingdesign.com. If you’re a blogger, what’s your favorite SEO Tool? I’ve had much keyword success with RankIQ. Learn more here. As an Amazon Associate, I earn from qualifying purchases. Thank you. This blog does not contain any content which might present a conflict of interest.

DIY Herb Drying Rack: Herb Drying at Home
This blog is about a DIY herb drying rack that I made at Windy Hill Farm.
Studio Sprig by Kimberly Herb Drying Baskets
Are you interested in drying your own herbs? I just love fresh herbs and I grow many on my farm in Bucks County, Pennsylvania. If you are interested in how I do that, please read this blog post: Herbs, and how to grow, harvest, and dry your own.
I use lots of fresh herbs in everything, my floral designs, my cooking, and even my baking. Having a large herb garden is great in the summer, but I soon realized I needed to dry much of my harvest because they were growing so fast and I just couldn’t eat them fast enough. Drying is a great way to have plenty of herbs throughout the winter.
Herb Drying Racks
As I began searching for herb drying racks I came to discover I did not care for the many options out there because they reminded me of large, round, mesh butterfly cages and I knew they would not fit well in my rectangular pantry -where I wanted to dry the herbs. So instead of buying one, I created my own.
How I Created My Own
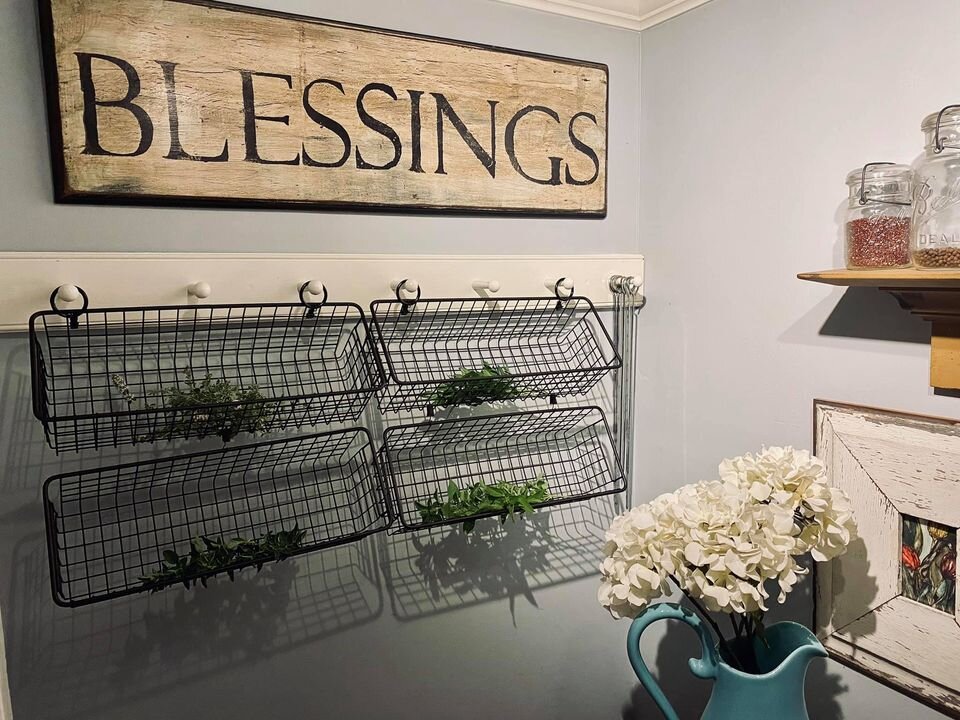
First, I started with an existing peg rack that was already hanging in my pantry. If you don’t have one, you can easily find stylish pegs or hooks to add to any wall with this link.
I then hung simple curtain ring clips on four of the pegs and attached these simple metal baskets to the clips. You can find metal baskets in all shapes and sizes depending on what works best for you.
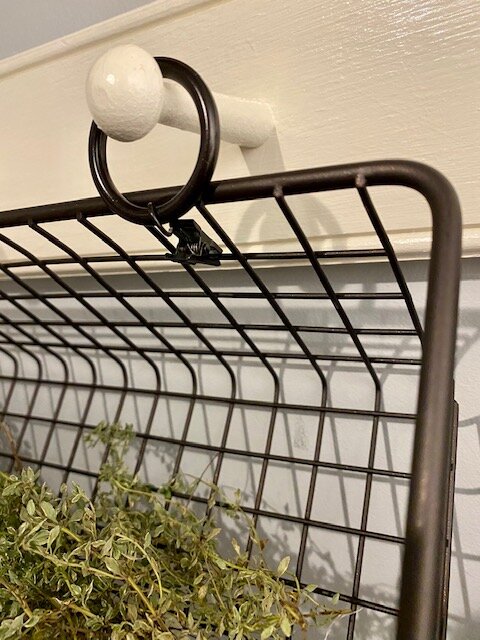
Next, I removed the rings from the clips and used just the clips to connect basket to basket, creating a cascading effect. I hung two columns of baskets, two deep, but you can create any configuration that works in your space.
Lastly, I lined the baskets with a small cutting of cheesecloth in case the herbs were damp from washing and needed to drip.
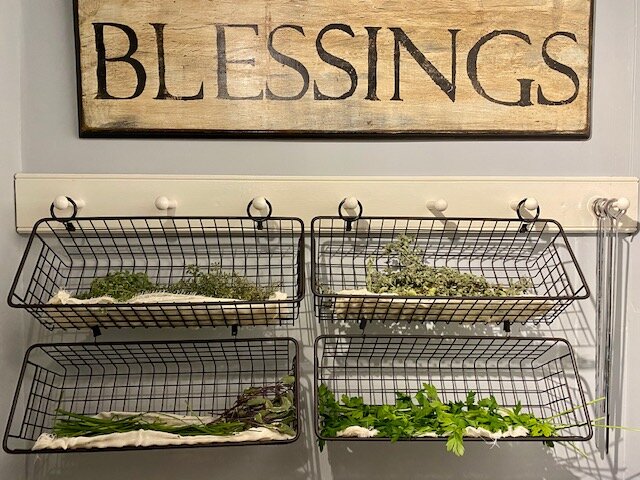
Now, the aroma in my pantry is always wonderful and it’s also a pleasant sight when I walk in -as it takes up the entire back wall. The great thing about this herb drying rack is that I can add to it and go all the way down the wall if I wish. If you have a large wall to cover, you can always intersperse framed herbal artwork or framed herbal photos taken from a calendar. You can also use your own custom photos or paintings and design a unique “Herbal Wall”. To help, I have included a list with links below where you will find some of the materials I used.


I’m always here to help you with your creative journey. Please sign up to receive blog post notifications and follow Studio Sprig on Instagram, Facebook, and Pinterest. I look forward to connecting. If you’re a blogger, what’s your favorite SEO Tool? I’ve had much keyword success with RankIQ. Learn more here. Kim
This post contains affiliate links. As an amazon associate, I make a small commission at no further cost to you. Thank you.

Simplified Wedding Ceremony during Covid
How to scale down a wedding and still have a beautiful result.

Is it possible to design and flawlessly execute your dream wedding in late July 2020, during covid?
Yes. Cassia and Justin used this opportunity to simplify and scale down their ceremony and reception while still creating the day of their dreams.
To accommodate guests they rented this splendid Airbnb in Berks County, Pennsylvania for friends and family as their backdrop and gathering site. Friends congregated the night before and prepared in the well-appointed farmhouse. The next day, the couple’s socially-distanced outdoor wedding ceremony took place on the back lawn, while the reception dinner was a short skip up the hill in the small, but perfect, mini-event space - custom built just for events like this.

Cassia requested a simple, seasonal bouquet of fresh herbs, bold zinnia and glorious summer dahlia, loosely tied with a white dangly ribbon. It was the perfect accompaniment to her free-flowing, meadow dress. Justin’s funky floral tie looked great paired with his tiny “clustered wildflower” boutonniere.


The small-scale redesign of this wedding allowed the bride and her family the opportunity to design their own dinner tables and a trio of cakes with plentiful fresh-cut organic herbs, sprigs, and flowers, supplied the day of by Studio Sprig. I think the results are breathtaking. If you enjoyed this blog please subscribe here. Thank you.


Please enjoy more stunning event photos by Scott and Kristi of Littlewing Studio.
Hi, I’m Kim. Welcome to Studio Sprig.
Kim Bensing’s original watercolors and designs are now available on wallpaper and fabric. To order visit Studio Sprig’s design library on Spoonflower. Contact me if you need assistance.
-
EVENTS
23
- Nov 3, 2026 Create a Winter Nature Bar to Entertain your Holiday Guests Nov 3, 2026
- Oct 23, 2026 Wrapped in Wonder: The Art of Giving a Gift Oct 23, 2026
- Sep 26, 2026 Homecoming Flowers: A Beautiful Tradition Then and Now Sep 26, 2026
- Sep 23, 2026 Choose Wedding Flowers With Meaning: How to Create a Bouquet That Tells Your Love Story Sep 23, 2026
- Sep 21, 2026 The Pre-Prom Tradition Every Mom Should Try: Host a Backyard Bouquet Party Sep 21, 2026
- Sep 18, 2026 Lambertville’s Halloween Magic: A Funky, Creative Rivertown Comes Alive Sep 18, 2026
- Aug 20, 2026 How to Host a Beautiful Flower Bar: The Ultimate DIY Flower Bar Party Guide Aug 20, 2026
- Aug 19, 2026 How to Decorate Cakes with Fresh Flowers: Floral Wreaths, Crowns & More Aug 19, 2026
- Aug 19, 2026 Decorating Cakes with Fresh Flowers Aug 19, 2026
- May 18, 2025 How to Make DIY Bouquets for Prom May 18, 2025
- May 7, 2025 How to Preserve and Use Your Spring Flowers - All Year Long May 7, 2025
- Feb 27, 2025 Get Excited for The Flower Show Feb 27, 2025
- Feb 14, 2025 Historic Castles. What are they used for? Feb 14, 2025
- Jan 31, 2025 Creative Ideas For Your Valentine Jan 31, 2025
- Jan 28, 2025 How An Invitation Can Tell Your Love Story Jan 28, 2025
- Jan 23, 2025 How to Design a Valentine Tree Jan 23, 2025
- Jan 16, 2025 Host a Fabulous Bouquet Bar for Valentine's Day Jan 16, 2025
- Apr 4, 2023 Why Choose Seasonal Flowers for Your Special Occasion? Apr 4, 2023
- Feb 1, 2023 10 Ideas for an Eco-Friendly Event or Wedding Feb 1, 2023
- Nov 14, 2022 A Family Tree Inspired Wedding Invitation Nov 14, 2022
- Oct 3, 2022 How to choose flowers that have sentimental meaning Oct 3, 2022
- Nov 9, 2020 Simplified Wedding Ceremony during Covid Nov 9, 2020
- Apr 2, 2019 Why You Should Choose Seasonal Prom Flowers Apr 2, 2019
-
HOME
23
- Sep 9, 2026 How to Name a Farm: 10 Meaningful Ideas for Creating a Name With a Story Sep 9, 2026
- Sep 1, 2026 How to Preserve Flowers for Creative Projects Sep 1, 2026
- Jul 2, 2026 How to make your own flower confetti Jul 2, 2026
- Apr 22, 2025 How We Painted our Barn Apr 22, 2025
- Apr 16, 2025 What to Plant for Mesmerizing Spring Blooms Apr 16, 2025
- Apr 8, 2025 Narcissus AKA Daffodil - What's Blooming at Studio Sprig Apr 8, 2025
- Apr 1, 2025 Glory-of-the-Snow - What's Blooming at Studio Sprig Apr 1, 2025
- Mar 19, 2025 How we turned an Artist Studio into a Weekend Retreat Mar 19, 2025
- Mar 12, 2025 The Mighty Crocus - First to Bloom - What's Blooming at Studio Sprig Mar 12, 2025
- Jan 23, 2025 How to Design a Valentine Tree Jan 23, 2025
- Jan 16, 2025 Host a Fabulous Bouquet Bar for Valentine's Day Jan 16, 2025
- Jan 9, 2025 How to Make Your Own Mint Tea Jan 9, 2025
- Jan 7, 2025 How To Create A Courtyard Jan 7, 2025
- Jan 2, 2025 How to Create a Stunning Centerpiece Jan 2, 2025
- Mar 27, 2023 How We Transformed Our Farmhouse Kitchen by Reusing, Updating, and Thrifting: (Coffee Bar) Mar 27, 2023
- Mar 27, 2023 How We Transformed Our Farmhouse Kitchen by Reusing, Updating, and Thrifting Mar 27, 2023
- Mar 1, 2023 How and Why We Love Historic Homes Mar 1, 2023
- Jan 3, 2023 Eliminate Sneaky Sugars Jan 3, 2023
- Dec 14, 2022 How to Create a Pretty Mini Bar with Items You Already Own Dec 14, 2022
- Nov 21, 2022 Friendsgiving At Our Farm Nov 21, 2022
- Nov 9, 2022 Herbs: How to Grow, Harvest and Dry Your Own Nov 9, 2022
- Nov 9, 2022 DIY Herb Drying Rack: Herb Drying at Home Nov 9, 2022
- Oct 12, 2022 Have you ever thought about creating a beautiful water feature? Oct 12, 2022
-
STYLE
27
- Oct 6, 2026 Where Flowers Become Art, Experiences & Memories Oct 6, 2026
- Sep 1, 2026 How to Preserve Flowers for Creative Projects Sep 1, 2026
- Aug 20, 2026 How to Host a Beautiful Flower Bar: The Ultimate DIY Flower Bar Party Guide Aug 20, 2026
- Aug 19, 2026 How to Decorate Cakes with Fresh Flowers: Floral Wreaths, Crowns & More Aug 19, 2026
- Aug 19, 2026 Decorating Cakes with Fresh Flowers Aug 19, 2026
- Jul 2, 2026 How to make your own flower confetti Jul 2, 2026
- Nov 3, 2025 Creating a Pressed Flower Frame Nov 3, 2025
- May 7, 2025 How to Preserve and Use Your Spring Flowers - All Year Long May 7, 2025
- Jan 28, 2025 How An Invitation Can Tell Your Love Story Jan 28, 2025
- Jan 23, 2025 How to Design a Valentine Tree Jan 23, 2025
- Jan 6, 2025 How to Create Oyster Shell Necklaces Jan 6, 2025
- Jan 2, 2025 How to Create a Stunning Centerpiece Jan 2, 2025
- Mar 14, 2023 How to Make Sentimental Easter Eggs Mar 14, 2023
- Mar 6, 2023 How to Enjoy The PHS Philadelphia Flower Show Mar 6, 2023
- Feb 13, 2023 Let's Save The Bees Feb 13, 2023
- Feb 1, 2023 10 Ideas for an Eco-Friendly Event or Wedding Feb 1, 2023
- Jan 12, 2023 A Great Way to Help Kids with Cancer (PENN STATE) Jan 12, 2023
- Dec 14, 2022 How to Create a Pretty Mini Bar with Items You Already Own Dec 14, 2022
- Nov 29, 2022 Lunch and Dinner -Studio Sprig Style Micro Blog Nov 29, 2022
- Nov 14, 2022 A Family Tree Inspired Wedding Invitation Nov 14, 2022
- Nov 9, 2022 DIY Herb Drying Rack: Herb Drying at Home Nov 9, 2022
- Oct 30, 2022 Lambertville, Nj , A Funky, Cool Rivertown You Must Visit on Halloween. Oct 30, 2022
- Oct 19, 2022 How to choose an interesting place to stay when you travel or go on vacation Oct 19, 2022
- Oct 12, 2022 Have you ever thought about creating a beautiful water feature? Oct 12, 2022
- Oct 3, 2022 How to choose flowers that have sentimental meaning Oct 3, 2022
- Feb 1, 2021 How to design marketing materials for your small business Feb 1, 2021
- Oct 29, 2020 Surprise the bride when you can't come to her wedding Oct 29, 2020