
How to Design a Valentine Tree

Why I Designed a Tree FIlled with Love
As the Christmas season was coming to an end, I decided I wanted to enjoy our pretty tree a little longer. I knew I could get away with keeping our faux Balsam Hill Pine up through January dressed in its wintery guise, but what excuse did February have? That’s why, this year, I created a Valentine's Tree. Read on to see how I did it.

Transitioning a Christmas Tree
We created a pretty simple Christmas tree this year so the transition was easy. I first removed all of the Christmas balls but kept all the white lights and icicles. This step was very quick and with a semi-bare tree, I was able to then plan for February-appropriate decor.
Making a Valentine's Tree Topper
I considered keeping our glowing Moravian Star tree topper but decided that a Valentine's tree needed to better reflect Valentine’s Day. I considered a grapevine heart wreath covered in dried flowers but decided I’d like to just use found materials and make my own. This is how I did it.

Start with a basic shape
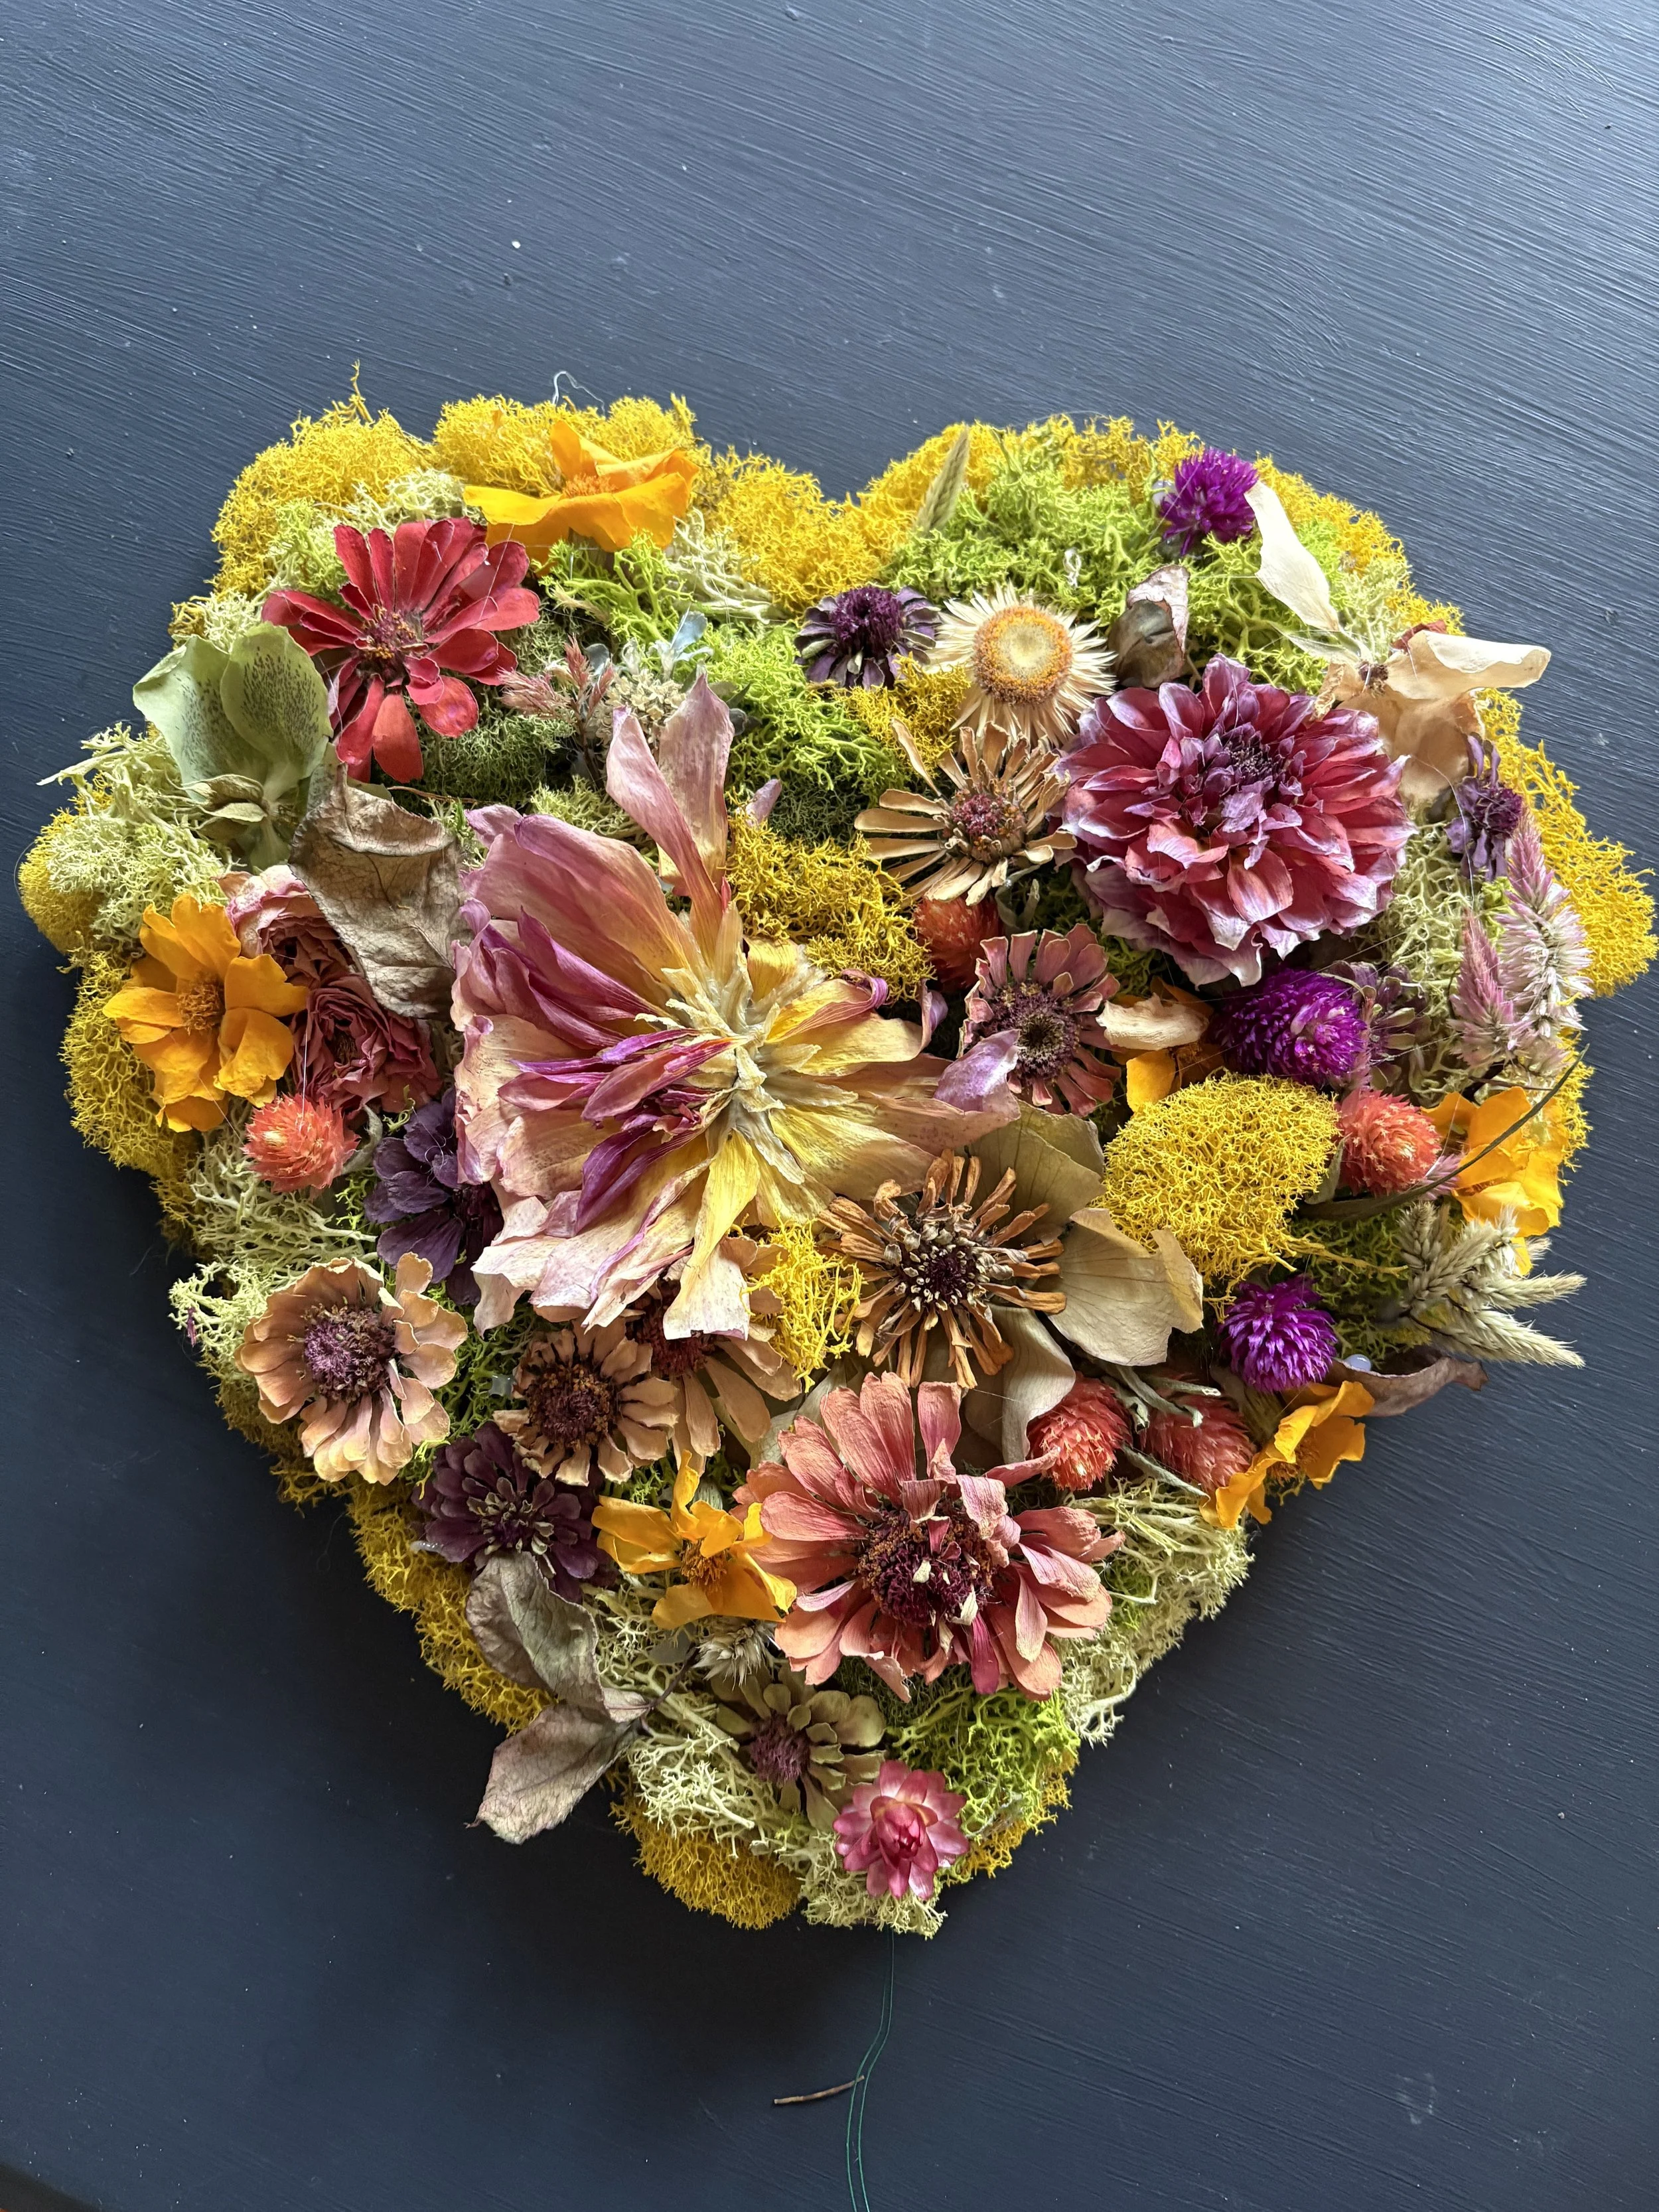
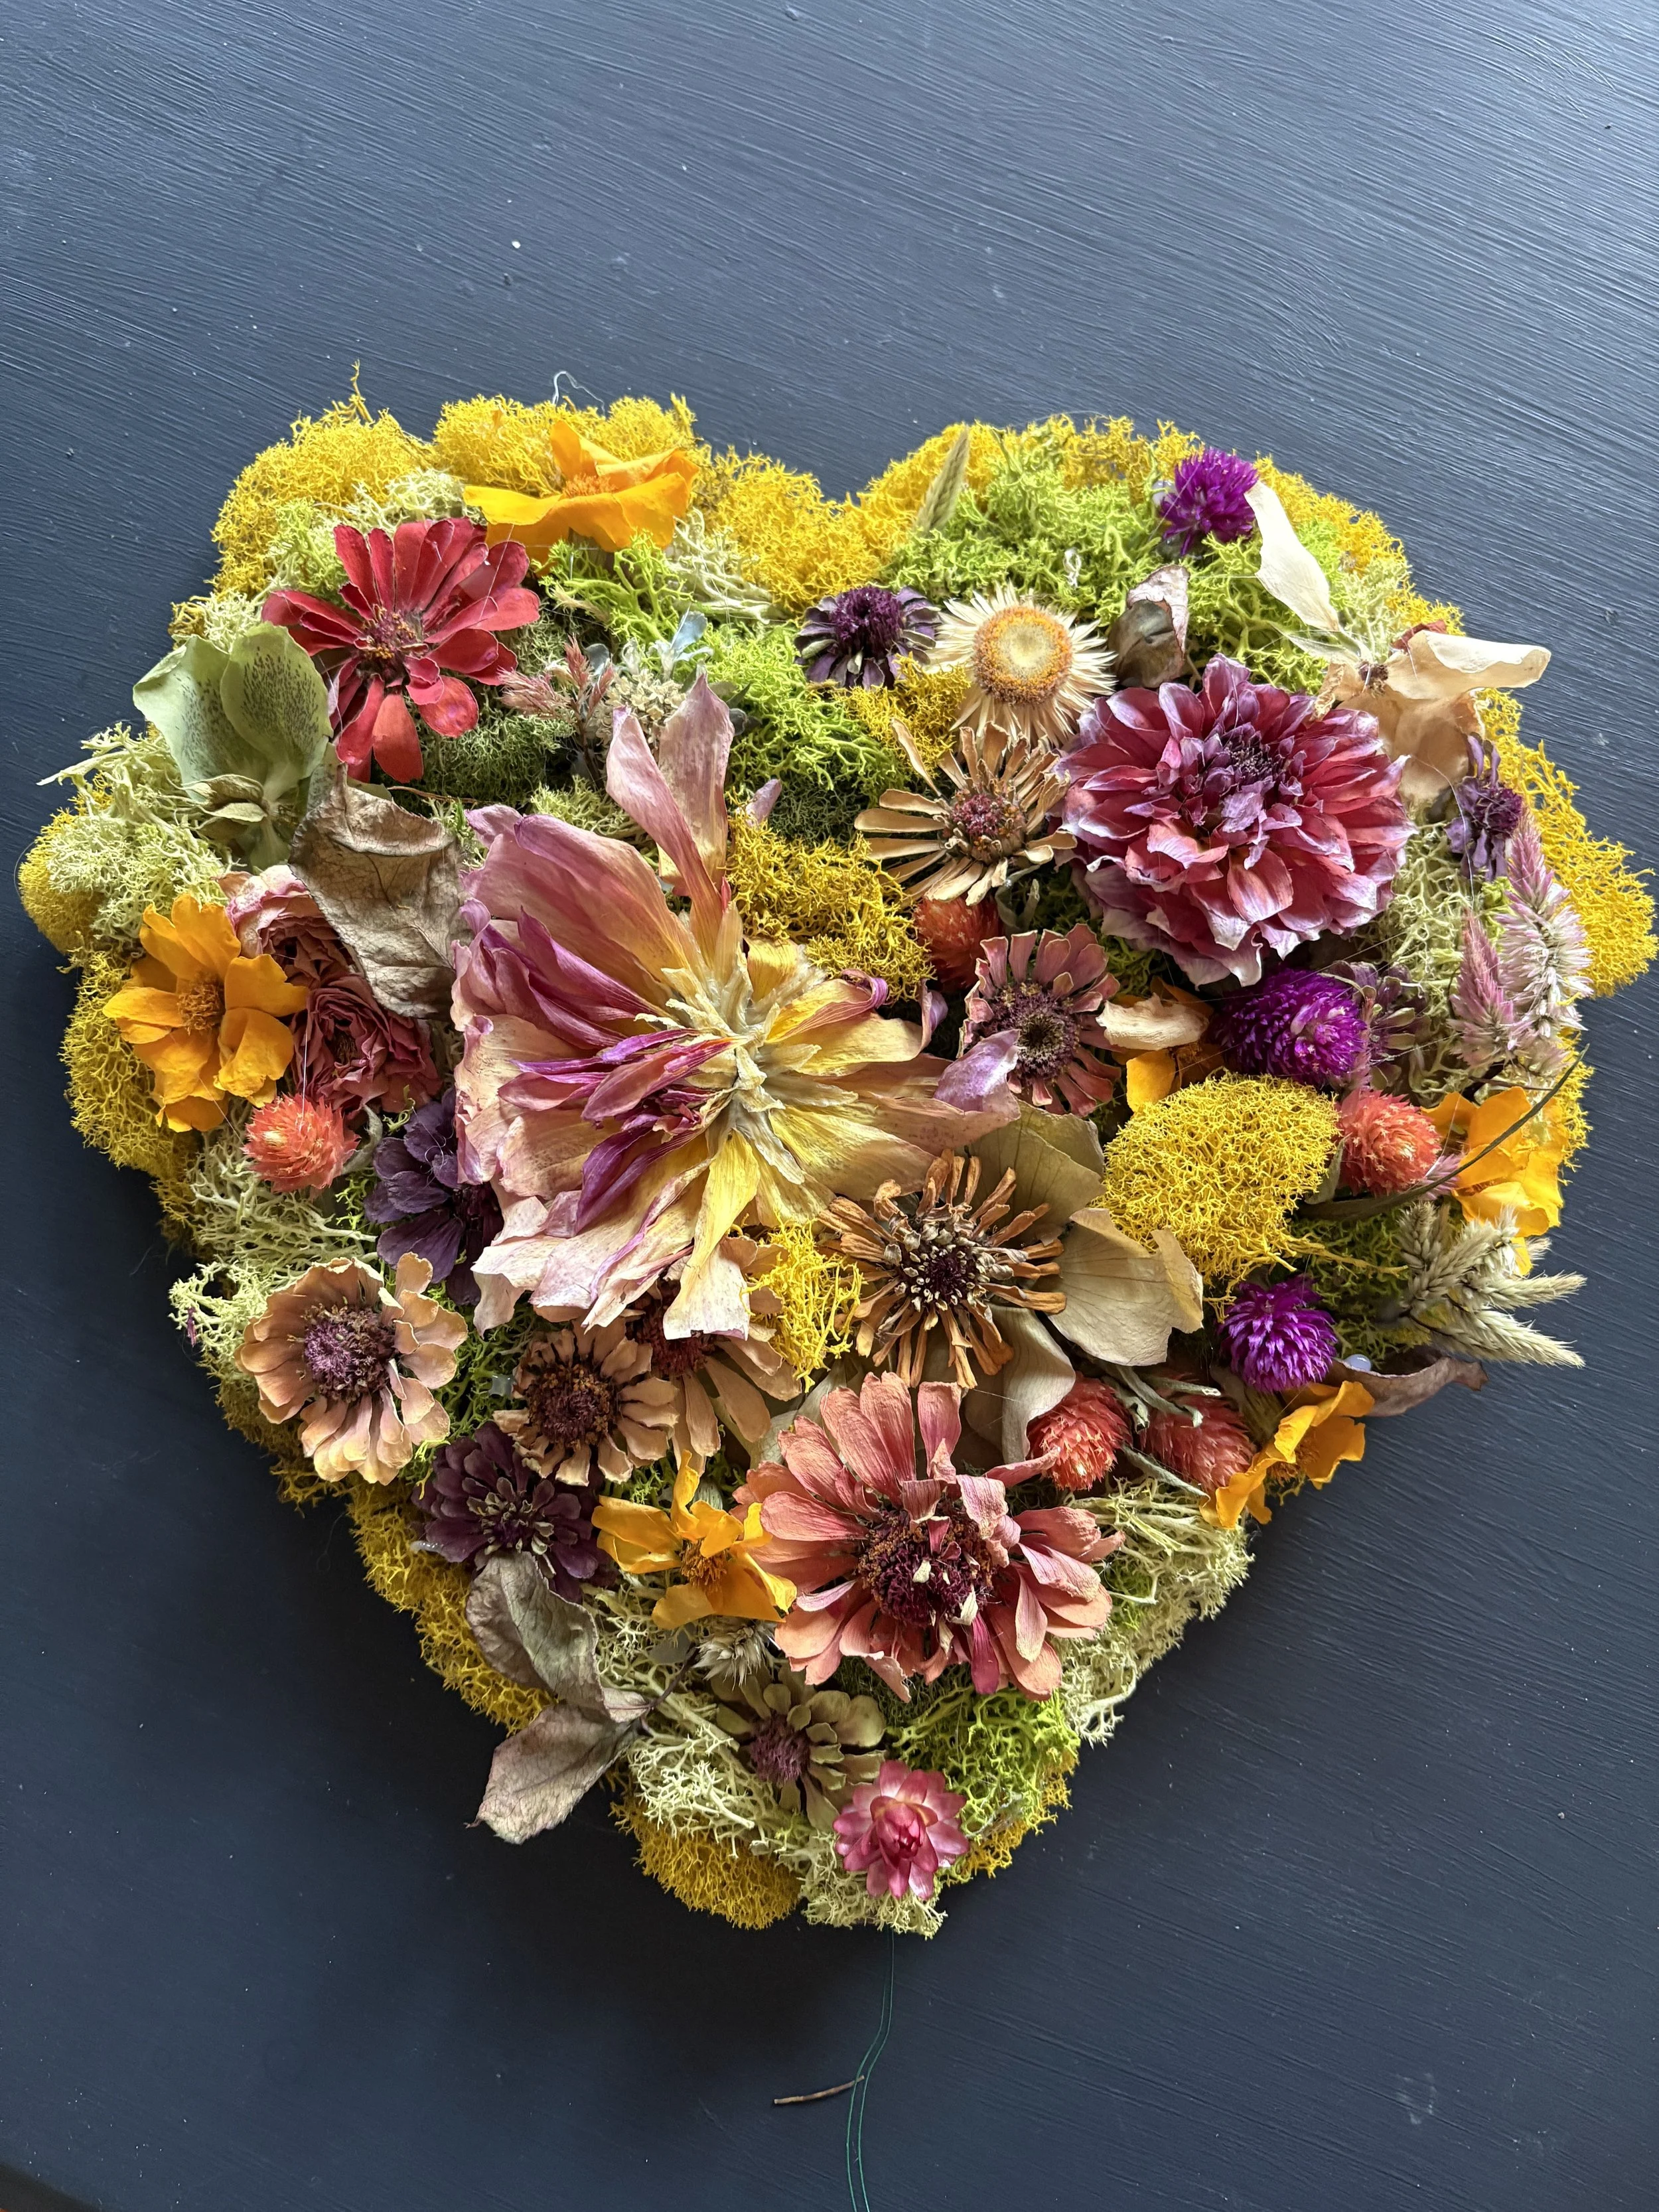
I took an old cardboard box and cut two identical free-form hearts. I then hot-glued a 10” doubled-up piece of floral wire about 4” deep inside the two panels and extended it out the bottom, so that I’d have something to wrap around the tree’s top branch. If I do it again, I will also extend the wire from each side so the heart has more stability when topping the tree.
Once the wire is secured, hot glue the hearts together. This step helps the topper to be more ridged and stable.

Designing the front of your heart topper
Start by designing one side of the heart with your dried flowers and moss. I used my professional-grade Ryobi glue gun, some reindeer moss, and the dried flowers I harvested this year. If you want to learn how to dry your own flowers, see my blog: Learn how to dry your own garden flowers. I didn’t have much of a design or plan, but I just kept filling in the cardboard as I went around the heart and eventually, one side of my heart was completely covered.

Designing side 2
When I finished side 1, I realized leaving the second side of the heart blank wouldn’t look very nice from the side view, so I cut up a coloring book, quickly glued it to the surface of the heart, and glued some leftover moss around the edges to finish it off. In retrospect, I would cover this side first with contact paper or something simple to make the job easier. You could also fill the back side with moss if you have it.

The Heart-Shaped Tree Topper
Here is the result. Not bad for a trial run. Later I’ll show you how it looks on the tree.
Hanging hearts on the Tree
Now the rest of the tree needed some LOVE-ly decor. I found these pretty heart ornaments in rose gold online. They are sold in sets of 45 so I only ordered one set. You can also get them in silver, pink, gold, red, and a pink, red & white combo.

Accenting with Vintage Valentine Cards
I also found some vintage Valentine ornaments to add some character to my tree. There are many types of interesting card ornaments to choose from on Amazon, so look around. Some are more childish which would be nice if you are creating this for your children or grandchildren.

The Unveiling
When all the little rose gold hearts and vintage Valentines were hung, I added a few large dried flowers and some colorful felt ball garlands that I had lying around.
I am very pleased with how this turned out and I’m happy I started a new tradition for our home. Don’t worry, if you’ve already removed your Christmas tree this year, you can plan for next February or grab some fallen branches from outside and place them in a garden pot to make a smaller Valentine’s Branch Tree. Anything is possible. Please share your thoughts in the comments below.

How and Why We Love Historic Homes
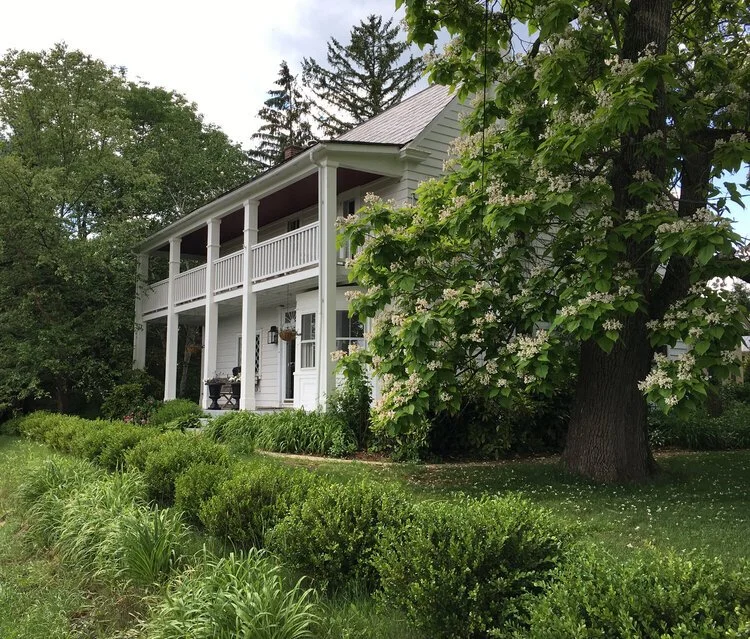
The first home we bought when we moved to this area was this 18th-century Stone Colonial. It was so unique, very well maintained, and quintessentially Early American.

A Little History
One of the things we love about this area of the country, Bucks County, Pennsylvania, is the availability of historic homes and properties. Bucks County boasts 12 original covered bridges and there are gorgeous barns and farms all over the place.
The first home we bought when we moved to this area was this 18th-century Stone Colonial. It was so unique, very well maintained, and quintessentially Early American. It had very uneven measurements, only 2 full bedrooms, and a little walk-through space off the master (which we quickly crafted into a nursery), a woodburning stove, a classic pie staircase, beautiful deep windowsills, a nice brick courtyard with a farm bell and climbing roses, a garden-filled yard, and a sweet little cottage (which became my studio).

Side view of stone colonial home.
Why our homes are sentimental
We lived in this home from 1998-2007 and it was our first so of course, it’s sentimental. Our young family loved and used every square inch of it because it was not very big. It was built from beautiful fieldstone and because it was well taken care of previously it did not require a lot of work or renovation which was perfect for that time of our lives. The only problem was that the home became a little too small for our growing family over time and it also sat on a busy road. This position near the road made sense when it was built in 1780 because it was built on a main road leading straight to Philadelphia, but in 2007 it was no longer a workable feature with our three young children, so we decided we needed to find something a little different. Not an easy decision as we had grown to love this little beauty.

Farm bell with climbing roses and two dancing queens.

Our family portrait in front of the Stone Colonial Home. Photo Courtesy: Catherine Byvelds
A Victorian Farmhouse up the hill
We searched for a new home for quite a while, always looking for another historic gem that we could easily call home. Eventually, we actually found a white Victorian Clapboard Farmhouse with 3 outbuildings that were literally up the hill (foreshadowing Windy Hill) from our original Stone Colonial. This worked out well because purchasing this Victorian would mean we wouldn't have to pull our children out of the primary school they were attending and could essentially stay connected to our neighborhood friends. It also had 4 massive bedrooms and a cottage apartment on the property so to us it seemed just like the Taj Mahal!!!

Windy Hill Farm in spring.
Learning about our home
Once we were certain this place was for us - but before the purchase, I made it my personal mission to befriend the current owner so that I could really get to know her, the house, and its history because I knew she had loved it for a very long time and that she felt the same way about historic properties. She told me she was searching for the perfect family to love her home. If you haven’t picked this up already, what you must know about owners of historic properties is that they are obsessed. They may be obsessed with history, architecture, farming, antiques, or ghosts, but trust me, they are in love with something like that and that is why they are drawn to care for a piece of history in the first place.

Windy Hill Farm in winter.
research with tea
So, because I am one of the obsessive types, I set up “tea dates” with the lovely woman who had owned this home for over 30 years so we could discuss all the little nuances that are so important to understand when buying an older home. She graciously filled me in on details about the gardens and the herds of yard deer (yes, that’s a thing), the neighbors, the well and water pipes, the paint colors she used and why she used them, the utility schedules, the septic system, and important details about the rental income the farm provided and how and why it would be in our best interest to keep that going.

Kids greet from the balcony.
how Rental Income sealed the deal
When purchasing a historic farm, don't underestimate the power of passive rental income. One of the reasons we chose this farm was because it came with established rental income derived from an outbuilding at the back of the property. The large outbuilding had been previously renovated and divided into 4 distinct storage-only garages: one to be used by the owner as a garage for the lawn mower, bikes, tools, and such, and the other 3 to be used for a home business or rented out if desired. There is a private driveway to this building and all access is in the back, so tenants never have to disturb the family in the main house.

Out building provides rental income.
Plant, don’t demolish
Full disclosure, at first I just wanted to demolish the building completely (I was strongly “persuaded” to plant pine trees instead) but today I’m glad we didn't demolish after all because, over the last 16 years, the building has provided a very nice passive income which took care of half of our monthly mortgage, and it has allowed us to do the many renovations and updates we've wanted to do on the original farmhouse and cottage. It also paid for exciting family vacations, and currently, it's helping to pay 3 simultaneous college tuitions. I now have more of an open mind and if you are searching for a historic property, I recommend finding a way to generate some passive income.

Kids planting first pines which will help to pay for their college!
Creative home inspirations
When we moved into the Victorian Farmhouse in the summer of 2007 we were very content with the state of the home. It had great bones, lovely updates, and many classic features. There is a main farmhouse, a big, green 4-story bank barn, a little studio cottage (perfect for my designing), and that long outbuilding above that we soon rented out. Bonus! Sure, this home would eventually need some updates, but we had three kids to raise, a lot of time, and much more energy then, so we were not in a hurry. Nevertheless, creative renovations did eventually happen everywhere (and sometimes twice) so sign up to receive alerts about the entire project and the way we did "creative home inspirations" here at Windy Hill. Below is a sampling of what is to come. If you enjoy this blog please comment below and share it with your friends. And you can subscribe here. Thank you, Kim

Side view of Windy Hill Farm.
Creative Home Inspirations….Sign up so you don’t miss them!
A Cute Courtyard & A Scary Tree
Weedy, Old Heirloom Gardens
The Cottage Becomes a Studio
A Yard Sale-Inspired Kitchen
A Wisteria-Covered Outdoor Entertainment Space
Our Peek-a-Boo Pantry
A Floral Workshop
An inviting Mudroom
The Under-the-Stair Secret Hideaway
A Lite & Bright Family Room
An Arhaus-Inspired Dining Room
A Fun & Foral Laundry Room
Our Simple and Fresh Bathrooms
The Transformable Bedrooms (Kid-to-Teen)
A Classic Living Room, Game Room & Home Office
The Marriage Marked Bank Barn
Shop the look at Windy Hill Farm! If you’re a blogger, what’s your favorite SEO Tool? I’ve had much keyword success with RankIQ. Learn more here.
Hi, I’m Kim. Welcome to Studio Sprig.
Kim Bensing’s original watercolors and designs are now available on wallpaper and fabric. To order visit Studio Sprig’s design library on Spoonflower. Contact me if you need assistance.
-
EVENTS
22
- Oct 23, 2026 Wrapped in Wonder: The Art of Giving a Gift Oct 23, 2026
- Sep 26, 2026 Homecoming Flowers: A Beautiful Tradition Then and Now Sep 26, 2026
- Sep 23, 2026 Choose Wedding Flowers With Meaning: How to Create a Bouquet That Tells Your Love Story Sep 23, 2026
- Sep 21, 2026 The Pre-Prom Tradition Every Mom Should Try: Host a Backyard Bouquet Party Sep 21, 2026
- Sep 18, 2026 Lambertville’s Halloween Magic: A Funky, Creative Rivertown Comes Alive Sep 18, 2026
- Aug 20, 2026 How to Host a Beautiful Flower Bar: The Ultimate DIY Flower Bar Party Guide Aug 20, 2026
- Aug 19, 2026 How to Decorate Cakes with Fresh Flowers: Floral Wreaths, Crowns & More Aug 19, 2026
- Aug 19, 2026 Decorating Cakes with Fresh Flowers Aug 19, 2026
- May 18, 2025 How to Make DIY Bouquets for Prom May 18, 2025
- May 7, 2025 How to Preserve and Use Your Spring Flowers - All Year Long May 7, 2025
- Feb 27, 2025 Get Excited for The Flower Show Feb 27, 2025
- Feb 14, 2025 Historic Castles. What are they used for? Feb 14, 2025
- Jan 31, 2025 Creative Ideas For Your Valentine Jan 31, 2025
- Jan 28, 2025 How An Invitation Can Tell Your Love Story Jan 28, 2025
- Jan 23, 2025 How to Design a Valentine Tree Jan 23, 2025
- Jan 16, 2025 Host a Fabulous Bouquet Bar for Valentine's Day Jan 16, 2025
- Apr 4, 2023 Why Choose Seasonal Flowers for Your Special Occasion? Apr 4, 2023
- Feb 1, 2023 10 Ideas for an Eco-Friendly Event or Wedding Feb 1, 2023
- Nov 14, 2022 A Family Tree Inspired Wedding Invitation Nov 14, 2022
- Oct 3, 2022 How to choose flowers that have sentimental meaning Oct 3, 2022
- Nov 9, 2020 Simplified Wedding Ceremony during Covid Nov 9, 2020
- Apr 2, 2019 Why You Should Choose Seasonal Prom Flowers Apr 2, 2019
-
HOME
23
- Sep 9, 2026 How to Name a Farm: 10 Meaningful Ideas for Creating a Name With a Story Sep 9, 2026
- Sep 1, 2026 How to Preserve Flowers for Creative Projects Sep 1, 2026
- Jul 2, 2026 How to make your own flower confetti Jul 2, 2026
- Apr 22, 2025 How We Painted our Barn Apr 22, 2025
- Apr 16, 2025 What to Plant for Mesmerizing Spring Blooms Apr 16, 2025
- Apr 8, 2025 Narcissus AKA Daffodil - What's Blooming at Studio Sprig Apr 8, 2025
- Apr 1, 2025 Glory-of-the-Snow - What's Blooming at Studio Sprig Apr 1, 2025
- Mar 19, 2025 How we turned an Artist Studio into a Weekend Retreat Mar 19, 2025
- Mar 12, 2025 The Mighty Crocus - First to Bloom - What's Blooming at Studio Sprig Mar 12, 2025
- Jan 23, 2025 How to Design a Valentine Tree Jan 23, 2025
- Jan 16, 2025 Host a Fabulous Bouquet Bar for Valentine's Day Jan 16, 2025
- Jan 9, 2025 How to Make Your Own Mint Tea Jan 9, 2025
- Jan 7, 2025 How To Create A Courtyard Jan 7, 2025
- Jan 2, 2025 How to Create a Stunning Centerpiece Jan 2, 2025
- Mar 27, 2023 How We Transformed Our Farmhouse Kitchen by Reusing, Updating, and Thrifting: (Coffee Bar) Mar 27, 2023
- Mar 27, 2023 How We Transformed Our Farmhouse Kitchen by Reusing, Updating, and Thrifting Mar 27, 2023
- Mar 1, 2023 How and Why We Love Historic Homes Mar 1, 2023
- Jan 3, 2023 Eliminate Sneaky Sugars Jan 3, 2023
- Dec 14, 2022 How to Create a Pretty Mini Bar with Items You Already Own Dec 14, 2022
- Nov 21, 2022 Friendsgiving At Our Farm Nov 21, 2022
- Nov 9, 2022 Herbs: How to Grow, Harvest and Dry Your Own Nov 9, 2022
- Nov 9, 2022 DIY Herb Drying Rack: Herb Drying at Home Nov 9, 2022
- Oct 12, 2022 Have you ever thought about creating a beautiful water feature? Oct 12, 2022
-
STYLE
27
- Oct 6, 2026 Where Flowers Become Art, Experiences & Memories Oct 6, 2026
- Sep 1, 2026 How to Preserve Flowers for Creative Projects Sep 1, 2026
- Aug 20, 2026 How to Host a Beautiful Flower Bar: The Ultimate DIY Flower Bar Party Guide Aug 20, 2026
- Aug 19, 2026 How to Decorate Cakes with Fresh Flowers: Floral Wreaths, Crowns & More Aug 19, 2026
- Aug 19, 2026 Decorating Cakes with Fresh Flowers Aug 19, 2026
- Jul 2, 2026 How to make your own flower confetti Jul 2, 2026
- Nov 3, 2025 Creating a Pressed Flower Frame Nov 3, 2025
- May 7, 2025 How to Preserve and Use Your Spring Flowers - All Year Long May 7, 2025
- Jan 28, 2025 How An Invitation Can Tell Your Love Story Jan 28, 2025
- Jan 23, 2025 How to Design a Valentine Tree Jan 23, 2025
- Jan 6, 2025 How to Create Oyster Shell Necklaces Jan 6, 2025
- Jan 2, 2025 How to Create a Stunning Centerpiece Jan 2, 2025
- Mar 14, 2023 How to Make Sentimental Easter Eggs Mar 14, 2023
- Mar 6, 2023 How to Enjoy The PHS Philadelphia Flower Show Mar 6, 2023
- Feb 13, 2023 Let's Save The Bees Feb 13, 2023
- Feb 1, 2023 10 Ideas for an Eco-Friendly Event or Wedding Feb 1, 2023
- Jan 12, 2023 A Great Way to Help Kids with Cancer (PENN STATE) Jan 12, 2023
- Dec 14, 2022 How to Create a Pretty Mini Bar with Items You Already Own Dec 14, 2022
- Nov 29, 2022 Lunch and Dinner -Studio Sprig Style Micro Blog Nov 29, 2022
- Nov 14, 2022 A Family Tree Inspired Wedding Invitation Nov 14, 2022
- Nov 9, 2022 DIY Herb Drying Rack: Herb Drying at Home Nov 9, 2022
- Oct 30, 2022 Lambertville, Nj , A Funky, Cool Rivertown You Must Visit on Halloween. Oct 30, 2022
- Oct 19, 2022 How to choose an interesting place to stay when you travel or go on vacation Oct 19, 2022
- Oct 12, 2022 Have you ever thought about creating a beautiful water feature? Oct 12, 2022
- Oct 3, 2022 How to choose flowers that have sentimental meaning Oct 3, 2022
- Feb 1, 2021 How to design marketing materials for your small business Feb 1, 2021
- Oct 29, 2020 Surprise the bride when you can't come to her wedding Oct 29, 2020